Manage Your Phones
Discover tips and tricks for managing your phones and editing their buttons using the Phone Manager tool and templates.
Table of Contents
The Phones Page
On the Phones page, you can view your registered devices and their information.

The information on this page that you may find useful include…
- Your phone's registration status.
- Your phone's model.
- The IP address of your phone.
- Your phone's unique MAC address.
✔ Checking this information can be helpful if you ever need to contact our technical support team regarding any technical issues affecting your phone.
Edit Your Phone's Buttons
On the Phones page, you can access and use the Phone Manager tool to edit the layout of each phone.
- On the Phones page, click the Phone Manager
 icon next to the phone you wish to edit.
 - On the Confirmation message, click the Yes button to use the Phone Manager tool.

✔ Doing this will pull up the Phone Manager page when you can view your phone's configuration.

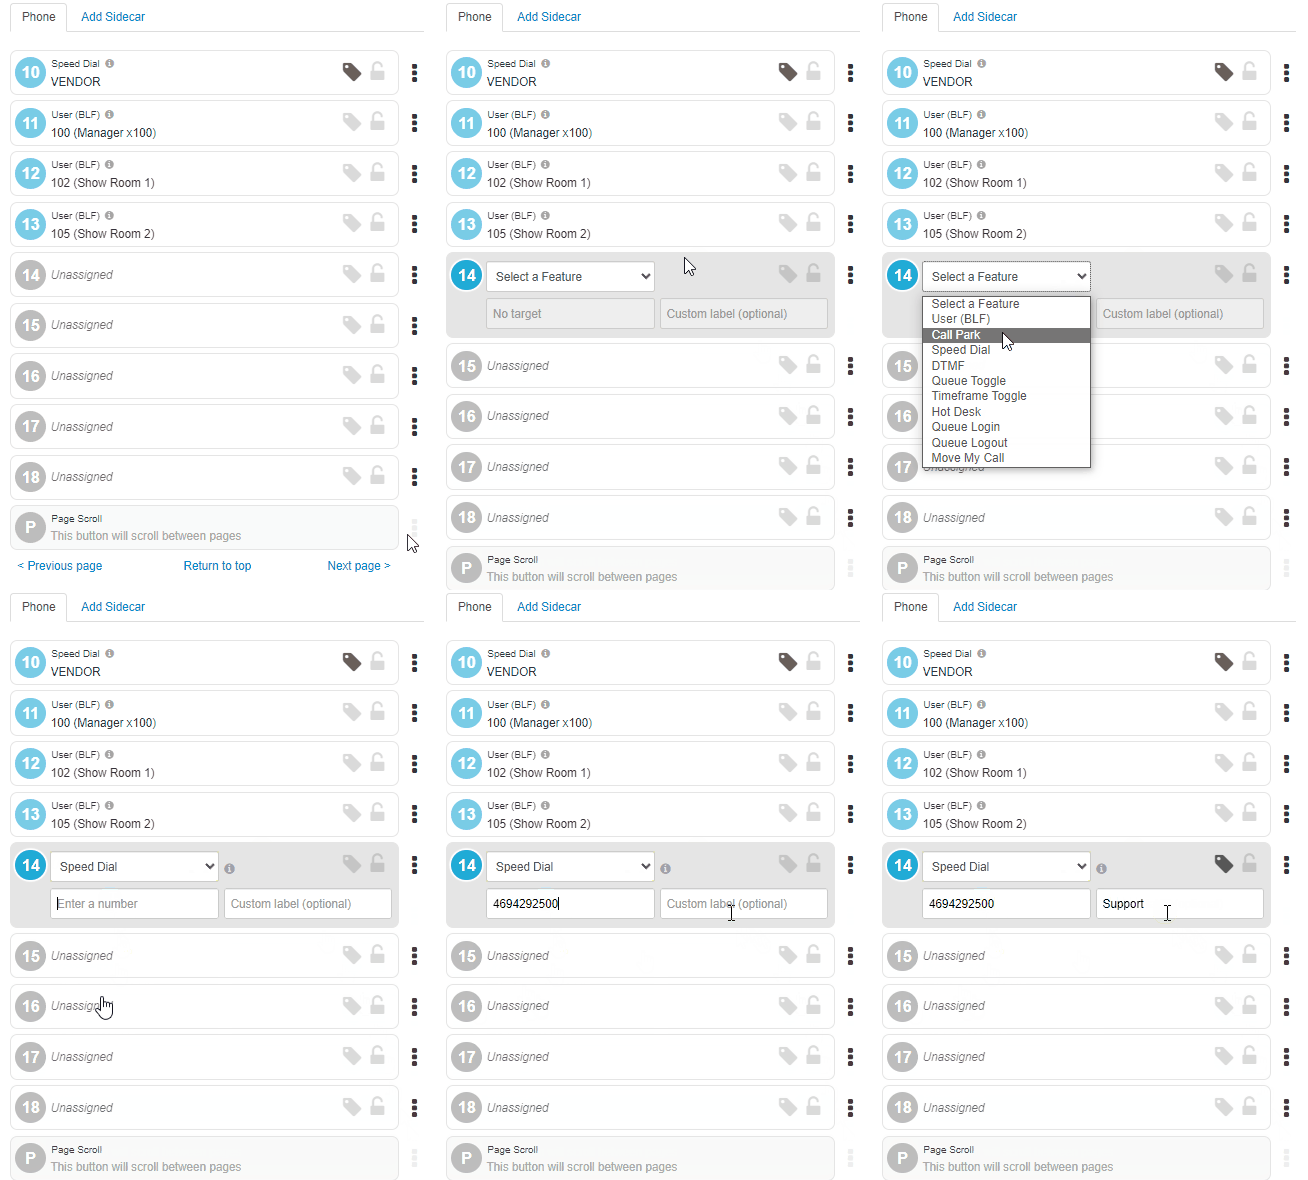
- Click a numbered spot where you would like a button, select a feature for the button, and fill in its information.
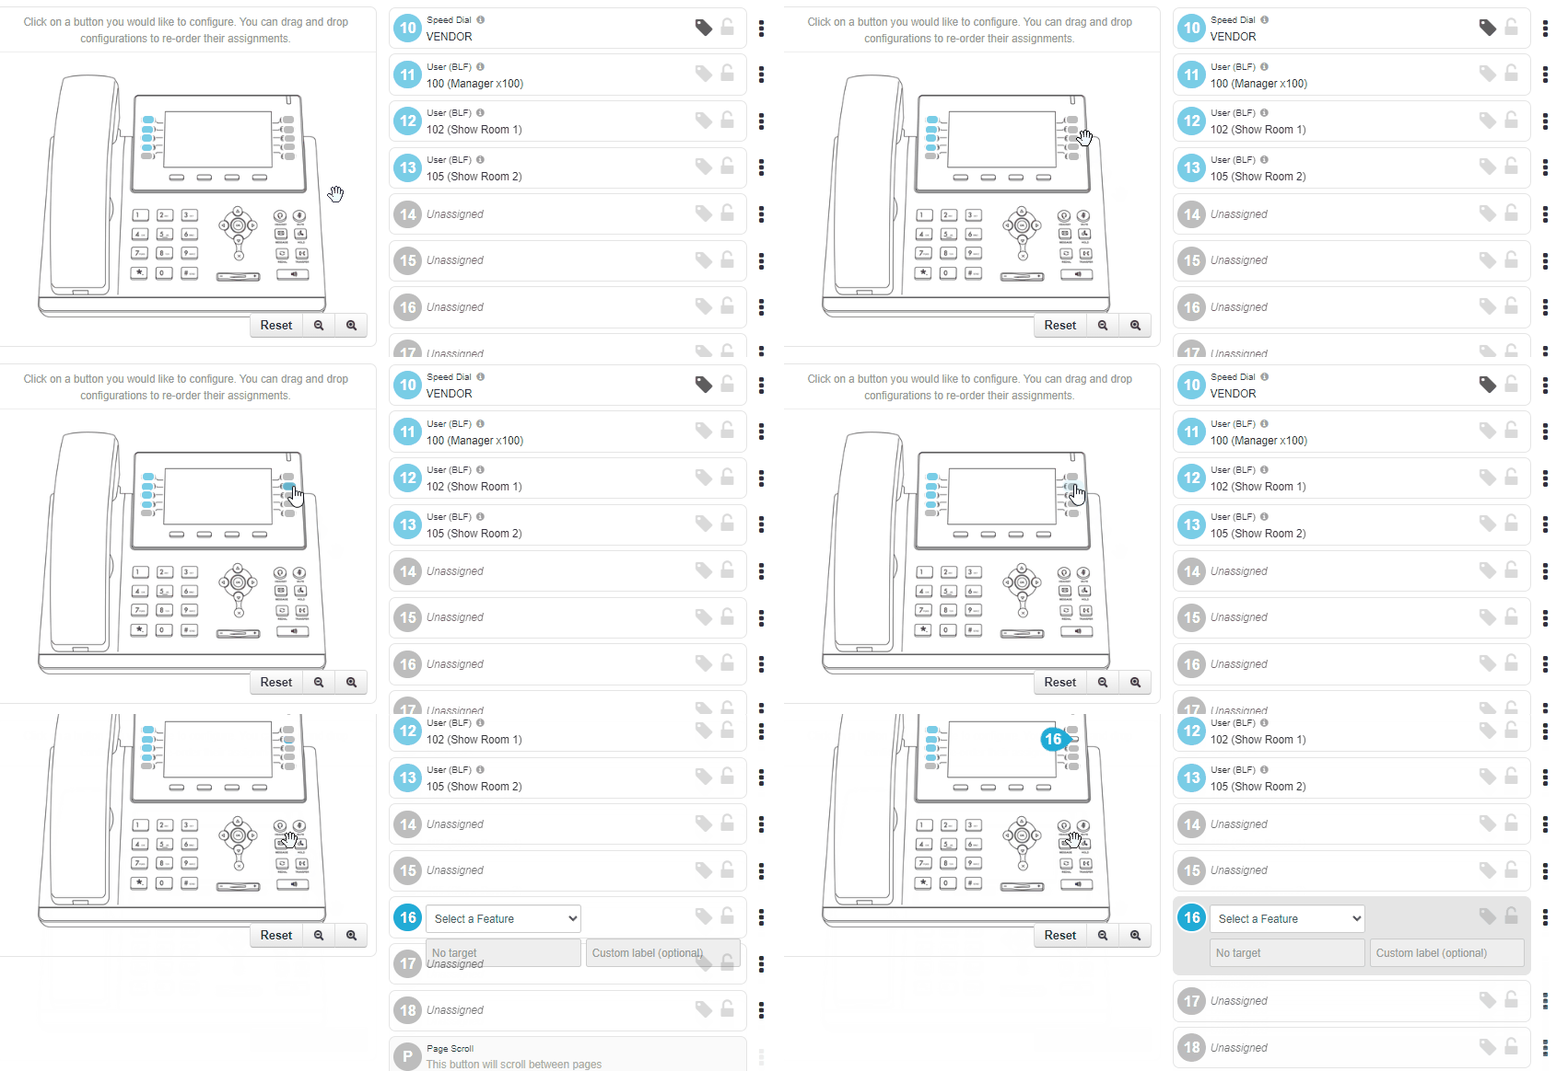
Quick Tip: You can click the buttons on the photo of your phone to quickly select that button on the menu to the right.
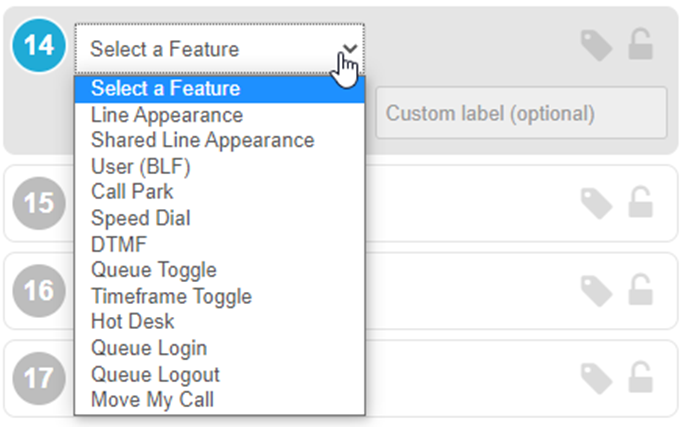
Features to Add to Buttons
As you are editing the layout of a phone using the Phone Manager tool, you will notice that there are different types of features that can be added to the line keys, or buttons, of a phone.
Line Appearance Keys
A Line Appearance key acts as a channel, or line, where a call can be hosted. Having multiple line appearance keys allows a phone to facilitate multiple calls at once.

✔ It is recommended to have at least two or three line appearance keys to allow your phone to perform transfers and conferencing.
Line appearance keys can be seen as the multiple buttons that display the phone's extension number. These line keys are usually located on the left side of page 1 on a phone's screen.
Shared Line Appearance (SLA) Keys
A Shared Line Appearance key allows two or more phones to share a line that uses the information of a certain extension number.

✔ Any phones that have a shared line appearance key of a certain extension can pick up and handle calls for that extension.
To make calls as the extension of a shared line, press the shared line appearance key and then dial the number to be called.
User (BLF) Keys
A User (BLF) key acts a speed dial for internal users that can be pressed to quickly call another user. This key can also be pressed during a transfer to easily send the call to someone else without the need to dial that person's extension number.

BLF stands for Busy Lamp Field, which is a function that allows the presence of someone or something to be indicated.
A user (BLF) key uses this function in the form of the light on its button which changes colors to indicate a user's status.Light
Status of User
Green User is available to take a call. Red User is currently busy or on DND (Do Not Disturb). No Light User is currently unavailable. Their phone may be disconnected or not receiving service. Call Park Keys
A Call Park key is used to transfer callers to a specific park queue. These park queues are a special type of call queue that act as unified holding pools where calls can be parked and picked up from.

Quick Tip: Your account can have as many call parks added as necessary. Many organizations set up three park queues for each of their departments.
To have more park queues added, feel free to contact our technical support team, or follow this guide to add more park queues.
Phones that share the same call park keys will be able to see a light that indicates the status of the park queue.
Color of Light
Status of Park Queue
Green
The call park is empty. Red
The call park is occupied. The key can be pressed to pick up a parked call. To park an active call, you can either…
• Press the call park key of the park queue you wish to transfer the call to.
• Press Transfer and then dial the extension number of the specific park queue.
• To dynamically park the call, dial *** during the call.To pick up a parked call, you can either…
• Press the call park key that is showing as occupied (red light).
• Dial the extension number of a park queue that is holding a call.Speed Dial Keys
A Speed Dial key can be used to quickly dial and transfer calls to someone. This key is commonly set up to dial the phone number of external users, such as vendors, cellphones, and more.
When setting up a speed dial, you will tell the key what exactly to dial. You can also label what the speed dial will be displayed as on the phone.

Quick Tip: Since a speed dial key dials exactly what is set during its creation, this key can be used to dial special codes such as star codes and feature codes.
To create a key that acts as a speed dial and shows the status of internal users, refer to the User (BLF) Keys section.
DTMF Keys
A DTMF key can be configured to dial a specific string of DTMF characters that prompts the phone to perform certain actions.
Although you may not set up this key yourself, you may see this type of key on your phone. For example, our team will commonly use a DTMF key to give users a button that will dial into a general voicemailbox and press *.
WARNING: DTMF keys are not supported by Cisco and Polycom phones.
Queue Toggle Keys
A Queue Toggle key allows users to quickly toggle their queue availability status between Available and Unavailable for the call queues they are set as an agent for.

If the phone supports the BLF (Busy Lamp Field) function, the user will see a light that indicates their status in their call queues.
Color of Light Status of User in Queues Green
The user is set as offline. The key can be pressed to set the user as available in their call queues. Red
The user is set as online. The key can be pressed to set the user as unavailable in their call queues. Timeframe Toggle Keys
The Timeframe Toggle key be pressed to toggle a specific time frame on and off for the phone's user.

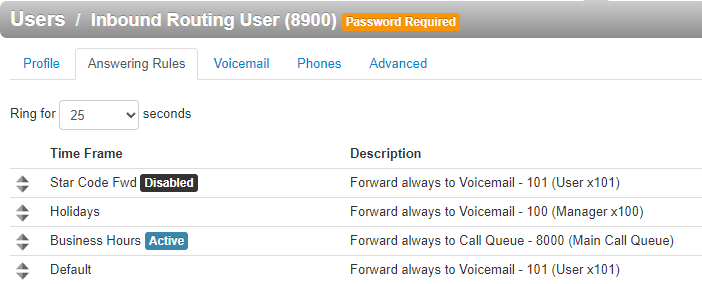
When you create a Timeframe Toggle key, you will be required to select a time frame that is being used by an answering rule set up for the phone's user or the user indicated in the Target User box.
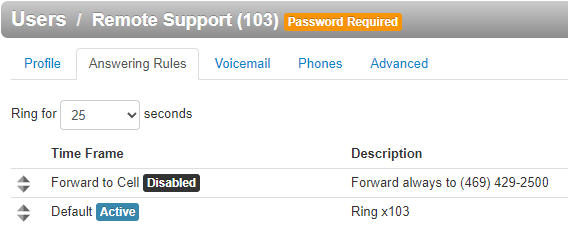

This key can be set up to forward calls for the whole business by having the Target User box set with the extension number of an inbound routing user (usually extension 8900).

WARNING: When you use this method of forwarding, the time frame box will not allow you to select a time frame. The time frame's name must be typed out.

The time frame's name must be typed exactly as seen in the answering rules to work correctly. The same spelling and capitalization used by the time frame itself must be used.
Hot Desk Keys
Hot-desking allows your users to log in and log out of a phone each time they are set to take calls. This hot-desking can be useful in call center environments where multiple people will be using different phones at different times.
Although the hot desk key can be added in Phone Manager, this key is not recommended to be used as hot-desking is configured differently depending on the phone.

✔ To have hot-desking set up for your phones, please reach out to our technical support team.
Queue Login Key
The Queue Login key can be pressed to log the phone's extension into any call queues they are set as an agent for.

✔ The user will be marked as online, or available, and start receiving calls coming from the call queues they are in.
Queue Logout Key
In contrast to the Queue Login key, the Queue Logout key can be pressed to log the phone's extension out of any call queues they are set as an agent for.

✔ The user will be marked as offline, or unavailable, and stop receiving calls coming from the call queues they are in.
Move My Call Key
The Move My Call key can be set up to allow you to easily move a call from another device registered to your extension, such as the SpectrumVoIP Stratus Mobile App or the SpectrumVoIP Desktop App, to your desk phone.

✔ Using this key can be useful when you are handling a call on your mobile app and want to move the call to your desk phone when you arrive in the office.
- If you need to remove a button, click the 3-dot
 icon and select Clear Button.
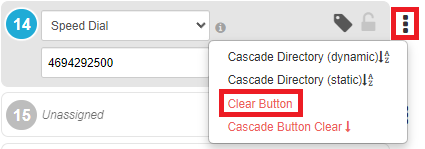
Quick Tip: Selecting Cascade Button Clear will clear that button and any buttons below that spot.
- Once you are done editing your phone's buttons, save your changes by doing one of the following:

-
Save - Save without applying your changes.
Note: When your phone does its nightly update, it should apply these changes automatically.
- Save and resync - Save your changes and have your phone resync itself to apply the changes.
- Save as new template - Save this configuration as a template that you can apply to your other phones.
-
Save - Save without applying your changes.
Apply Directory Entries to Line Keys
To apply User (BLF) keys based off of the directory on the phone, select the 3-Dot  icon next to the line where the BLFs will begin, and select Cascade Directory (static) or Cascade Directory (Dynamic).
-
Cascade Directory (static) option auto fills the selected button and all subsequent buttons with static BLFs for the current directory entries.
Note: Statically cascading BLFs allows you to view how the BLF buttons will look, make adjustments to the BLFs, and clear out any that you do not wish to have added.

Anytime one of the contact's information changes, the keys will need to have that information manually updated.
For example, if a user's name changes, their BLF will need to have its Label updated to reflect this change. -
Cascade Directory (dynamic) option auto fills the selected button and all subsequent buttons with dynamic BLFs, which update whenever the phone resyncs.
Note: Dynamically cascading BLFs will have your phone's Directory entries automatically applied. Anytime one of the contact's information changes, such as their name, the keys will automatically update themselves when the phone does its nightly resync.

Adjust Your Cascaded BLF Keys
If you do not like how the BLF buttons look after cascading them, you can adjust how exactly they are added using the Directory menu of Phone Manager.
Hide a Contact
If you do not want a certain user to show up on the BLF keys that are added, you can hide that user by editing the phone's Directory through Phone Manager.
NOTE: Using this method will hide this user from your phone's Directory feature as well.
If you still want to see this user in your phone's Directory, it is recommended to either use the Cascade Directory (static) option or add your BLF buttons one-by-one.
To hide a user from your phone's BLFs and Directory feature.
1. On the Phone Manager page, click the Directory button.
 or
or 
✔ Doing so will pull up the Phone Manager Directory modal.
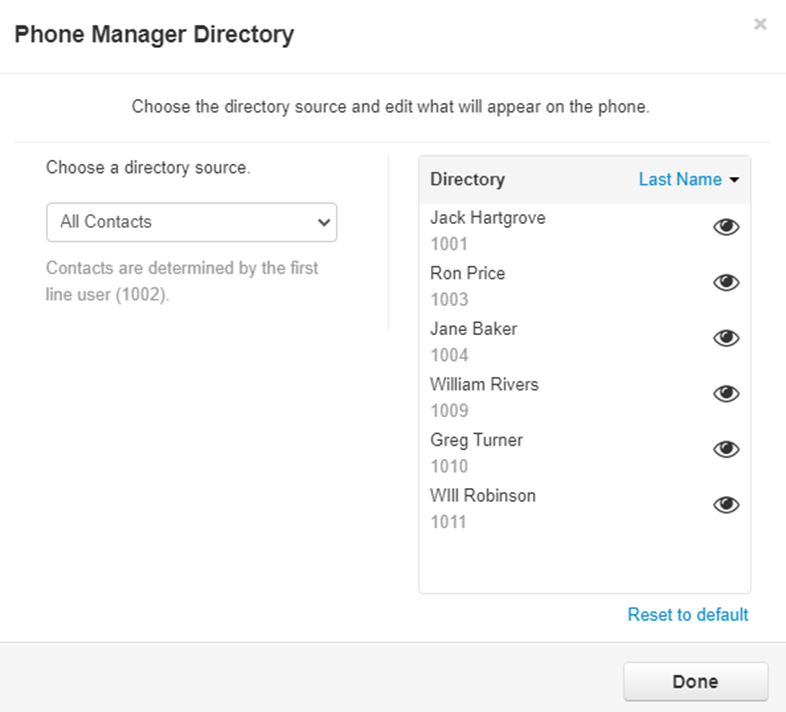
2. Click the eye icon to hide/show a contact.

✔ The hidden user's name will grey out while the eye will appear with a slash. This user will be removed from your phone's directory.
To undo all the changes at one time, select Reset to Default.
3. Click the Done button to apply these changes.
Change the Source
The Contacts that are used for the BLF keys that are cascaded are determined by the Directory Source set for your phone.
NOTE: Editing the Directory Source will also affect the contacts shown in your phone's Directory feature.
If you do not want to affect the contacts shown in your phone's Directory, it is recommended to either use the Cascade Directory (static) option or add your BLF buttons one-by-one.
To edit your phone's directory source to only show certain contacts…
1. On the Phone Manager page, click the Directory button.
 or
or 
✔ Doing so will pull up the Phone Manager Directory modal.

2. Use the Directory Source drop-down to select what kind of contacts should be referenced.

3. Click the Done button to save this change.Re-Sort Contacts
By default, the order that the cascaded BLFs are applied will be by extension number. If needed, you can have these BLFs ordered and applied by First Name or Last Name instead.
NOTE: Editing the Directory Source will also affect the contacts shown in your phone's Directory feature.
If you do not want to affect the order of the contacts shown in your phone's Directory, it is recommended to either use the Cascade Directory (static) option and edit the keys added or manually add your BLF buttons one-by-one.
To adjust how your BLFs are organized…
1. On the Phone Manager page, click the Directory button.
 or
or 
✔ Doing so will pull up the Phone Manager Directory modal.

2. Select if the contacts should be sorted by Extension Number, First Name, or Last Name.
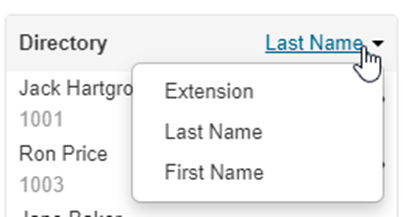
3. Click the Done button to save this change.After making any changes, be sure to save your changes.

Utilize Templates
To make editing your phones more efficient as a basic user, you can create and apply templates.
When you are customizing your phone, you have the option to save your phone's configuration as a template that can be applied to any of your other phones. You can also apply templates created by a Stratus admin user for your business.
Create a New Template
As a basic user, you can create a template by saving your phone's layout as a template.
To do so…
- Edit your phone's layout to match what you would like your template to apply.

- Once you are done editing your phone, click the Arrow next to the Save button and select Save as New Template.

- In the Save as New Template menu, give this template a name.

- Click the Save button.
✔ Once the template is saved, you should see a confirmation message with a hyperlink that you can click to view the new template and make any edits.

Apply a Template
When you have templates that can be used, you can apply any of those templates to your phone.
To apply a template…
- On the Phone Manager page, click the Templates button and select a template from the dropdown.

- Click the Apply Template button.

✔ You should see the buttons appear on the Phone Manager screen.
- Click Save and Resync to apply the template to your device.

Adjust Your Phone's Directory Source
The source of the directory will determine what contacts a phone will display when the Remote Phonebook of your phone is accessed using the Directory button on your phone.
To adjust your phone's directory source…
- On the Phone Manager page, click one of the two Directory buttons available:
 or
or 
✔ Doing so will pull up the Phone Manager Directory modal.

- Use the Directory Source dropdown to select a directory source (determined by the first line user assigned).
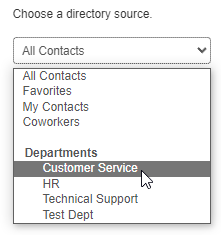
- All Contacts
- Favorites
- My Contacts
- Coworkers
- Departments
- Use the Directory section to view the contacts that will be shown.

- Sort the contacts by Extension Number, First Name, or Last Name.

- Click the eye icon to hide/show a contact.

✔ The hidden user's name will grey out while the eye will appear with a slash. This user will be removed from your phone's directory.
To undo all the changes at one time, select Reset to Default.
- Click the Done button to apply these changes.

Note: Once the directory has been updated, you will need to reboot the phone to allow the phone to update. Alternatively, you can wait until the phone does its nightly update.