Enswitch - Pattern Menus
Learn more about Enswitch's pattern menus to see if using one may be a good fit for your business.
Table of Contents
What is a Pattern Menu?
Pattern menus are flexible, automated menus that allow callers to enter a specific string of digits to have their call routes to different places. In contrast to an auto attendant or an IVR menu, a pattern menu allows callers to dial a larger range of digits to do certain things.
The digits and the functions of those dialed digits are set using patterns. A pattern menu can reference and use many different patterns.
✔ A Pattern Menu can be useful in the following example scenarios:
• Phone number routes to a pattern menu for employees to call for internal purposes.
• Users can dial a feature code to be routed to a pattern menu used for internal purposes.
• Call Route routes callers with a specific area code to a pattern menu.
• Callers need to be able to dial a series of numbers that are not usable in an auto atttendant or IVR Menu.
Set Up a Pattern Menu
A Pattern Menu can be created using your Enswitch web portal. To create and configure a functional pattern menu, you will need to…
- Create a pattern menu.
- Add patterns to the pattern menu.
- Check and adjust the pattern menu's greetings.
- Set up a way for callers to reach the pattern menu.
Step 1: Create a Pattern Menu
| Option | Description |
|---|---|
| * Name | Type a name to identify the pattern menu with. |
| Description | Type a brief description of what the pattern menu will be used for. |
| Owner | If needed, select a user that should be able to view and edit this pattern menu in the web portal. |
| Ask caller to enter digits | Set the maximum number of digits callers should be able to enter. |
| Show in control panel | Select whether or not to show this pattern menu in the Control Panel to allow calls to be drag and drop transferred via the Control Panel page. |
Step 2: Add Patterns
Now that a Pattern Menu has been created, patterns can be added to it so that the pattern menu can recognize when certain digits have been dialed so that it can route the calls as needed.
- While viewing the pattern menu, scroll to the Patterns section and click the New >> button.

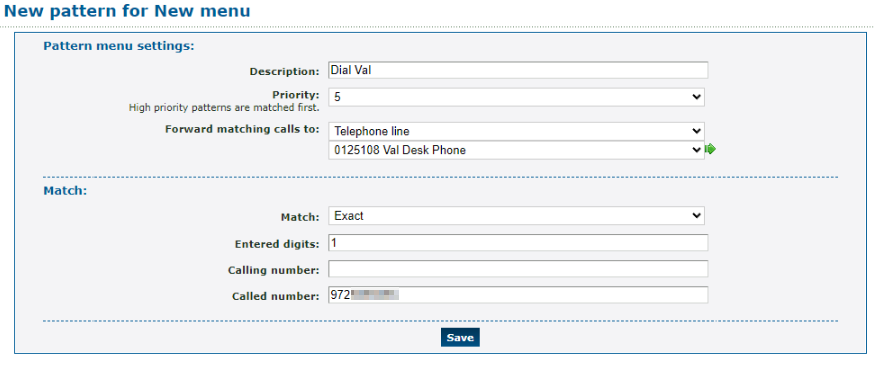
- In the New pattern menu, fill in the following information:

| Option | Description |
|---|---|
| Description | Type a brief description of the purpose of this pattern. |
| Priority |
If needed, set a priority for this pattern. Quick Tip: Setting a priority for a pattern can be useful if there is a similar pattern using the same digit but has a different destination, calling number, or called number. |
| Forward matching calls to | Use the dropdowns to select where calls will be sent according to this pattern. |
| Match | Select how calls should be matched according to the options below. |
| Entered digits | Type the digits (numbers only) that a caller would dial to have their call routed using this pattern. |
| Calling number | If needed, type the phone number of a caller that this pattern should apply to. |
| Called number | If needed, type the phone number that was dialed by the caller to reach the pattern menu. |
- Click the Save button.
-
Repeat steps 1-3 for each needed pattern.
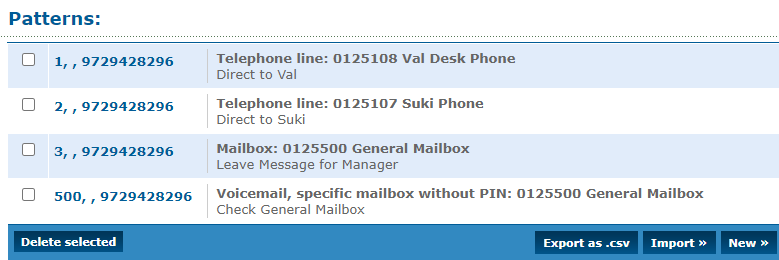
✔ You should now be able to see a list of the patterns you have created.

Now when a caller in the pattern menu dials the digits set in these patterns, their call will be routed according to the destination set in the patterns.
Import Multiple Patterns
If there are multiple patterns that should be added, you can import a spreadsheet of patterns to add them all at once. This can help cut down time by eliminating the need to add patterns one-by-one.
To make sure that the spreadsheet you create the patterns in is formatted correctly, it is recommended to do the following:
1. Click the Export as .csv button to download a spreadsheet that is already formatted.
2. Open the downloaded spreadsheet.
3. In the spreadsheet, fill in the information for each applicable column.
4. Once you are done, save the file by clicking Save or pressing Ctrl+S.
5. Back in the web portal, click the Import >> button.
6. In the Import pattern menu, click the Choose File button to select the edited spreadsheet from your PC.
7. If needed, adjust the following options:
• Delete all existing patterns first - If there are already patterns created, you can select Yes to delete the old patterns and replace them with the patterns in the spreadsheet.
• Overwrite existing patterns - If patterns that already exist have been adjusted in the spreadsheet, you can select Yes to overwrite the edited patterns.
8. Once you are ready, click the Import button.
✔ You should see a confirmation message stating that the patterns have been imported.
When you return to the pattern menu, you should see those patterns now listed.
Export a Spreadsheet of Patterns
If needed, the patterns listed in the pattern menu can be exported as a spreadsheet.
✔ Downloading, printing, and handing out a spreadsheet of these patterns can be done to help your users keep track of the patterns they may need to use to interact with internal pattern menus.
To export a spreadsheet of these patterns, click the Export as .csv button.
You can open, view, and print the downloaded spreadsheet as needed.
Step 3: Adjust the Greetings
Each created Pattern Menu will have default greetings in place that gives callers instructions on what to do.
These greetings include…
- A greeting asking the caller to dial the digits they need referenced.
- A greeting stating that the digits dialed are invalid.
- A greeting telling the caller goodbye.
You can listen to these greetings by placing a call to the Pattern Menu. If needed, these greetings can be replaced.
The “Enter Digits” Greeting
Using the Upload greeting section, you can adjust a specific greeting used by the Pattern Menu. One of these greetings is the “Enter digits” greeting. This is the greeting callers will first hear when they reach the pattern menu. Once the Invalid greeting plays, the Enter Digits greeting will play again.
Usually, this greeting tells the caller to put in their input. Some businesses may replace the default greeting with one that tells callers what they need to dial to do certain things.
To edit the Enter digits greeting, use the Greeting dropdown to select Enter digits. Either select a saved Sound from the Sounds page of the web portal or use the Choose File button to select a .wav audio file from your PC.

The “Invalid” Greeting
Using the Upload greeting section, you can adjust a specific greeting used by the Pattern Menu. One of these greetings is the “Invalid” greeting. This is the greeting callers will hear when they dial digits that are not set as a pattern. Once the Invalid greeting plays, the Enter Digits greeting will play again.
The default Invalid greeting will tell callers the number they dialed does not exist. Some businesses may replace the default greeting to adjust its verbiage or add in a snippet about the digits they should dial to do certain things.
To edit the Invalid greeting, use the Greeting dropdown to select Invalid. Either select a saved Sound from the Sounds page of the web portal or use the Choose File button to select a .wav audio file from your PC.

The “Goodbye” Greeting
Using the Upload greeting section, you can adjust a specific greeting used by the Pattern Menu. One of these greetings is the “Goodbye” greeting. This is the greeting callers will hear when they incorrectly dial digits 3 times.
The default Goodbye greeting will tell the caller that the number they dialed does not exist before saying “Goodbye” and then ending the call. Some businesses may replace the default greeting to tell the caller to try dialing a different number.
To edit the Goodbye greeting, use the Greeting dropdown to select Goodbye. Either select a saved Sound from the Sounds page of the web portal or use the Choose File button to select a .wav audio file from your PC.

Once the greetings have been adjusted, you can use the Download or play greeting section to select a greeting and either download it or have the greeting play through a call. 
If a greeting is no longer needed, use the Delete greeting section to delete a specific greeting.
Step 4: Route Calls to a Pattern Menu
To allow callers to be able to interact with a pattern menu, routing will need to be created that will allow calls to be forwarded to a pattern menu. Depending on how and by whom the pattern menu will be used, the way calls are routed to a pattern menu may differ.
The three, main ways to route calls to a pattern menu include…
- Dialing a feature code.
- Setting the default destination of a phone number to route calls to a pattern menu.
- Creating a time route for a phone number to route calls to a pattern menu.
- Creating a caller route for a phone number to route calls to a pattern menu.
Feature Code
A feature code can be created to allow your users to dial a pattern menu directly using their desk phone or the SpectrumVoIP ES mobile app.
To create a feature code to be used for directly dialing a pattern menu…
1. Navigate to Features → Feature codes.
2. Click the New >> button to create a new feature code.
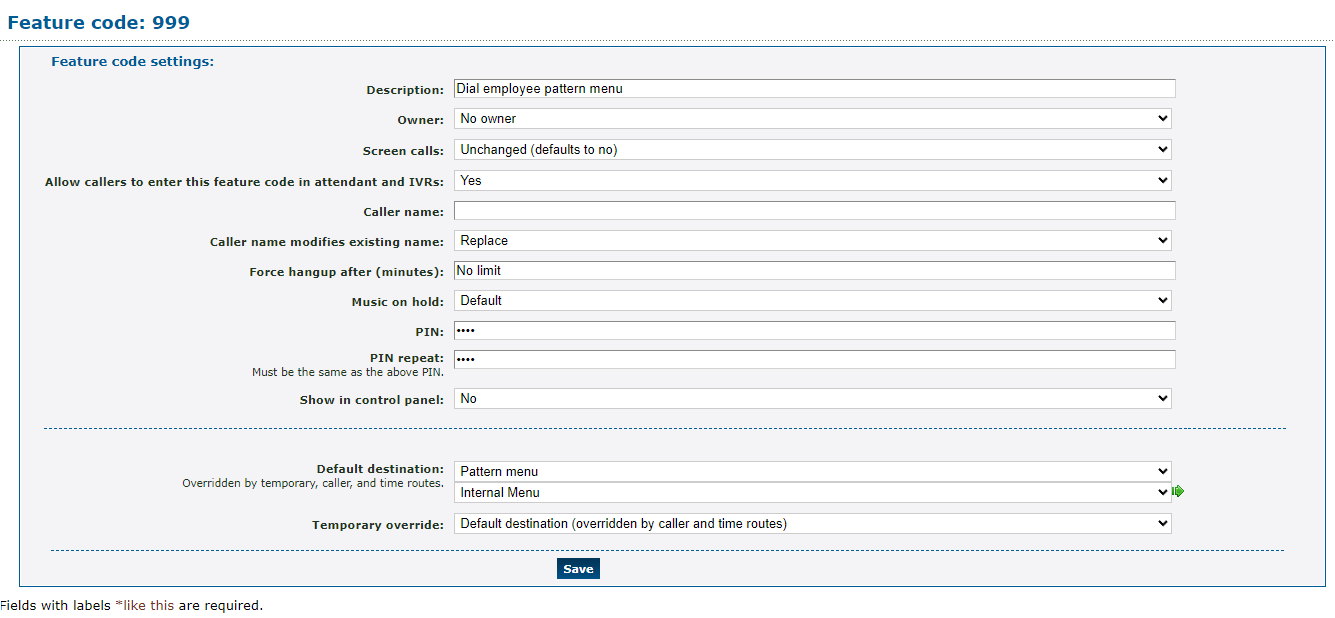
3. In the menu, fill out the following information:

| Option | Description |
|---|---|
| Description | Type a brief description of the purpose of this feature code. |
| Owner | If needed, select a user that can view and edit this feature code in the web portal. |
| Allow callers to enter this feature code in attendant and IVRs | Select whether or not callers can dial this feature code in an auto attendant or IVR menu to access the pattern menu. |
| Show in control panel | Show or hide this feature code from the Control Panel page. Showing this feature code allows for a web portal user to drag and drop an active call onto the feature code to transfer. |
| Default destination | Select Pattern menu. In the second box, select the name of the pattern menu that this feature code should send calls to when dialed. |
4. Once the feature code's information has been put in, click the Save button.
✔ Users should now be able to dial the new feature code (999 for this example) on their desk phone or the SpectrumVoIP ES mobile app to place a call directly to the pattern menu selected for this feature code.
Default Destination
If a phone number should solely be used to dial a pattern menu, you can set the Default Destination of a phone number to route calls to a pattern menu.
To do this…
1. Navigate to Features → Numbers.
2. Click the phone number that should be used solely for the pattern menu.
3. In the Route calls to section, use the Default destination dropdown to select Pattern Menu, and use the second box to select the specific pattern menu to be used.
4. Click the Save button.
✔ You should now see that phone number listed with its destination set as the pattern menu you selected, like so:

Caller Route
If callers with a specific area code or phone number should be sent to a pattern menu, you can create a Caller Route in a phone number's settings so that callers that call in with a matching phone number will be sent to the selected pattern menu.
To do this…
1. Navigate to Features → Numbers.
2. Click the phone number that should be used solely for the pattern menu.
3. In the Caller routes section of the phone number's settings, click the Add a caller route >> button.
4. In the New caller route menu, fill in the following information.
| Setting | Description |
|---|---|
| Caller number prefix | Type the whole or starting part a caller's phone number that should be sent to the pattern menu. |
| Description | Type a brief note describing this caller route. |
| Forward matching calls to | Select Pattern Menu to send calls from this caller route to a pattern menu. Use the second dropdown to select the specific pattern menu that should receive the call. 
|
5. Click the Save button when ready.
✔ You should now see the new caller route routing calls to the pattern menu you wish to use.

Time Route
If there is a specific time or date that calls should be sent to a pattern menu, you can edit a phone number's time routes to route calls to a selected pattern menu.
To do so…
1. Navigate to Features → Numbers.
2. Click the phone number that should be used solely for the pattern menu.
3. In the Time routes section, click the name of the time route that needs its destination changed.
Note: To learn more about creating Time Routes and editing Time Groups, check out this guide.
4. In the menu, use the Forward matching calls to dropdown to select Pattern Menu, and the second dropdown to select the name of the pattern menu to be used.
5. Click the Save button.
✔ You should now see the time route set to route calls to your pattern menu when the time group it is based off is active.


