Create a Busy Auto Attendant
Learn more about busy auto attendants and see if creating a busy auto attendant could optimize your call flow.
Table of Contents
Why Use a Busy Auto Attendant?
A busy auto attendant is a commonly used auto attendant that plays callers a message. This message will usually inform callers that agents may be handling other calls. Some companies may include a comfort message that lets callers know that their call is important.
✔ When a call queue is experiencing a large call volume and agents are not able to answer calls in time, the call queue could route any unanswered calls to a busy auto attendant.
Configure the Auto Attendant
To implement this type of auto attendant, the following will need to be done:
- Create a new auto attendant.
- Set up a menu prompt for the auto attendant.
- Configure the dial pad menu's options.
- (Optional) Adjust any extra settings for the auto attendant.
Step 1: Add the Auto Attendant
- Navigate to the Auto Attendants page.

- Click the Add Attendant button.

- In the Add an Auto Attendant menu, fill in the following information:

- Name - Type in a descriptive name for the auto attendant.
-
Extension - Type in an extension number that is not in use.
Quick Tip: Extension numbers in the 8100s are recommended for auto attendants. It is also good practice to keep your Auto Attendants in sequential order by organizing them in number ranges.
For example, if you have an Auto Attendant already created that is extension 8100, then the next New Auto Attendant would be created as 8101, then 8102, and so on.
- Time Frame - Select default (all the time).
- Click the Add button when finished.

✔ Clicking Add will pop up a new screen for configuring the new auto attendant's prompt and dial pad menu options.

Step 2: Create a Busy Message
Step 3: Set Up the Dial Pad Menu Options
(Optional) Adjust Extra Options
While setting up an Auto Attendant, there are extra settings that can be adjusted to fine-tune how the Auto Attendant acts.

Click the Options button  on the right to pull up the Options menu where the basic and speech keyword settings can be adjusted.
Basic Options
There are several, basic settings that can be adjusted to customize an auto attendant. Each of these settings affects how the auto attendant will handle a call under certain circumstances.

Basic Options to Adjust
Dial by Extension
The Dial by Extension feature allow callers in an auto attendant to dial the extension number of an employee to skip past using the options.
Quick Tip: Disabling Dial by Extension ensures that callers can only follow the auto attendant's options.
This setting is enabled by default and can be easily switched by clearing the checkbox.
If no key is pressed
If the caller does not select an option before the timeout expires, you can route the call to repeat the greeting, go to an option that is already set, or hang up the call.
If unassigned key is pressed
Using this option, you can route callers that press an unassigned key to either hear a repeated greeting, go to an option that is already set, or hang up the call.
Timeout before first key press
This option determines how long the auto attendant will wait before recognizing any key presses.
Note: By default, the system will wait 3 seconds before recognizing keys pressed.
Timeout after the last key press
Unlike the first key press, this option determines how long the auto attendant will wait after the last key press to register another key press.
Note: By default, the system will wait 3 seconds before registering another key press.
Maximum key presses to collect
You can use this option to set a limit for how many keys can be pressed.
Speech Keywords
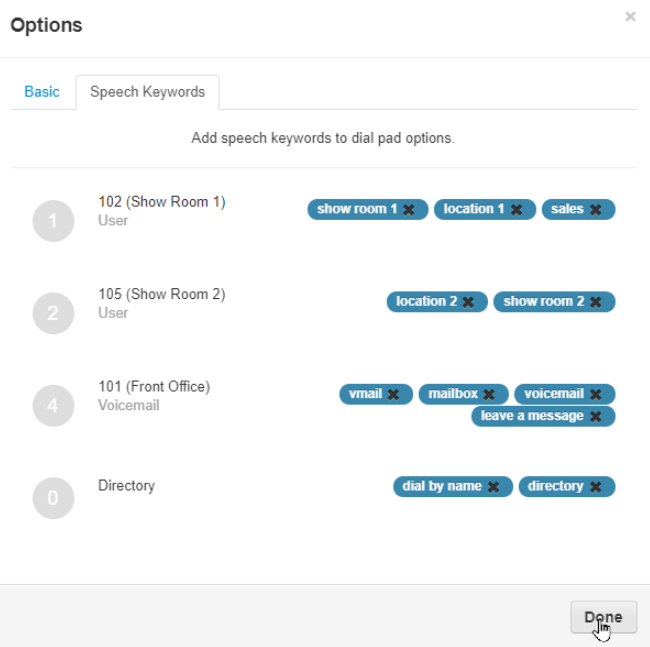
Speech Keywords are used by the Auto Attendant to trigger routing whenever it hears a certain word or phrase spoken by the caller. Each dial pad option can have multiple keywords/phrases implemented.
Add Keywords and Phrases…
Whenever you add a dial pad menu option, an entry will populate in the Speech Keywords section of the Options modal:

These options can be clicked to show a field for entering in a word or phrase:
Using the Add a keyword or phrase box, type in what you would like the system to listen for to route calls to this selected option.
Click the Done button to save these changes. 
Add a Busy Auto Attendant to Call Routing
There are different ways that calls can be routed to the busy auto attendant.
Use the module below to learn more about the most common methods for adding a busy auto attendant into a company's call routing.
Route a Queue's Unanswered Calls
If a company prefers not to use the callback feature of a queue, they may instead route a queue's unanswered calls to a busy auto attendant.
What is the Callback Feature for Queues
If needed, a queue can have callbacks enabled. The callback feature will have an automated menu give callers the option to leave a voicemail, request a callback, or return to the queue.
When a caller selects to leave a voicemail, they are taken to the mailbox of the queue itself. If the caller requests a callback, they will be prompted to enter the phone number that should be called back by an agent. When a caller selects the option to return to the queue, they will return to the queue in the same spot they were in before.
Quick Tip: A company may prefer to utilize a busy auto attendant over the callback feature for the following reasons:
• They do not want callers leaving a message in the queue's mailbox. They may want callers to leave messages in a general mailbox or a user's mailbox instead.
• They want callers to be able to select from multiple mailboxes to leave a message with.
• They do not want agents to handle callback calls.
• They want to encourage callers to call back at a later time.
• They want callers to hear a custom message that may include alternate ways for callers to contact their team.
• They want to include a comfort message in the busy auto attendant's greeting.
If you want a queue's unanswered calls to be sent to a busy auto attendant, you can do so by doing the following:
1. Navigate to the Call Queues page.![]()
2. Click the name of the queue or the Edit Queue  icon next to the queue.
3. In the Edit Queue menu, navigate to the In Queue Options tab.
4. Check to make sure the Timeout matches how long (in seconds) you want callers waiting in the queue before being forwarded to the busy auto attendant.
Quick Tip: The Queue Ring Timeout can be set in increments of 5 seconds. 5 seconds is equivalent to 1 ring.
For this example, the queue will ring for 30 seconds, which is 6 rings.
5. Ensure that the If unanswered dropdown is set to Forward to destination.
6. In the Forward Destination box, type and select the name or extension number of the busy auto attendant.
7. Click the Save button. ![]()
✔ Now when callers are waiting in the queue for longer than the set Queue Ring Timeout, callers will be sent to the busy auto attendant where they can select from the dial pad menu options you have created.
Route Calls for a Period of Time
For some businesses, they may want to use a busy auto attendant for callers that call during a specific time period. This could be for when the business has lunch, meetings, or any other events.
If your business needs callers sent straight to a busy auto attendant during a specific time, the following will need to be completed to add the Busy Auto Attendant into your call routing:
1. Add a Time Frame for the routing.
2. Create an Answering Rule that will route calls to the busy auto attendant when the time frame is active.
Step 1: Add a Time Frame
To tell the system when calls will need to go to the busy auto attendant, a time frame will need to be created,
To create a time frame…
1. Navigate to the Time Frames page.
![]()
2. Do one of the following:
• Click the name of the user that needs a time frame.
• In the search bar, type and select the ion number of the user that needs a time frame.
• If you are adding a time frame for your business' routing, click Domain instead:
Quick Tip: If you are not able to see the user you are trying to add a time frame for, deselect Hide Users Without Time Frames.
3. Click the Add Time Frame button. ![]()
4. In the Add a Timeframe menu, do the following:
• Name - Type a unique name for identifying this time frame. 
• When - Select the type of time frame to be created.
Options for When
• Always - If the time frame should be active until it is disabled, select Always.
• Days of the week and times - Select this if the time frame will be active on a recurring basis (same time and day every week). Select those days of the week and use the boxes to enter the starting and ending time of the time period.
– To add a break in the time that the time frame is active on a certain day, click the Add range  icon.
icon.
• Specific dates or ranges - Type and select the date(s) and times the time frame will be active for. 
– Click the Add date range  button to add more dates.
• Holidays - Use the Holidays search tool to find and select national holidays your business observes.
• Custom - Create a time frame that allows you to add a combination of Days of the Week, Specific Dates, and Holidays.
5. On the second tab that appears, fill in the information listed to define when this time frame will become active.
6. Click the Save button. ![]()
7. To add more time frames, repeat steps 3-5.
Step 2: Create an Answering Rule
Now that a time frame has been created, an answering rule can be added that will route calls to the busy auto attendant when the time frame is active.
To add an answering rule for routing…
1. Navigate to the Users page.![]()
2. In the search bar, search for the user by name or extension number.
Note: If you are adjusting your business' call routing, find the Inbound Routing User for the location.

3. Click the Edit  icon and select Answering Rules.
4. On the user's Answering Rules page, click the Add Rule button. ![]()
5. In the Add an Answering Rule menu, do the following:
• Time Frame - Select the time frame that the busy auto attendant will be used for.
• Call Forwarding - Select Always and in the box, type the name or extension number of the busy auto attendant.
6. Click the Save button. ![]()
7. You should see the answering rule appear above the Default answering rule.
8. Click and drag the triangle icons to move this answering rule to the top.
✔ A message should appear letting you know that the answering rules have been reprioritized before prompting you to click Save like so:

9. Click the Save button. ![]()
✔ Now when that time frame is active, calls will be sent to the busy auto attendant for that user or the business, depending on if you have adjusted the answering rules for a user or the inbound routing user.
 icon.
icon.


