Set Up Callbacks for a Queue
Discover how you can set a call queue to accept and facilitate callbacks for callers waiting in the queue.
Table of Contents
Why Use the Callback Feature?
If needed, a queue can have callbacks enabled. The callback feature will have an automated menu give callers the option to leave a voicemail, request a callback, or return to the queue. This feature can give callers more power over how their call is handled while waiting in a call queue. The callback feature can help lower abandonment rates, hold times, call spikes, and handle time.
When a caller selects to leave a voicemail, they are taken to the mailbox of the queue itself. If the caller requests a callback, they will be prompted to enter the phone number that should be called back by an agent. When a caller selects the option to return to the queue, they will return to the queue in the same spot they were in before.
Note: Some companies may not want to use the callback feature. As an alternative, a busy auto attendant can be created.
Why Use a Busy Auto Attendant Instead of Callbacks?
A company may prefer to utilize a busy auto attendant over the callback feature for the following reasons:
• They do not want callers leaving a message in the queue's mailbox. They may want callers to leave messages in a general mailbox or a user's mailbox instead.
• They want callers to be able to select from multiple mailboxes to leave a message with.
• They do not want agents to handle callback calls.
• They want to encourage callers to call back at a later time.
• They want callers to hear a custom message that may include alternate ways for callers to contact their team.
• They want to include a comfort message in the busy auto attendant's greeting.
To learn more about setting up a busy auto attendant, check out this article.
Enable Callbacks for a Queue
In order for callbacks to be active for a queue, the following will need to be accomplished:
- Enable the Allow Callback option setting in the queue's Pre Queue Options.
- Adjust the queue's In Queue Options to ensure callbacks function properly.
Step 1: Enable the Allow Callback Option Setting
To set the queue to allow callers to request a callback, we will need to enable the Allow Callback option setting in the queue's Pre Queue Options.
To enable this setting…
- Navigate to the Call Queues page.

- Click the Edit Queue
 icon next to the call queue needing this change.
 - Visit the Pre Queue Options tab.

- In the Pre Queue Options tab, click the Allow Callback option drop-down and select Yes.

- Click the Save button.

Step 2: Adjust the Queue's In Queue Options
To have the call queue recognize when it will need to give callers the option to set up a callback, the following In Queue Options settings will need to be adjusted:
- The Queue Ring Timeout setting - Determines how long callers can wait (in seconds) before being offered a callback.
- The Enable Voicemail setting - Allows the automated callback menu to prompt users to press 2 to leave a voicemail.
- The If Unanswered setting's Stay in Queue option - Sets the queue to keep callers in the queue, which will allow the automated callback menu to keep the caller's place in line.
To prepare your queue's In Queue Options…
- Visit the In Queue Options tab.

- Use the Queue Ring Timeout slider to set how long (in seconds) the queue should ring all agents for.

- Ensure that Enable voicemail is set to Yes.

Note: When callers press 2 to leave a voicemail, they will be taken to the queue's own voicemailbox to leave a message.
To check the call queue's voicemailbox, you can either…
• Log in as the call queue in the web portal.
• Dial 03 and the n number of the call queue and press star (*).
– Doing this will allow you to enter the call queue's voicemail PIN.
• Dial 5000 and use the automated menu to do the following:
– When prompted to enter an account number, dial the queue's extension number.
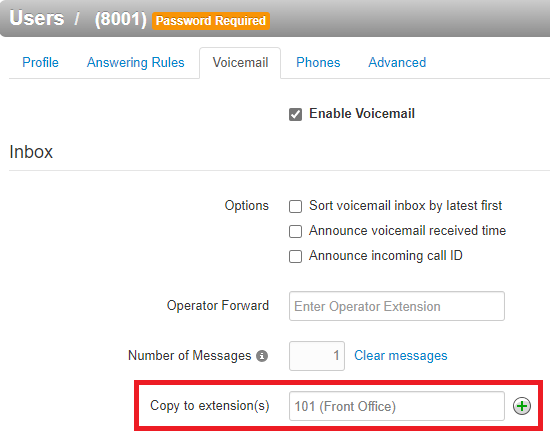
– When prompted to enter a password, dial the queue's voicemail PIN.Alternatively, you can go into the call queue's Voicemail tab and set the queue to copy voicemails to a different extension:

- Ensure that the If unanswered dropdown is set to Stay in queue.

- When you are done making changes, click the Save button.

The Callback Process
Once the caller has waited longer than the queue ring timeout, they will be prompted by the queue to…
- Press 2 to leave a voicemail.
- Press 3 to keep their place in the queue and receive a callback when an agent becomes available.
- Press # to return to the queue to continue waiting.
If they press 3 to receive a callback, they will be prompted to do one of the following…
- Press 1 to confirm their number is correct for a callback.
- Press 2 to enter a different phone number to receive the callback.
When an agent becomes available in the queue, they will receive a call from the queue itself.
This call will announce that the agent is receiving a call to complete a callback.
When the agent presses 1 to connect the call, the call queue will call the callback number entered by the caller.
View the Callback Call Process in Your Call History
When you view your Call History page, you can view how a callback is initiated, when the agents' phones ring to take a callback call, and who accepts the callback call from the queue.
