Why Is My Phone Not Ringing?
Explore the different reasons and scenarios where your phone may not ring.
Table of Contents
I Can Place Calls but My Phone Does Not Ring
If you are able to make calls, but you are not able to receive calls, then your phone could be either…
- The volume is turned down too low or muted.
- Not yet ringing since it is not yet having calls routed to it.
- Set as Unavailable due to your call queue status as an agent.
- Set as Unavailable because Do Not Disturb is active.
- Not receiving calls because a call forward is active.
Before following this guide, ensure that your phone is has its volume turned up to a good level. This can be done using the volume button of your device.
This Is a New Phone or App
If you have just gotten this particular desk phone, desktop app, or mobile app set up, then your new device may not yet be set to ring.
Set All of a User's Devices to Ring - Stratus Admins
By default, users will usually have their Answering Rules set to just ring their main device, which is usually a desk phone.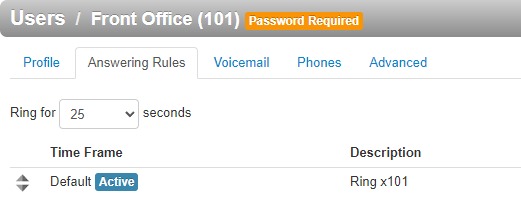
As an Admin Stratus user, you can adjust the answering rules of any user to ensure their devices are ringing simultaneously instead. To do so…
1. Navigate to the Users page.
2. Use the search bar to find the on number or name of the user needing their new device to ring.
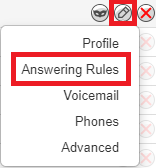
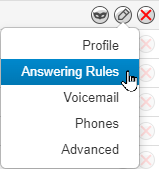
3. Click the Edit  icon next to the user and select Answering Rules.
4. Click the Edit  icon next to user's main answering rule.
Quick Tip: The main answering rule for most users is the Default rule.
5. In the Edit Answering Rule menu, select Simultaneous ring and Ring all user's phones.
6. Click the Save button.
✔ Now all of that user's registered devices should ring when their extension is called.

Set All of Your Devices to Ring - Stratus Users
As a Basic Stratus user, you can adjust your own Answering Rules to ensure all of your registered devices are ringing when your extension number is called. To do so…
1. Navigate to the Answering Rules page.
2. Click the Edit  icon next to your main answering rule.
Quick Tip: The main answering rule for most users is the Default rule.
3. In the Edit Answering Rule menu, select Simultaneous ring and Ring all user's phones.
4. Click the Save button.
✔ Now all of your devices should ring at the same time when your extension number is called, as long as those devices are registered and online.

We Use a Call Queue that Rings Agents by Device - Stratus Users
If an agent's new device is not ringing when there is a call waiting in a call queue, then your agents may be added into that call queue by Phone instead of by User.

As a solution, you can either add the agent's new device, or convert your agents to Users instead of Devices.
Add an Agent's Device to the Queue
1. Navigate to the Call Queues page.
 w
w
2. Click the Edit Agents  icon.
icon.
Quick Tip: Alternatively, you can click the number of agents in the Agents (Available) column.

3. Click the Add Agent button.
4. Use the Add Agent(s) by drop-down to select Phone.
5. In the Agent Phone box, type the name or extension number of the agent and select the device.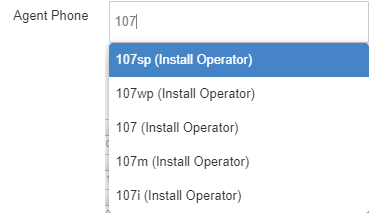
Quick Tip: The letter at the end of their extension number will indicate what kind of device it is.
These devices and their associated letters include:
– i = SpectrumVoIP Stratus Mobile App
– sp = SpectrumVoIP Desktop App
– wp = Stratus Web Phone
– h = Commonly used for desk phones at home
– m = Old, deprecated SpectrumVoIP Mobile App
– z = Zoiper softphone app
6. If needed, adjust the agent's settings.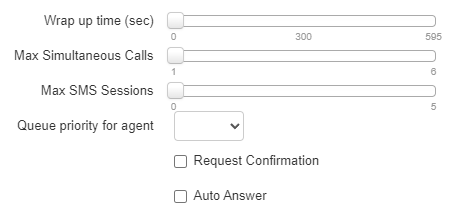
7. Click the Save Agent button.
8. If the agent's device is showing as Offline when it should be Online, click the Edit Agent  icon beside the agent.
9. Use the Status drop-down to select Online.
10. Click the Save Agent button again.
✔ That agent's device should now be listed with the other agents and showing as Online.

Confirm that the added device is ringing correctly by placing a test call to the call queue.
Convert Your Agents
1. Navigate to the Call Queues page.

2. Click the Edit Agents  icon.
icon.
3. Click the Convert Agents button.
4. In the confirmation message, click the Convert button.
5. Wait a minute or two for the Agents to convert to Users.
✔ You should now see your agents listed as Users.
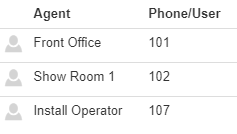
6. If an agent is showing as Offline when they should be Online, click the Edit Agent  icon beside the agent.
7. Use the Status drop-down to select Online.
8. Click the Save Agent button.
✔ All of your Agents should now show as Online.
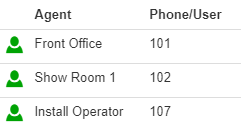
Confirm that your agents' devices are ringing correctly by placing a test call to the call queue.
Create a Call Queue that Rings a User's Devices - Enswitch (ES) Admins
If one of your users has not ever had multiple devices ring and they are not part of a call queue, they can be set to have multiple devices ring using a call queue.
Configure a Call Queue for a User
As an Enswitch Admin, you can add call queues for your users that can be used to ring multiple devices for a user. To do so…
1. Navigate to Features → Queues.
2. Click the New >> button.
3. Fill in the following information for this user's queue: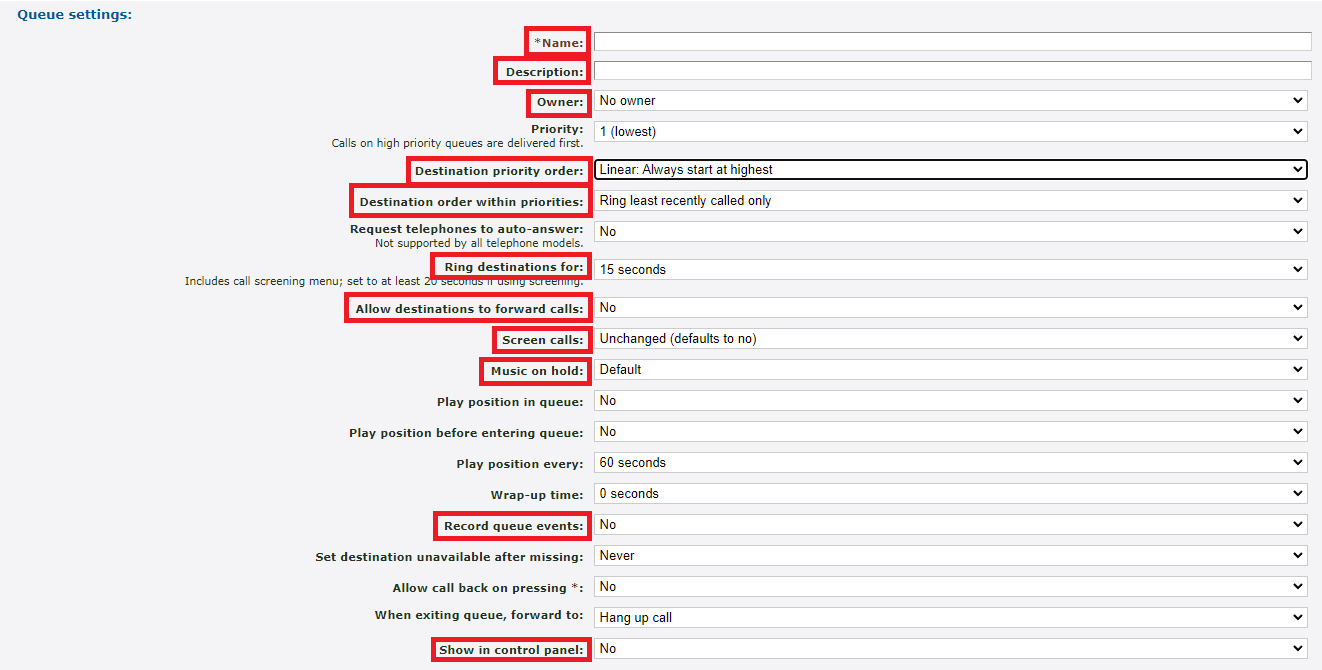
– * Name - A unique name for identifying the queue.
– Description - A note that is displayed alongside the queue's name in the list of queues.
– Owner - Allows a user to edit the queue even if they are not an admin.
– Destination priority order - Determines how the queue will ring agents. These options include…
– Linear - The queue will ring agents with the highest level of priority.
– Smart linear - The queue will ring the last level that answered before ringing linearly.
– Circular - The queue will ring starting at the next level from the level that handled the previous call.
– Smart Circular - The queue will ring the last level that answered and then continue ringing circular.
– Destination order within priorities - Choose to either ring the next available line in a priority grouping or ring all available lines in a grouping at once.
– Ring destinations for - Select how many seconds a call will ring to each destination. When a destination does not answer, the call is returned to the queue to ring the next destination.
Note: If call screening will be enabled, set this time to at least 20 seconds.
– Allow destinations to forward calls - It is recommended to leave this set to no to avoid causing loops.
– Screen calls - Choose whether or not to screen calls.
✔ When set to yes, the destination will be asked if they will accept the call. This can help mitigate ghost and spam calls.
– Music on hold - Use this option to select if callers should hear music or ringing while waiting in the queue.
– Record queue events - Allows events in a queue to be recorded if queue statistics are enabled.
– Show in control panel - Choose whether or not to show this queue and its status in the Control panel page of the web portal.
Set Up Exit Options
As a safeguard, settings that reference the When exiting queue, forward to option can be set up that can tell the queue how to handle calls that meet certain conditions.
Use these following fields to configure when callers will follow the queue's exit option: – There are already calls in the queue - This acts as the maximum queue length. Choose how many callers can wait in the queue at a time.
✔ When additional calls try to enter the queue when it is full, the extra callers will be sent to the destination set in the When exiting queue, forward to option.
– Maximum hold time is reached - Set how long callers will be able to wait before the queue exits them out of the queue according to the When exiting queue, forward to option.
– No destinations are logged in or entering the queue - Decide if callers should follow the When exiting queue, forward to option when there are not any destinations logged in to the queue when a call is made to the queue.
Add a Message for Callers Waiting in the Queue
Sometimes it may be necessary to have a message played for callers as they wait in the queue.

To add in a message, you can either…
– Select a sound file saved in the Sounds page (Features → Sounds) of the web portal.
– Upload a .wav file created from a recording or text-to-speech.
DANGER: To upload a .wav file, it is recommended to ensure the file has been converted to the proper format (.wav 8Khz, Mono, 16-Bit PCM).
If needed, please contact our technical support team to set up this message by calling (469) 429-2500 or emailing support@spectrumvoip.com.
Uploading an incorrectly formatted audio file can result in unexpected, potentially catastrophic issues for your phone system.
Once a message has been added in, a new setting will appear in the Queue settings section: Play message to queued calls.
To have this message play to callers waiting, use the Play message to queued calls drop-down to select Yes.

✔ Once the queue has been configured, make sure to click Save.

Now you should be able to see the user's queue listed in the Queues page.
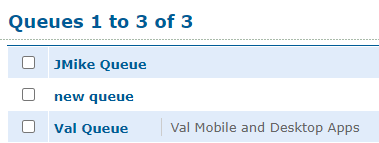
Add Devices to the Queue
Now that a user has a queue of their own, the devices that ring will need to be added. Since each device is registered to its own telephone lines, those telephone lines will need to be added as destinations for the queue.
As an Enswitch Admin, you can easily add more telephone lines to ring in a call queue. To do so…
1. Navigate to Features → Queues.
2. Click the name of the queue.
3. In the Destinations section, click Add a destination.
4. On the New destination page, use the Destination drop-down to select Telephone line.
5. If you selected Telephone line, use the drop-down to select user's telephone line that will be rung.
6. Use the Available for calls drop-down to select if the destination should immediately be available for calls.
7. Use the Priority drop-down to select the priority of this destination. By default, the priority is 1, so each agent can receive an equal number of calls.
8. Click the Save button.

9. If needed, click Add another destination to add more agents for the queue.
Check the Statuses of the User's Devices
When you add a new agent to a call queue, it is best practice to check that their status is showing correctly using the Queue Panel.
One of the most commonly reported issues for newly added agents is their status being stuck as Unavailable 0:00.
To check and correct your new agents' statuses in the Queue Panel…
1. Navigate to Control panel → Queue panel.
2. Click the Options  icon to open the Panel options menu.
3. To show only a specific queue and its agents, use the Show only queues option to select the queue(s) to show in the queue panel.
4. Click the Save options button.
5. In the confirmation prompt, click OK.
6. Minimize the menu by clicking the arrow icon.
7. Click the agent whose status is showing incorrectly and select Set other work in all queues.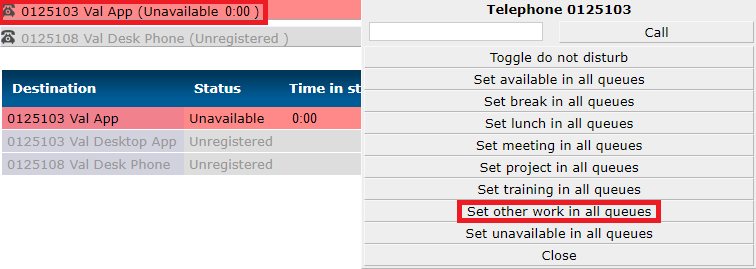
8. Click the agent again and select the status the agent should show with.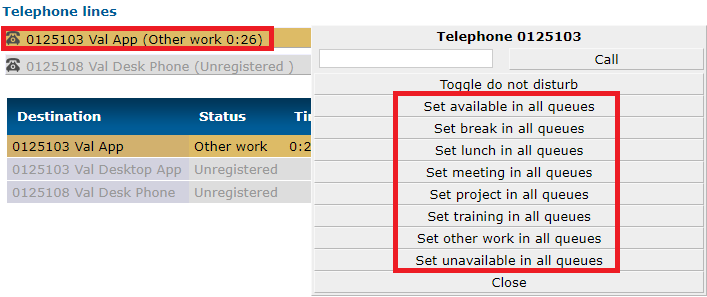
Route Calls to the Call Queue
Now that this user has a call queue that will ring their devices for calls, the call queue will need to be able to be contacted.
One of the main ways of contacting a user internally is by calling their feature code, which is usually a 3-digit version of their extension number. Another way of contacting a user is by calling their Direct Inward Dialing (DID) number. Using either of these methods, we can make the new call queue accessible for callers.
Create a Feature Code that Dials the User's Call Queue
To create a new feature code that will route internal calls to the user's new call queue…
1. Navigate to Features → Feature codes.
2. Click the New >> button.
3. Fill in the following boxes: (fields marked with * are required)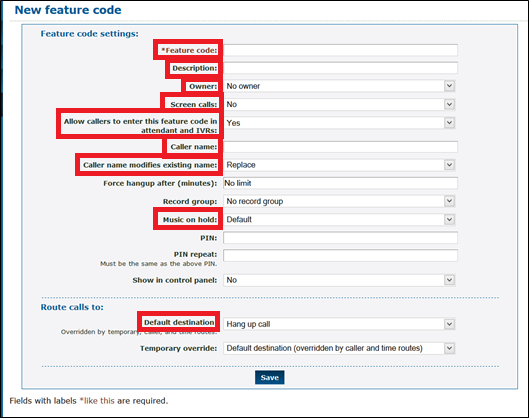
– * Feature code: This must be a combination of numbers and/or * (for example, *123 or 123).
Quick Tip: The most commonly used feature code for contacting a user is a 3-digit version of that user's 7-digit extension.
For example, user 0125101 may prefer to use 101 as their feature code.
DANGER: Do NOT use a N11 number, such as 911, 211, or 411.
– Description: This text is displayed next to the code in the list of feature codes.
– Owner: This person may edit the feature code even if they are not an administrator.
– Screen calls: When set to Yes, the person answering is asked if they want to accept the call.
– Allow callers to enter this feature code in attendant and IVRs: When set to yes, this feature code can be entered in the auto-attendant and IVR menus.
– Caller name: Allows users on a SIP telephone to see which feature code the call came from. If not set, the caller name supplied by the caller will be used.
– Caller name modifies existing name: Determines whether the caller name setting above replaces the caller name supplied by the caller, prepends to it, or appends to it.
– Music on hold: When selected, users who dialed this code and are on hold will have music played back to them.
– Default destination: Use the drop-down to select Queue.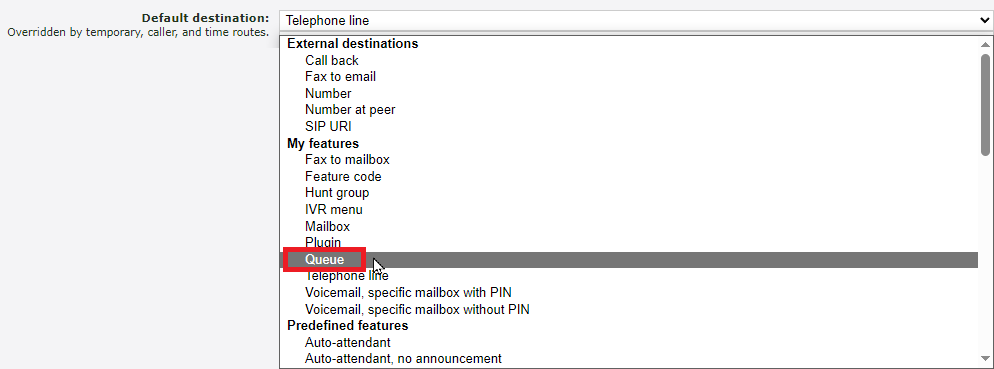
– Queue: Use the second drop-down that appears to select the user's call queue.
4. Click the Save button.
Edit an Existing Feature Code that Dials a User
If this user already has a feature code, we can adjust where their feature code routes calls. To do so…
1. Navigate to Features → Feature codes.
2. Click the Feature Code that needs to be edited.
3. Edit the following options:
– Description: This text is displayed next to the code in the list of feature codes.
– Default destination: Use the drop-down to select Queue.
– Queue: Use the second drop-down that appears to select the user's call queue.
4. Click the Save button.
✔ Now when that feature code is dialed, the call queue will receive the call and ring the user's devices.

Reroute the User's DID Number
One option for routing a user's call is a Direct Inward Dialing (DID) number. If a user already has one, you can reroute that DID to route calls to the user's call queue instead of a specific device's telephone line.
1. Navigate to Features → Numbers.
2. Click the user's phone number.
3. In the Route calls to section, use the Default destination drop-down to select Queue.
4. Use the second drop-down to select the user's new queue.
5. Click the Save button.
✔ You should now see that user's DID number listed with it routing to the new queue.

Add Your New Device to Ring in Your Own Call Queue - Enswitch (ES) Users
Each new device that is added is registered to its own Telephone Line, or extension. One method of having multiple devices ring is using a call queue that rings those device's telephone lines.
If you are set as an owner of a call queue, you can add telephone lines to ring in that call queue. To do so…
1. Navigate to Features → Queues.
2. Click the name of the queue.
3. In the Destinations section, click Add a destination.
4. On the New destination page, use the Destination drop-down to select Telephone line.
5. Use the drop-down to select the telephone line of the new device that will need to ring.
6. Use the Available for calls drop-down to select if the destination should immediately be available for calls.
7. Use the Priority drop-down to select the priority of this destination. By default, the priority is 1, so each telephone line can receive an equal number of calls.
8. Click Save.
9. If needed, click Add another destination to add more devices to the queue.
Add a New Telephone Line to Ring in a Call Queue - Enswitch (ES) Admins
When a new device has a telephone line created, it can be easy to forget that the new telephone line may need to be added to a call queue if that device should be ringing for call queue calls.
Add an Agent's Device to a Queue
As an Enswitch Admin, you can easily add more telephone lines to ring in a call queue. To do so…
1. Navigate to Features → Queues.
2. Click the name of the queue.
3. In the Destinations section, click Add a destination.
4. On the New destination page, use the Destination drop-down to select Telephone line.
5. If you selected Telephone line, use the drop-down to select user's telephone line that will be rung.
6. Use the Available for calls drop-down to select if the destination should immediately be available for calls.
7. Use the Priority drop-down to select the priority of this destination. By default, the priority is 1, so each agent can receive an equal number of calls.
8. Click Save.
9. If needed, click Add another destination to add more agents for the queue.
Check Your Agents' Statuses
When you add a new agent to a call queue, it is best practice to check that their status is showing correctly using the Queue Panel.
One of the most commonly reported issues for newly added agents is their status being stuck as Unavailable 0:00.
To check and correct your new agents' statuses in the Queue Panel…
1. Navigate to Control panel → Queue panel.
2. Click the Options  icon to open the Panel options menu.
3. To show only a specific queue and its agents, use the Show only queues option to select the queue(s) to show in the queue panel.
4. Click the Save options button.
5. In the confirmation prompt, click OK.
6. Minimize the menu by clicking the arrow icon.
7. Click the agent whose status is showing incorrectly and select Set other work in all queues.
8. Click the agent again and select the status the agent should show with.
I Am a Call Queue Agent That Uses Statuses
If you set your status in a call queue daily, then your phone may not be ringing if you are set as Offline or any other unavailable status.
Update Your Status - Stratus Users
Dial a Code
| Star Code | Function | Notes |
|---|---|---|
| *50 | Log in for one call | You will be set as Online until you receive and handle one call from the call queue. After the one call is finished, you will be automatically set as Offline. |
| *51 | Log into all queues | After pressing send, you will hear a voice confirming you are now available for calls. You will receive calls until you go Offline. |
| *52 | Log out of all queues | After pressing send, you will hear a voice confirming you are now unavailable. You will stop receiving calls until you go Online again. |
✔ These codes can be dialed on any SpectrumVoIP device, including our softphone apps.
In the Web Portal
Call Center Agents have a Call Center page in their Stratus Web Portal. Here, call center agents can view their availability status, personal call statistics, recent calls, and active phones.

Granular Log In/Out
Agents that are in multiple queues are able to log in and out of individual call queues to which they have been assigned.
To do this, click on the icon that has a door with an arrow on it. Within a few seconds the agent will be logged out of that specific call queue.

To log back into a specific queue, press the same button again.
NOTE: After clicking login/logout, all call queues might go unavailable for a few seconds. This is because the system is processing and will soon clear back to showing the correct status.
Portal Status Change
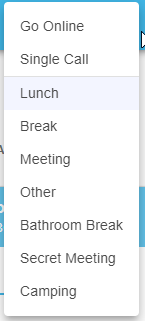
On the Call Center page, call center agents are able to use a drop-down menu to change their availability status.

| Agent Status | Function |
|---|---|
| Go Online | Be set as available to take inbound calls for the call queues you are in. |
| Single-Call Mode | Be available to take one inbound call. After finishing up the call, the status will change to Offline. |
| Lunch, Break, Meeting, Other, and Web | Appear as unavailable for inbound calls for different scenarios. You are still able to receive calls that do not originate from a call queue. You can also place outbound calls. |
| Offline | Be unavailable for calls originating from call queues. It is best practice for Call Center Agents to set themselves to Offline when they have finished their shift for the day. |
Note: Custom Statuses can be created by an Office Manager or Call Center Supervisor.
On the StratusHUB Desktop App
The Call Center Status button and drop-down can be used to set your status in the call queues you are present in.
To do this, use the Call Center Status drop-down to select a Status.
Note: Custom Statuses can be created by an Office Manager or Call Center Supervisor.
The color of the Call Center Status icon indicates your current status in the queue.
| Color | Example | Status |
|---|---|---|
| Green |  |
You are set as Online so that you can handle calls from your queue. |
| Red |  |
You are currently set as Offline. You will stop receiving calls from call queues until you go back Online. |
| Yellow |  |
Your status is set as Lunch, Meeting, Break, Web, or any custom status. You will be set as unavailable for calls in the call queue until you go back Online. You can still receive direct calls and make outbound calls. |
| Grey |  |
Your call center status is set as Other. You will be set as unavailable for calls in the call queue until you go back Online. You can still receive direct calls and make outbound calls. |
Update Your Status - Enswitch (ES) Users
Use a Desk Phone
To make it easier for you to adjust your availability in your call queues, you can use your Yealink desk phone to update your status using the Queues key.
There are three different ways you can adjust your availability in your queues using this feature:
1. Log into all queues you are a member of.
2. Log out of all queues you are a member of.
3. Log in/out of a specific queue.
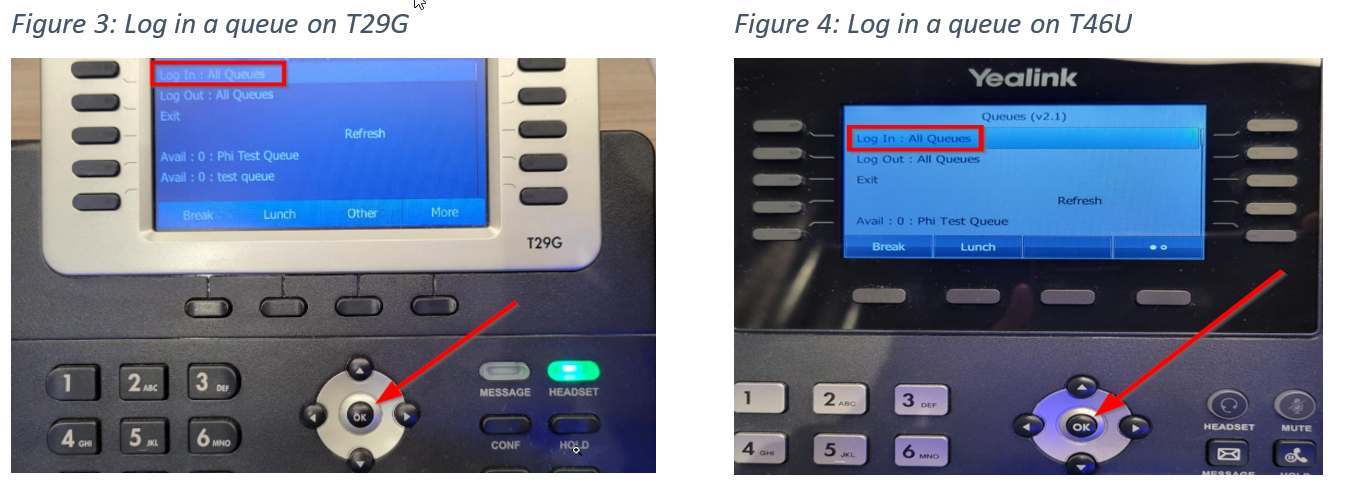
Log Into All Queues
Using your phone's pre-programmed Queues key, you can easily log into all of the queues you are an agent for.
To log into all of the queues you are a part of…
1. Press the Queues key on your phone. 2. On the Queues screen, highlight Log In: All Queues and press the OK button on your phone.
Log Out of All Queues
This same Queue key can be used to log you out of all of your queues.
To log out of all of the queues you are a part of…
1. Press the Queues key on your phone.
2. On the Queues screen, use the down navigational button to highlight Log Out: All Queues.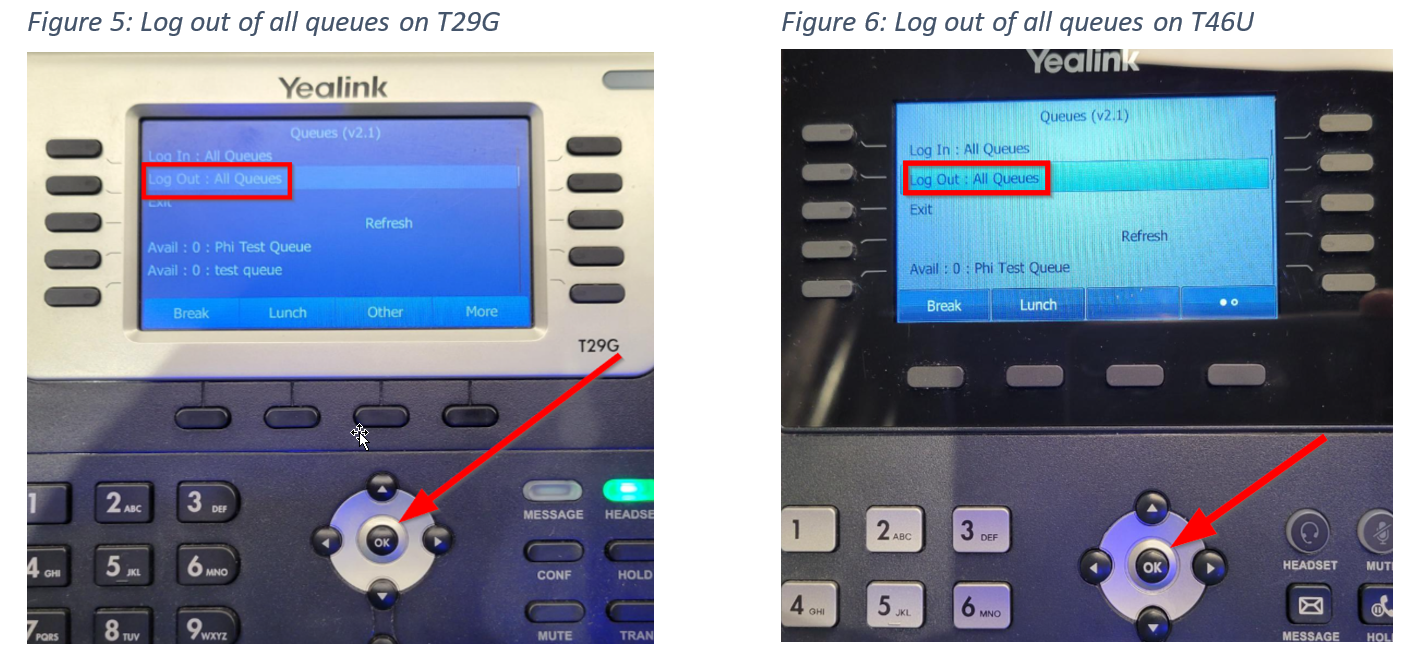 3. Press the OK button on your phone.
Change Your Status in a Specific Queue
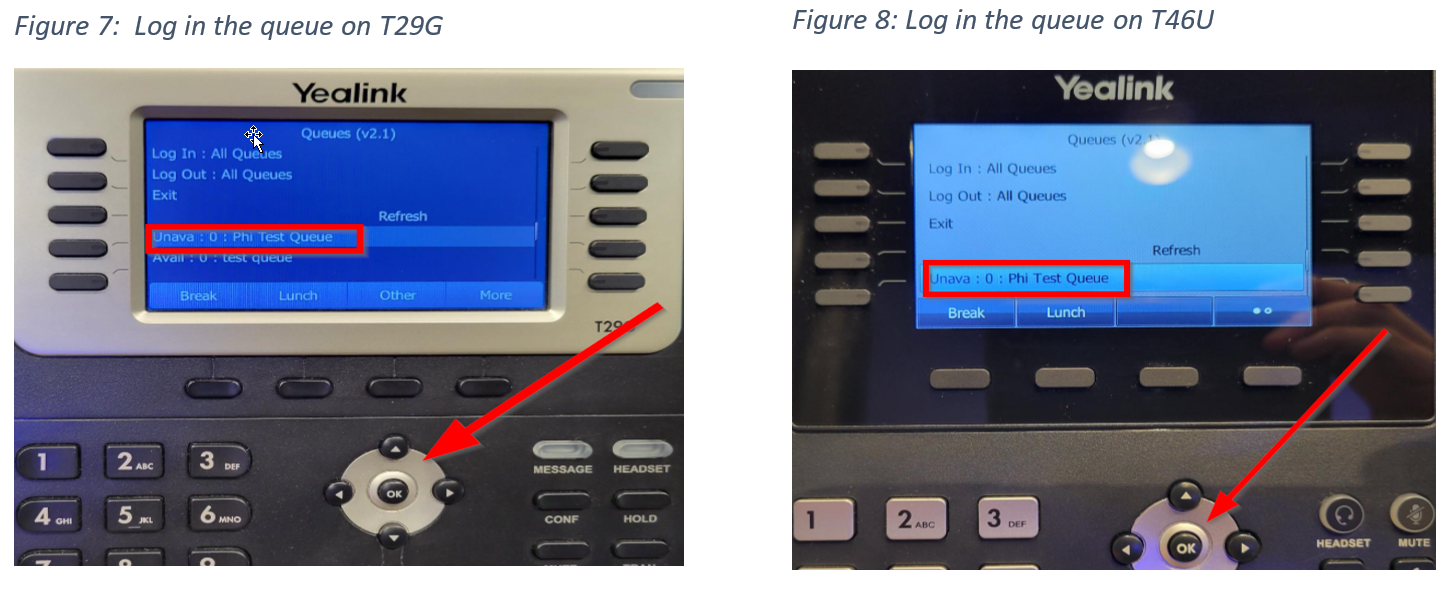
On the Queues screen, you can choose to log in or log out of a specific queue. This is done by using the up and down navigational buttons to select one of the queues you are a part of.
To change your availability in a specific queue, make sure the right queue is highlighted and press the OK button on your phone.
You can also press the Break, Lunch, and Other softkeys to select a specific status.

Use the SpectrumVoIP ES Mobile App
Using the ES Mobile App, you can view and update your status for the call queues you are in. This can be done using the Queue Panel.
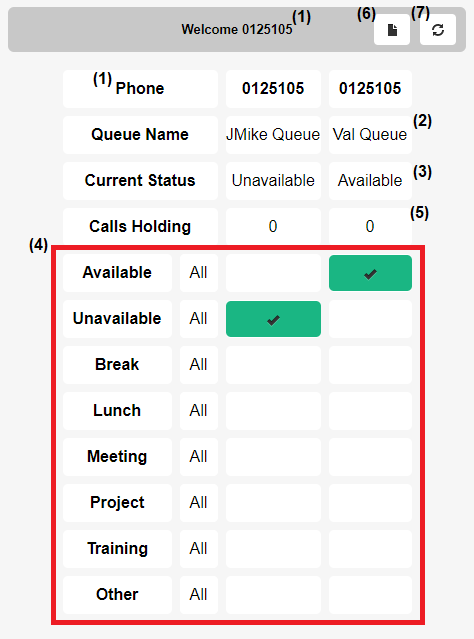
Using this tool, you can…
– View your 7-digit extension number (1).
– Check the call queues you are in (2).
– Look at your Current Status (3) in each queue.
– Adjust your Status (4) for each queue.
– View the number of Calls Holding (5).
– Change the Page Layout (6) of the queue panel.
– Refresh (7) the queue panel to check for any changes.
This tool can be viewed on the Browser  tab.
tab.

Change Your Status
The ES app can be used to adjust your Current Status for the queue you are present in. To do so…
1. Navigate to the Browser  tab.
tab.
2. Tap one of the boxes next to the status you would like to appear as under each queue.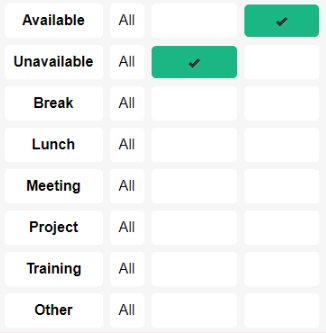
✔ When a status has been selected, the box will change to show it is active like so:

Update Your Agents' Statuses - Enswitch (ES) Admin or Call Center Supervisor Users
As an Enswitch Admin or Call Center Supervisor, you can use the Queue Panel to update the queue status of any agent in any queue.
To update an agent's status…
1. Navigate to Control panel → Queue panel.
Note: It may take a minute or two for everything to load on the page.
2. Click the Options  icon to open the Panel options menu.
3. If you would like this queue(s) to be shown by default anytime the Queue Panel is opened, click the Save options button.
4. In the confirmation prompt, click OK.
5. Minimize the menu by clicking the arrow icon.
6. To change the status of an agent, click the agent and select the status the agent should show as.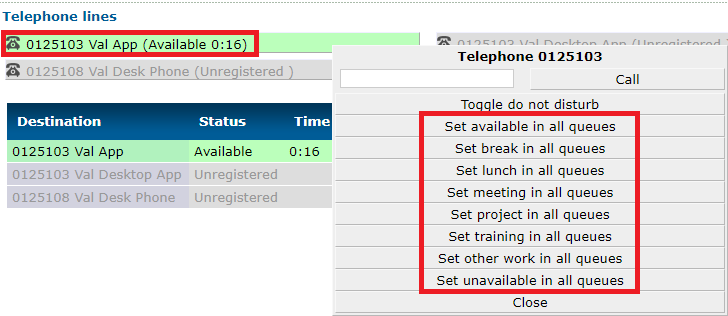
Create Dialable Feature Codes that Set Availability - Enswitch (ES) Admins
Configure a Queue Toggle Feature Code
If you do not have designated users that are set as Call Center Supervisors or Admins, it can be difficult for users to change their status in call queues unless they are using the ES desktop app or mobile app.
As a convenient alternative, a dialable feature code can be created to allow your users to dial a set of numbers to set themselves as either available or unavailable in call queues.
To create a feature code that be used to toggle agents as available/unavailable in queues…
1. In the Enswitch web interface, navigate to Features → Feature codes.
2. Click the New >> button.
3. In the New feature code menu, fill in the following information: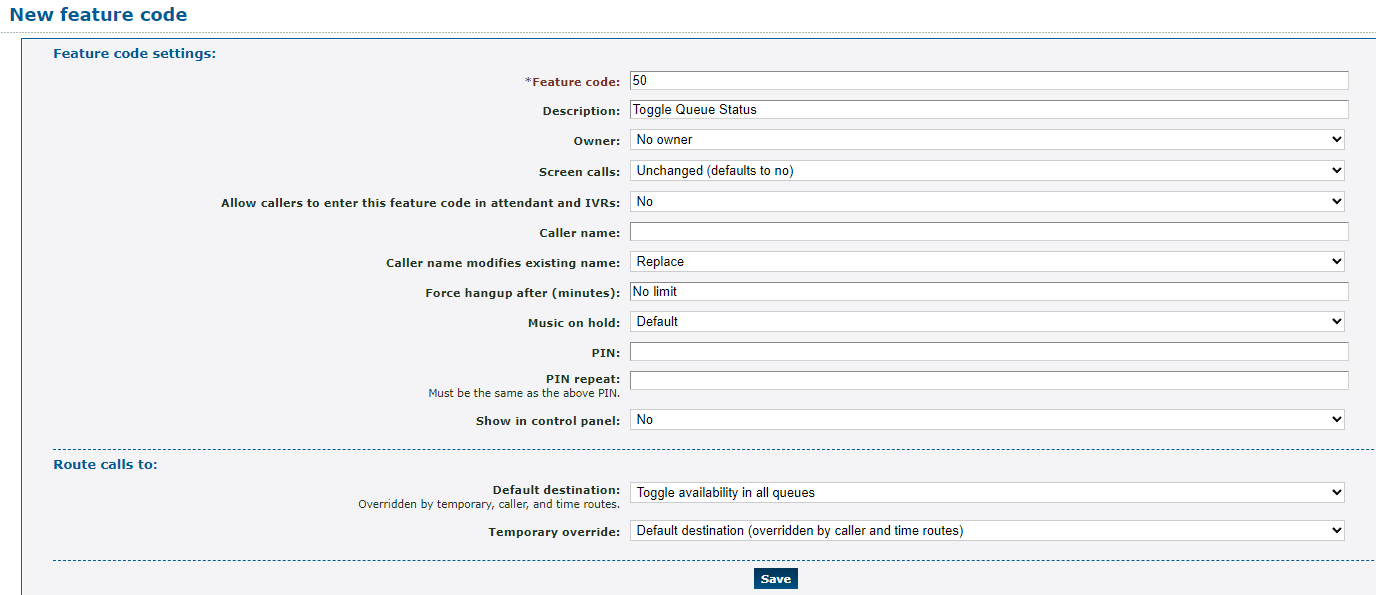
– * Feature code - Type the set of numbers that should be dialed to toggle this feature on and off.
Quick Tip: This code can be any set of numbers, as long as the combination of numbers is unique and does not use a star (*).
DANGER: Do NOT use a N11 number, such as 911, 211, or 411.
– Description - Give the feature code a descriptive name that will show in the Feature codes list.
– Owner - If needed, select a user that should be able to view and change the queue toggle code.
– Allow callers to enter this feature code in attendant and IVRs - Set this feature to No if callers should not be able to dial this code. 
– Default destination - Use the Default destination drop-down to select Toggle availability in all queues.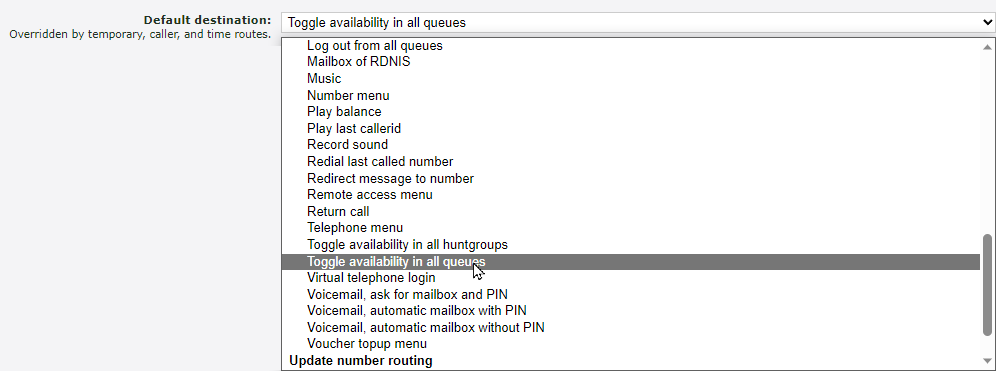
4. Click the Save button.
Create Separate Log In and Log Out Codes
In some call center environments, it may be important to have separate feature codes for users to use to set themselves as available or unavailable in the queues they are in.
Individual login and log out codes can be set up with ease using the Feature Codes page of the Enswitch web portal.
Configure a Queue Log In Feature Code
To create a feature code that sets agents as available when dialed…
1. In the Enswitch web interface, navigate to Features → Feature codes.
2. Click the New >> button.
3. In the New feature code menu, fill in the following information: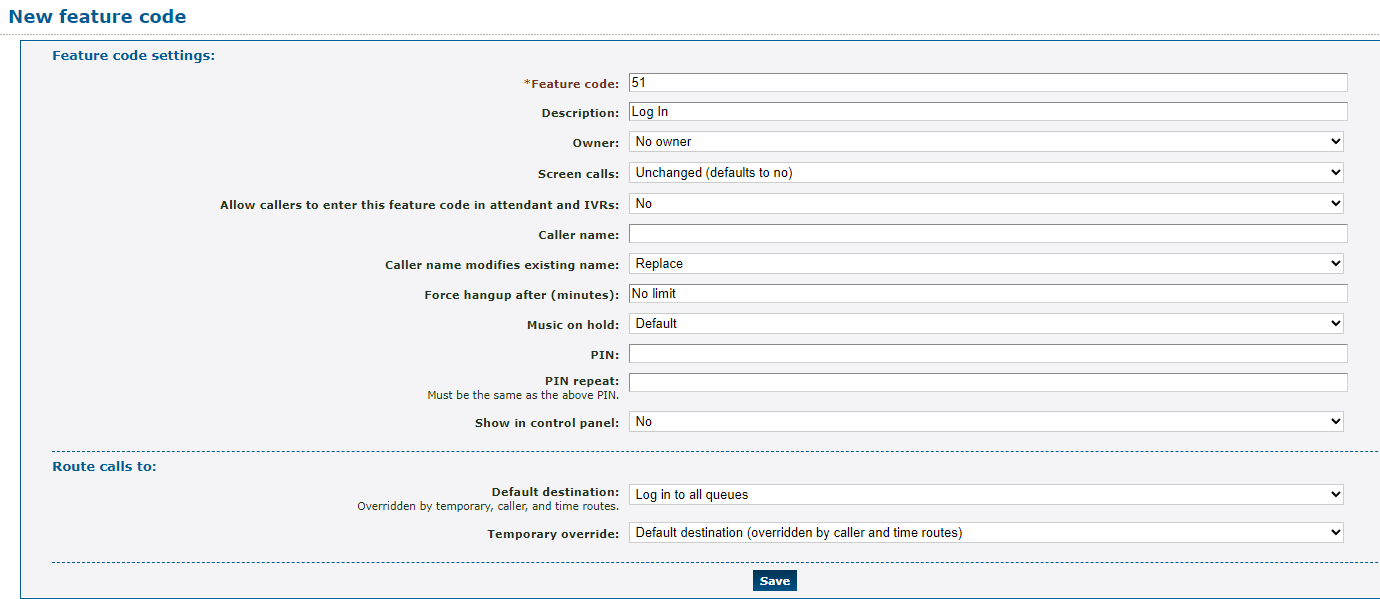 – * Feature code - Type the set of numbers that should be dialed to toggle this feature on and off.
Quick Tip: This code can be any set of numbers, as long as the combination of numbers is unique and does not use a star (*).
DANGER: Do NOT use a N11 number, such as 911, 211, or 411.
– Description - Give the feature code a descriptive name that will show in the Feature codes list.
– Owner - If needed, select a user that should be able to view and change the queue toggle code.
– Allow callers to enter this feature code in attendant and IVRs - Set this feature to No if callers should not be able to dial this code. 
– Default destination - Use the Default destination drop-down to select Log in to all queues.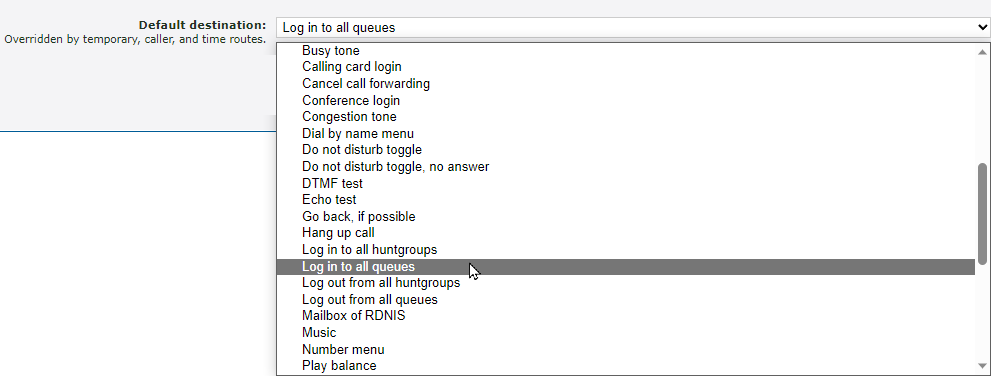
4. Click the Save button.
Configure a Queue Log Out Feature Code
To create a feature code that sets agents as unavailable when dialed…
1. In the Enswitch web interface, navigate to Features → Feature codes.
2. Click the New >> button.
3. In the New feature code menu, fill in the following information: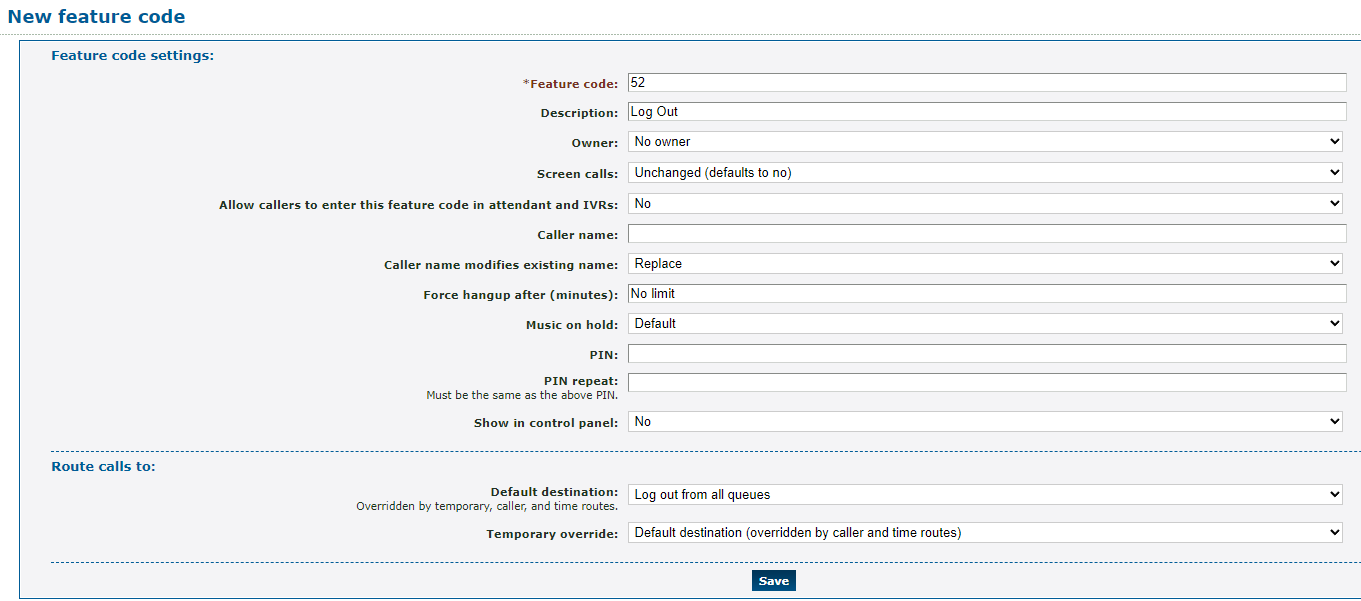
– * Feature code - Type the set of numbers that should be dialed to toggle this feature on and off.
Quick Tip: This code can be any set of numbers, as long as the combination of numbers is unique and does not use a star (*).
DANGER: Do NOT use a N11 number, such as 911, 211, or 411.
– Description - Give the feature code a descriptive name that will show in the Feature codes list.
– Owner - If needed, select a user that should be able to view and change the queue toggle code.
– Allow callers to enter this feature code in attendant and IVRs - Set this feature to No if callers should not be able to dial this code. 
– Default destination - Use the Default destination drop-down to select Log out from all queues.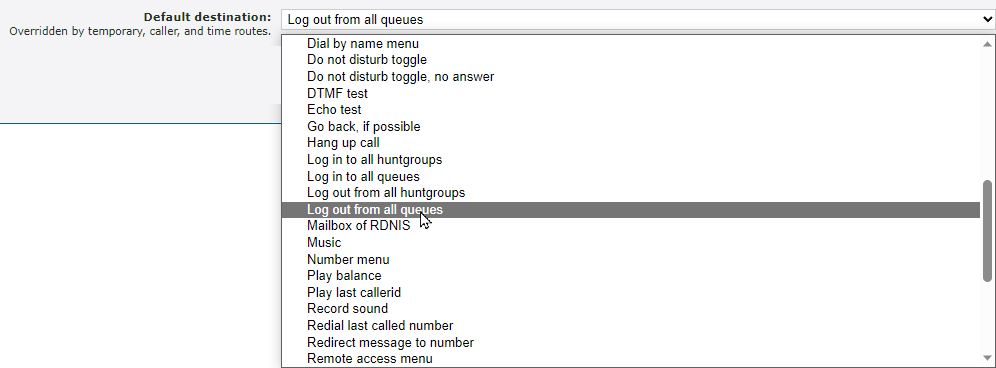
4. Click the Save button.
I Use Do Not Disturb Often
DND (Do Not Disturb) mode can be a valuable tool to use while you are managing calls. DND can be activated using your SpectrumVoIP device or the web portal of your phone system.
Deactivate DND Mode on Your Device
One of the most common ways of using Do Not Disturb is through a SpectrumVoIP serviced device, such as a desk phone, cordless handset, desktop app, mobile app, etc.
Use Dialable Feature Codes to Enable/Disable DND
For Stratus Users
| Star Code | Function | Notes |
|---|---|---|
| *78 | Enable DND | After pressing send, you will hear a voice confirming that Do Not Disturb is enabled. You will not be able to receive incoming calls. Incoming calls will either be sent to your voicemail, move to the next agent (if you are in a call queue), or follow a Busy Forward (if configured). |
| *79 | Disable DND | After pressing send, you will hear a voice confirming that Do Not Disturb is disabled. You will now be able to receive calls. |
For Enswitch Users
– Dial the feature code that has been set up for your account.
Reference the Feature Codes for Your Users as an Admin
Admins of the ES web portal can check the Feature Codes shown for all of their users using the web portal.
To check the feature codes for the whole account…
1. Log into the ES web portal.
2. Navigate to Features → Feature codes.
3. View and take note of the feature codes for your users.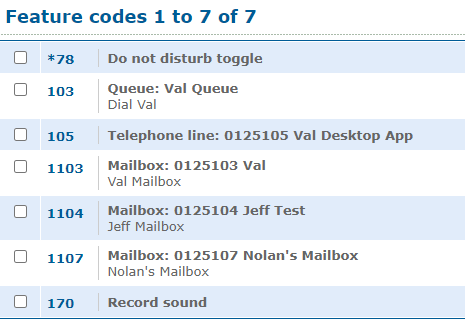
4. If needed, click the Export as .csv button to download this list of feature codes as a spreadsheet that you can keep record of and share with your team.
– If there is not yet a feature code created for your account, you can either…
– Contact our technical support team.
– Read this article to create a DND toggle feature code as an Enswitch admin.
Use Your Yealink Phone's DND Feature
When you need to step away from the phone, you can enable DND (Do Not Disturb) Mode.
While the phone is on DND, the phone will be set as Busy and calls that are received will automatically be sent to voicemail or the destination of a Busy Forward.
Yealink Desk Phone
When DND is enabled, the phone will display a message saying “DND mode is enabled” with an icon showing in the status bar. These icons include:
– 
– ![]()
– ![]()
If you do see that DND is active, you can disable it by pressing the DND softkey.
If you are not sure if DND is enabled, you can check your phone's DND status through the phone's Menu.
To do so…
1. Press the Menu softkey.
2. In the Menu, navigate to Features → 5. DND.
3. In the DND menu, make sure that 1. DND Status is set to Off.
Yealink Cordless Handset
The Red Circle icon with a line through it ( ) on the idle screen indicates that DND mode is activated. You can press the Line soft key when the handset is idle to check the line status. The DND
  icon in the bottom of a line indicates that the DND mode is activated for this line.
If you do see this icon and need to disable DND mode, you can easily do so through your cordless handset's Menu.
1. Press the OK button to enter the main menu.
2. Select Call Features → Do Not Disturb.
3. The LCD screen displays the incoming lines currently assigned to the handset. Press up or down to highlight the desired line. Press the OK soft key.
4. Press left or right to select Disabled from the Status field.
5. Press the OK soft key to accept the change.
Yealink Conference Phone
When DND is enabled, the phone will show a prompt saying “DND mode is enabled” with the DND  icon showing in the status bar.
If you do see this icon and you are ready to begin receiving calls again, do one of the following to disable DND mode:
– Select Exit DND mode from the idle screen.
– Swipe down from the top of the screen to show the Control Center and toggle DND off.
– Navigate to More → Settings → Features → DND.
– Turn off DND Status and tap  .
.
Use Your Poly Phone's DND Feature
Polycom VVX Phone
When you need to temporarily step away from the phone, you can briefly stop receiving calls by turning on DND (Do Not Disturb) mode.
– To turn on DND mode, press More → DND.
– To turn off DND mode, press DND again.
Alternatively, you can press the Home  button and navigate to Features → 1 Do Not Disturb to Enable or Disable DND mode.
✔ While you are on DND mode, your phone will not be receiving calls. You will be marked as busy so calls will either go to your voicemail or be forwarded according to a busy forward that has been configured.
While DND is active, you can still make outbound calls and check your voicemail.
Poly Edge E Phone
When you need to temporarily step away from the phone, you can briefly stop receiving calls by turning on DND (Do Not Disturb) mode.
– To turn on DND mode, press More → DND.
– To turn off DND mode, press DND again.
Alternatively, you can press the Home button and select 6 DND to Enable/Disable DND mode.
✔ While you are on DND mode, your phone will not be receiving calls. You will be marked as busy so calls will either go to your voicemail or be forwarded according to a busy forward that has been configured.
While DND is active, you can still make outbound calls and check your voicemail.
Use Your Fanvil Phone's DND Feature
Toggle DND Mode
When you need to temporarily step away from the phone, you can briefly stop receiving calls by turning on DND (Do Not Disturb) mode.
– To turn on Do Not Disturb, press the DND soft-menu button. 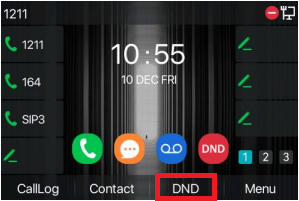
– To turn off DND mode, press the DND soft-menu button again.
Alternatively, you can navigate to Menu → Features → DND and use the 4. State option to either Enable or Disable DND mode.
Use the DND Timer Feature
If you know how long you will need Do Not Disturb enabled, you can set the phone to automatically turn DND off and on using its DND Timer.
To configure the DND Timer feature…
1. Press the Menu soft-menu button and navigate to Features.
2. Select 4. DND and then 2. DND Timer.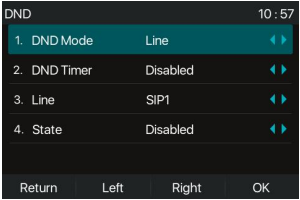
3. Use the left or right navigational buttons to set 2. DND Timer to Enabled.
4. On options 3. DND Start Time and 4. DND End Time, set the times when DND should turn on and off.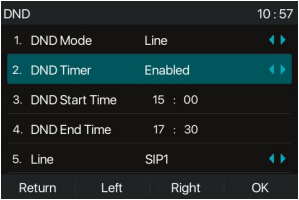 "
"
5. Press the OK soft-menu button.
✔ If DND will only be for that day, make sure to Disable the DND Timer option when you are done using it.
If you would like this DND Timer to repeat daily, leave the DND Timer option Enabled.
Enable/Disable DND on Your SpectrumVoIP Desktop App - Stratus Users
Enable DND Mode
If you need to stop receiving calls temporarily, you can set your answering rules to Do Not Disturb with ease through the desktop app.
To enable Do Not Disturb for your extension…
1. Navigate to the Answering Rules page of the app.
2. Click the Edit  icon next to your main answering rule.
3. In the Edit Answering Rule menu, select Do Not Disturb.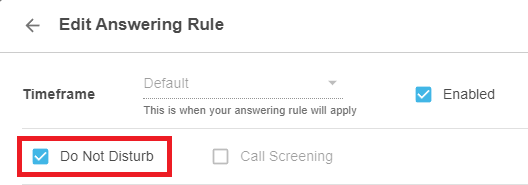
4. Click the SAVE button.
✔ Your main answering rule should not show with a Description of Do not disturb.

Disable DND Mode
Once you are ready to receive calls on the desktop app again…
1. Click the Edit  icon next to your answering rule.
6. Unselect Do Not Disturb.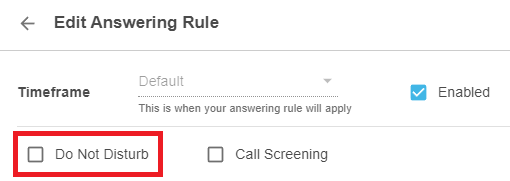
7. Click the SAVE button again.
✔ Your main answering rule should nbe back to normal.

Enable/Disable DND on Your SpectrumVoIP ES Desktop App
If you need to stop receiving calls for any reason, you can turn on Do Not Disturb (DND) mode.
| Icon | Indication |
|---|---|
 |
Do Not Disturb Mode is inactive. |
 |
Do Not Disturb Mode is active. |
To enable Do Not Disturb, click the Busy  icon.
icon.
To disable Do Not Disturb, click the Busy  icon again.
Enable/Disable DND on Your SpectrumVoIP Stratus Mobile App
Enable DND Mode
If you are looking to temporarily log out of the app, it is recommended to set your app on Do Not Disturb.
To enable Do Not Disturb for your app…
1. Tap your name on the top-left of your app.
2. Tap the Do Not Disturb toggle to enable it.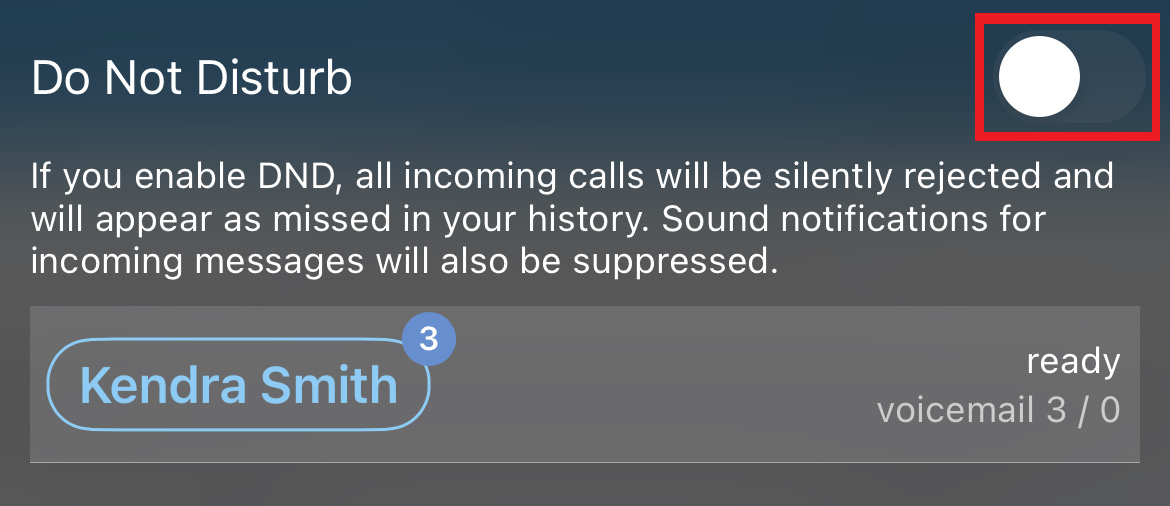
✔ You should now see the DND tag on your name.

Disable DND Mode
To allow your app to take calls again, disable Do Not Disturb by tapping the Do Not Disturb toggle again.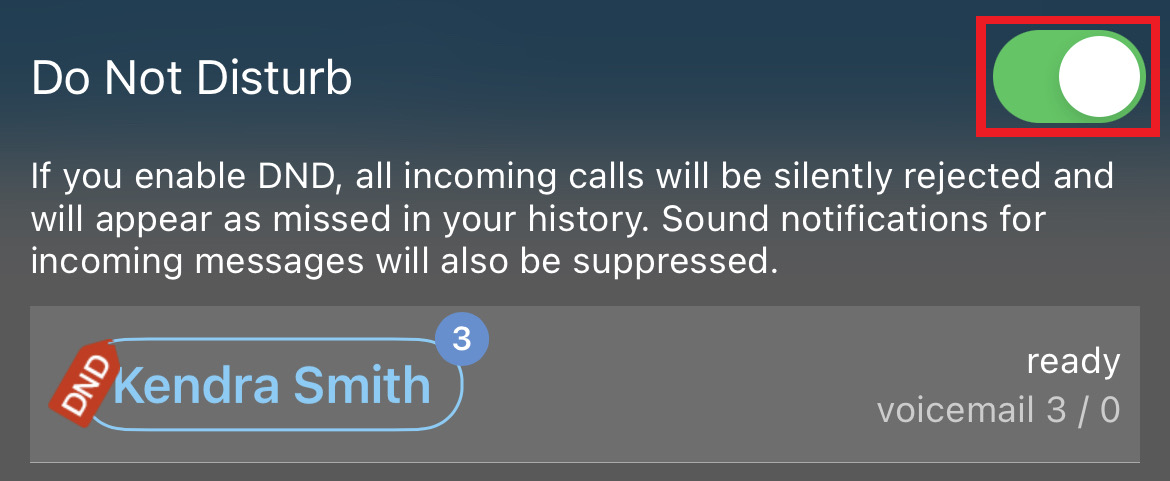
✔ The DND tag should now be removed from your name.

Utilize DND Rules
Whenever you have days and times that you are usually away from the phone, DND (Do Not Disturb) mode can be scheduled to be enabled or disabled ahead of time.
✔ This can be helpful for scheduling your app to be on DND for things like lunch breaks.
View Your DND Rules
To look at your DND rules that have been set…
1. Navigate to the Keypad  tab.
tab.
2. Tap the Settings  icon.
icon.
3. Touch Preferences.
4. Select Do Not Disturb.
✔ Doing so will show the DND Rules section of the app's Preferences.
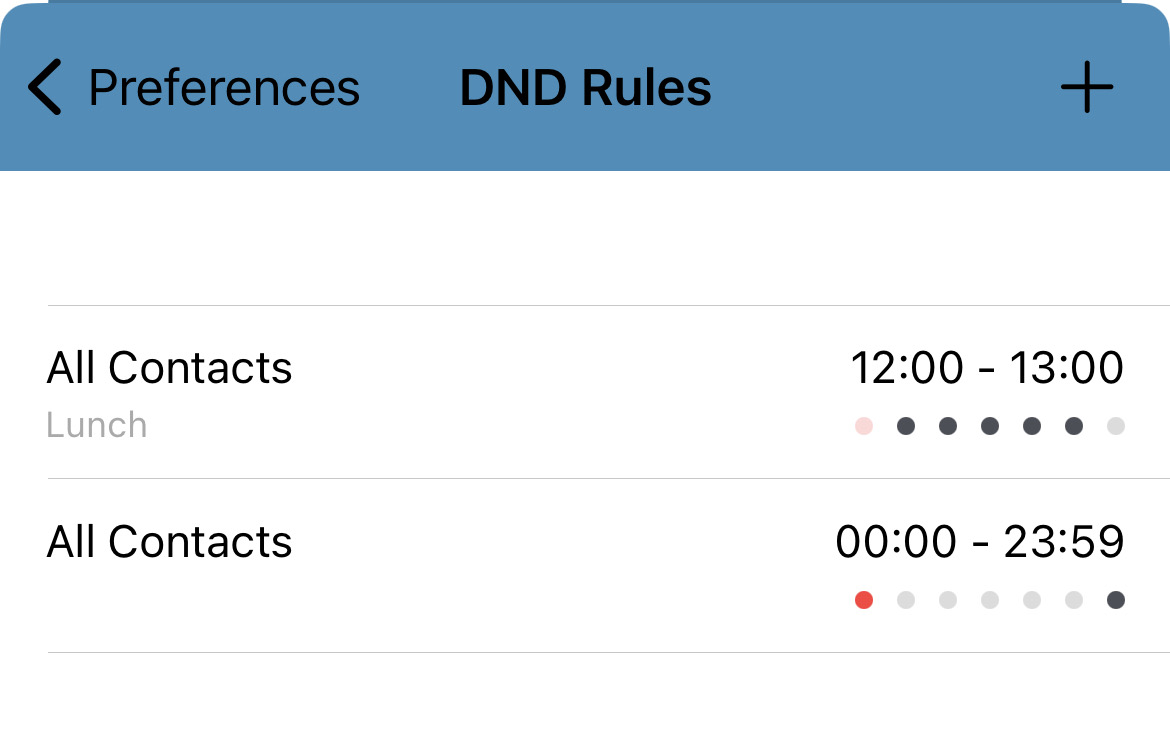
Quick Tip: If there have not been any DND rules added, the DND Rules section will show a message saying “No DND rules defined.”

Create a DND Rule
To add a new DND rule…
1. Tap the Add  icon.
icon.
✔ Now you should see the New DND Rule screen.
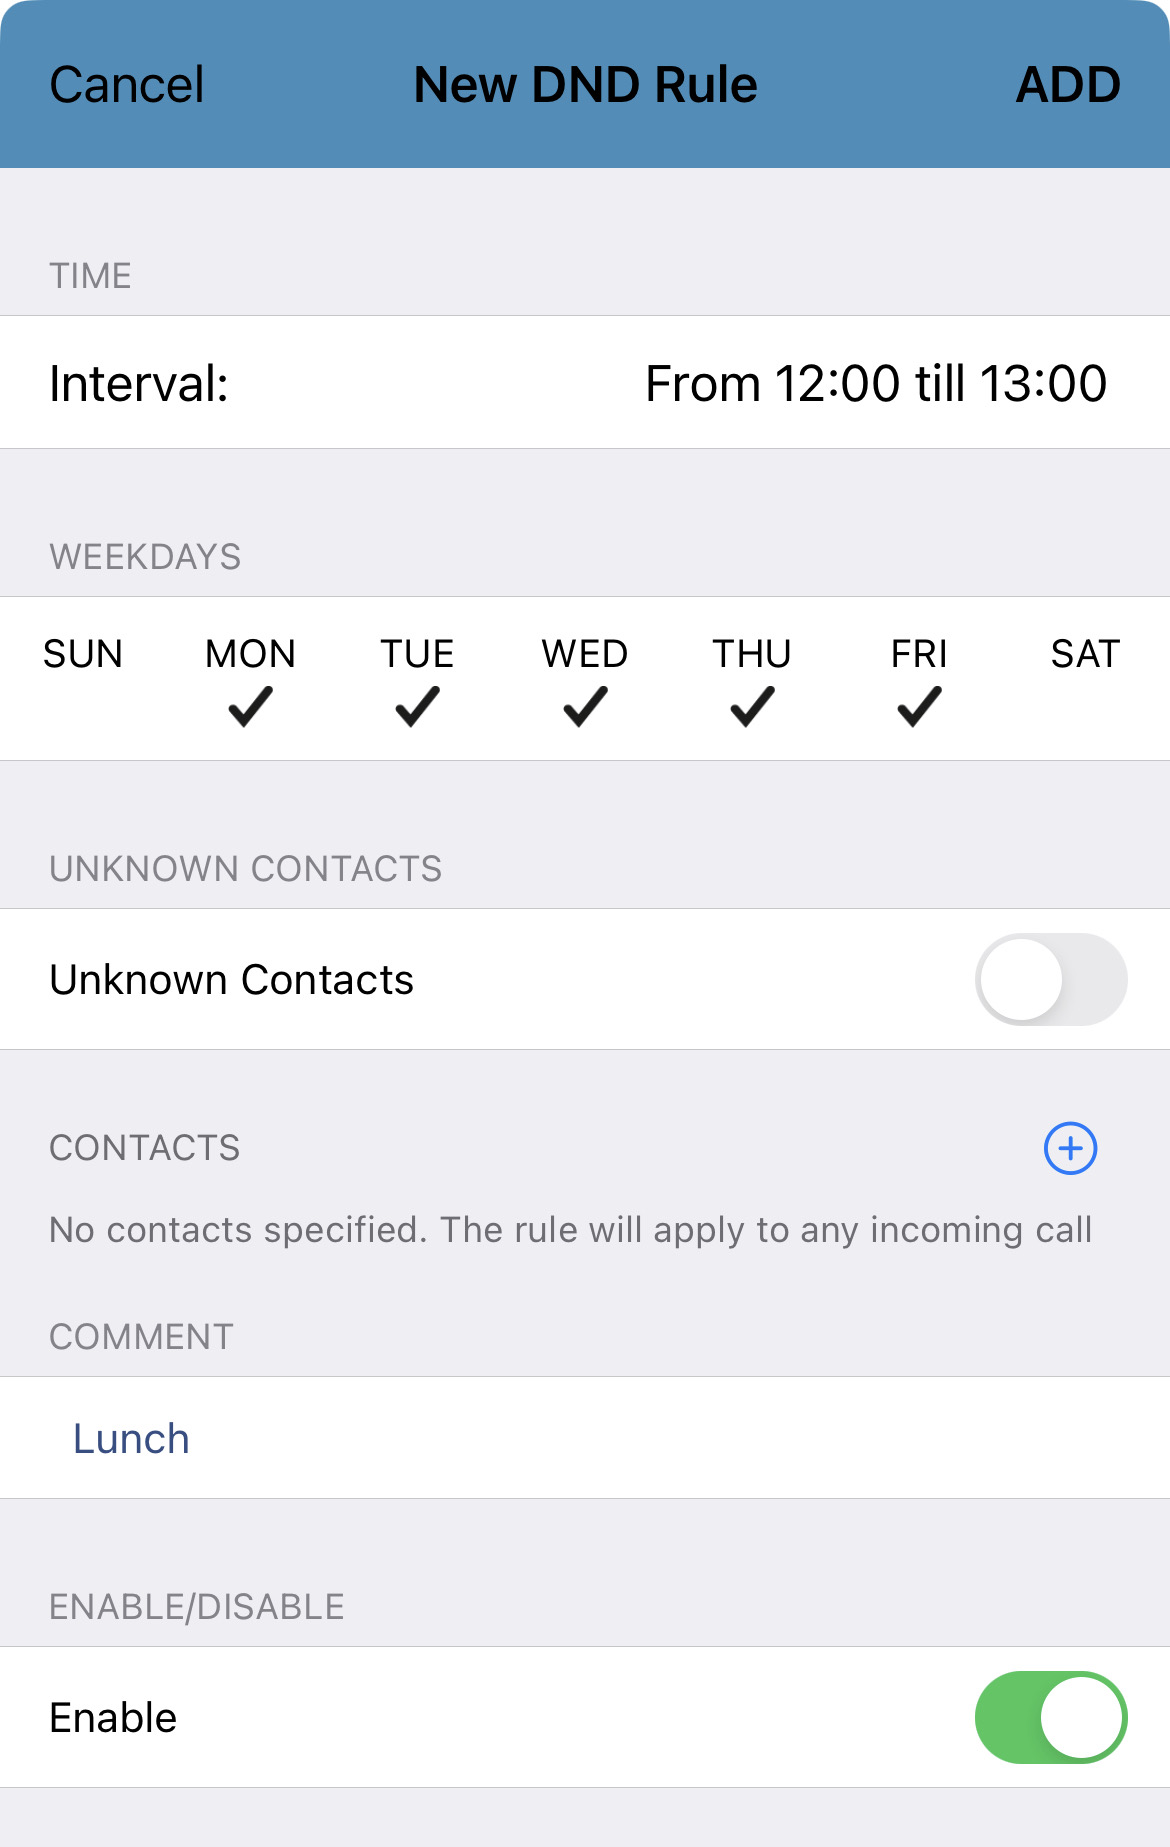
2. In the New DND Rule page, Tap the Interval box to adjust the time frame for when DND will be active/inactive.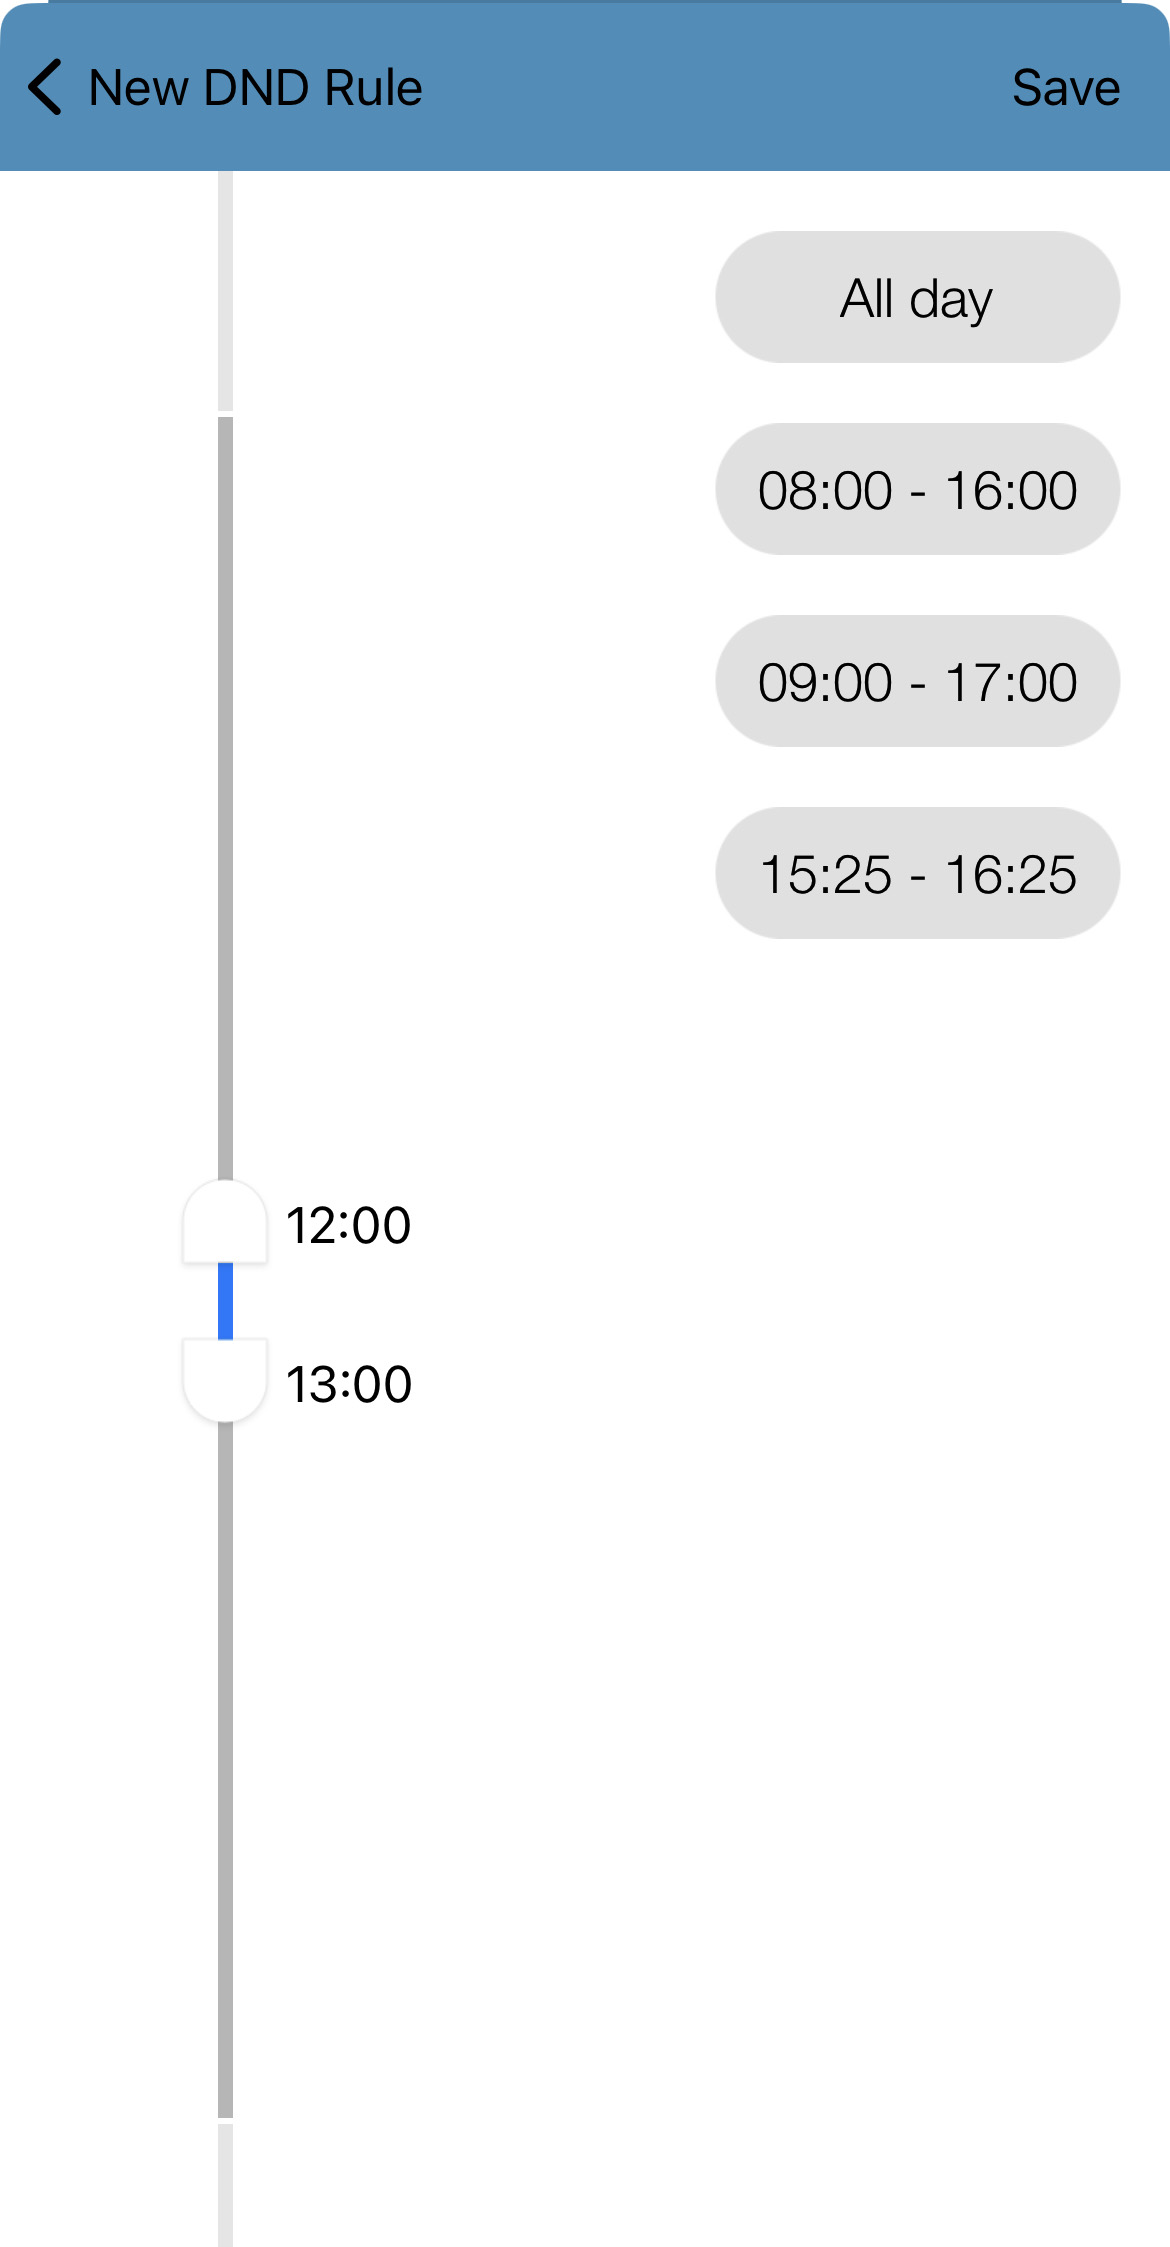
3. Tap Save.
4. In the Weekdays section, tap the days that this DND rule will apply to.
5. If needed, tap the Unknown Contacts toggle to have Unknown Contacts affected by the DND rule.
6. To only have specific contacts affected by the rule, tap the Add  icon to select contacts.
7. In the Comment box, type a description for the rule.
8. In the Enable/Disable section, tap the Enable toggle to have the rule set as active.
9. Tap ADD.
Disable a DND Rule
When a DND rule is no longer needed, the DND Rule can be disabled to allow you to take calls as needed. To do so…
1. Navigate to the Keypad  tab.
tab.
2. Tap the Settings  icon.
icon.
3. Touch Preferences.
4. Select Do Not Disturb.
5. Tap the DND rule that needs to be inactive.
6. In the Enable/Disable section, tap the Enable toggle to ensure it is disabled.
7. Tap Save.
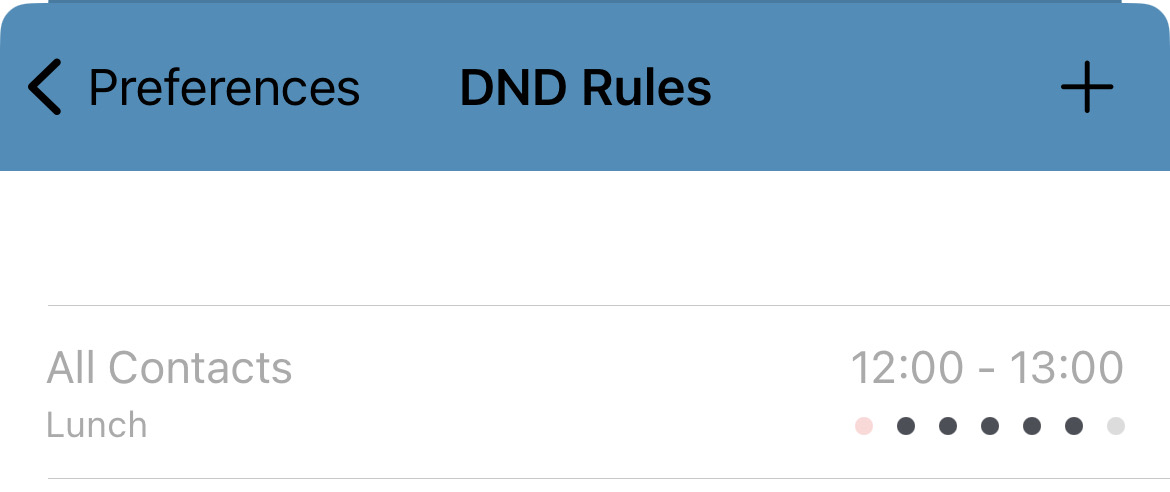
✔ The disabled DND rule will be greyed out:
Enable/Disable DND on Your SpectrumVoIP ES Mobile App
Enable DND Mode
If you are looking to temporarily log out of the app, it is recommended to set your app on Do Not Disturb.
To enable Do Not Disturb for your app…
1. Tap your name on the top-left of your app.
2. Tap the Do Not Disturb toggle to enable it.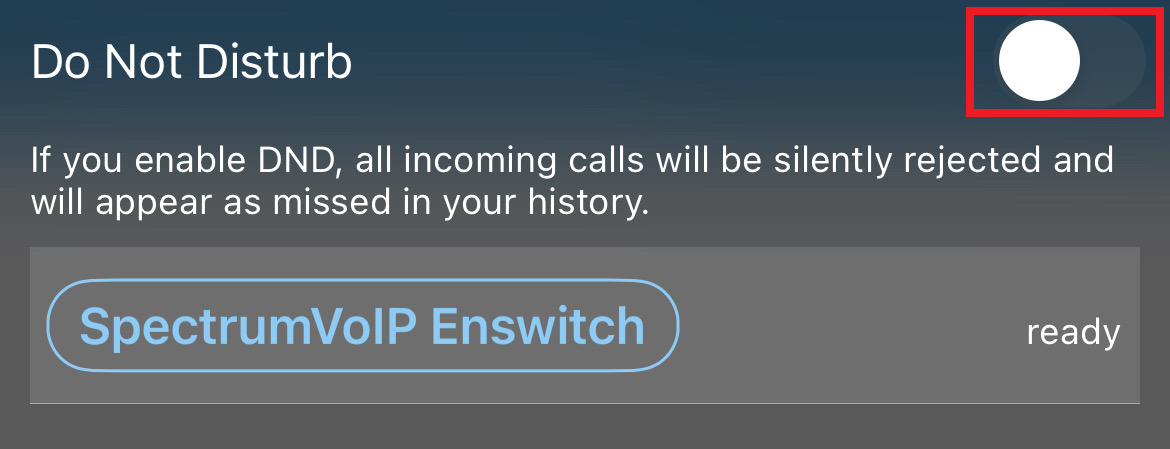
✔ You should now see the DND tag on your name.

Disable DND Mode
To allow your app to take calls again, disable Do Not Disturb by tapping the Do Not Disturb toggle again.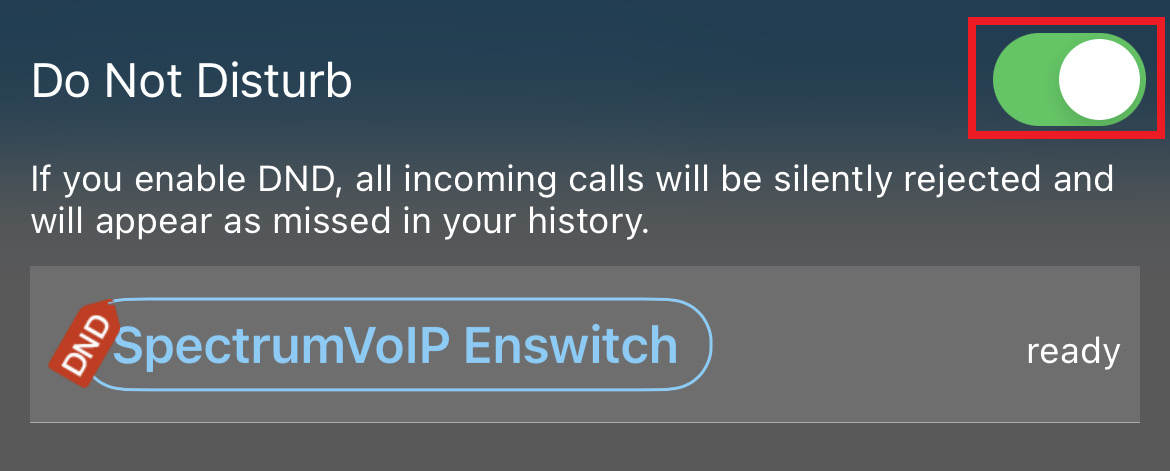
✔ The DND tag should now be removed from your name.

Utilize DND Rules
Whenever you have days and times that you are usually away from the phone, DND (Do Not Disturb) mode can be scheduled to be enabled or disabled ahead of time.
✔ This can be helpful for scheduling your app to be on DND for things like lunch breaks.
View Your DND Rules
To look at your DND rules that have been set…
1. Navigate to the Keypad  tab.
tab.
2. Tap the Settings  icon.
icon.
3. Touch Preferences.
4. Select Do Not Disturb.
✔ Doing so will show the DND Rules section of the app's Preferences.

Quick Tip: If there have not been any DND rules added, the DND Rules section will show a message saying “No DND rules defined.”

Create a DND Rule
To add a new DND rule…
1. Tap the Add  icon.
icon.
✔ Now you should see the New DND Rule screen.

2. In the New DND Rule page, Tap the Interval box to adjust the time frame for when DND will be active/inactive.
3. Tap Save.
4. In the Weekdays section, tap the days that this DND rule will apply to.
5. If needed, tap the Unknown Contacts toggle to have Unknown Contacts affected by the DND rule.
6. To only have specific contacts affected by the rule, tap the Add  icon to select contacts.
7. In the Comment box, type a description for the rule.
8. In the Enable/Disable section, tap the Enable toggle to have the rule set as active.
9. Tap ADD.
Disable a DND Rule
When a DND rule is no longer needed, the DND Rule can be disabled to allow you to take calls as needed. To do so…
1. Navigate to the Keypad  tab.
tab.
2. Tap the Settings  icon.
icon.
3. Touch Preferences.
4. Select Do Not Disturb.
5. Tap the DND rule that needs to be inactive.
6. In the Enable/Disable section, tap the Enable toggle to ensure it is disabled.
7. Tap Save.
✔ The disabled DND rule will be greyed out:

Check the Web Portal
Do Not Disturb can also be activated through the web portal of your phone system. Follow the subsections below to check if DND mode is active so that you can disable it based on the web platform you use.
Stratus Users
If you use Do Not Disturb through the web portal, you can check to see if Do Not Disturb was left active through your Answering Rules.
To check this…
1. On the Home page, check the ACTIVE ANSWERING RULE section to see if Do not disturb is active.
2. If Do not disturb is showing, navigate to the Answering Rules page.
3. Next to your main answering rule, click the Edit  icon.
icon.
4. In the Edit Answering Rule menu, unselect Do not disturb.
5. Click the Save button.
✔ You should now see your main answering rule returned to normal.

Enswitch (ES) Users
If you use Do Not Disturb through the web portal, you can check to see if Do Not Disturb was left active through your Telephone Line's settings.
To check this…
1. Navigate to Features → Telephone lines.
2. Click the 7-digit extension number of the device.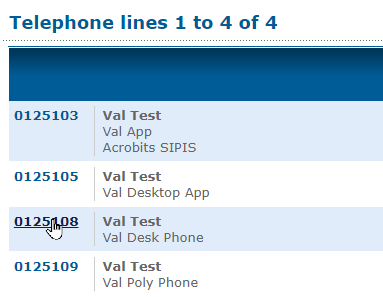
3. In the Settings section, check to see if Do not disturb is set to Refuse calls.
4. If calls are being refused, use the Do not disturb drop-down to select Accept calls.
5. Click the Save button.
I Enabled a Call Forward for Only My Phone
When you are not available to take calls, you can have calls forwarded elsewhere instead of having the caller leave a voicemail. Using a call forward can be useful for when you are out of the office, out in the field, or experiencing issues using your SpectrumVoIP devices.
On the Web Portal
One way call forwards can be set up is through the web portal of the phone system you utilize. Follow the subsections below to check for any forwarding and correct that routing based on the web platform you use.
Stratus Web Portal Users
Dial a Code
| Feature Code | Function | Description and Examples |
|---|---|---|
| *72 + <extension or 10 or 11-digit telephone number> | Set Forward Destination | Dial *72100 to forward all calls to extension 100 until the forwarding is disabled. Dial *725551234567 to forward all calls to the example phone number of (555) 123-4567. |
| *73 | Disable Forwarding | Dial *73 to disable any forwarding that is active. |
Use the Web Portal
If you have configured and enabled a temporary forward before for your own extension, you can disable it at any time in the Answering Rules page.
To disable a forward you have configured…
1. Navigate to the Answering Rules page.
2. Check to see if there is an le that is Active.
2. Click the Edit  icon next to that forwarding rule.
3. Deselect the Enabled box.
4. Click the Save button.
5. Place a test call to yourself to confirm that calls are routing normally.
Stratus Web Portal Admins
As a Stratus admin user, you can check to see if any of your users has any forwarding active in their own answering rules.
To disable an answering rule that is actively forwarding a user's calls…
1. Navigate to the Users page.
2. In the search bar, type either the name or extension number associated for the user.
3. Click the Edit icon and select Answering Rules.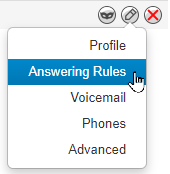
4. Check to see if there is an ing rule that is Active.
5. Click the Edit  icon next to that answering rule.
6. Deselect the Enabled box.
7. Click the Save button.
8. Place a test call to the user's extension number to confirm that calls are routing normally.
Enswitch (ES) Web Portal Users
Disable Forwarding for Your Phone Number
As an Ensiwtch user that is set as an owner of a phone number by an Enswitch admin, you can forward your phone number's calls. If you have forwarded calls in this way, you can use the web portal to ensure that forwarding is no longer active.
To disable temporary forwarding set on your own phone number…
1. Navigate to Features → Numbers.
2. Select the phone number that needs to temporarily be forwarded.
3. In the Route calls to section, use the Temporary override drop-down to select Default destination (overridden by caller and time routes).
4. Click the Save button.
5. Place a test call to your phone number confirm that calls are routing normally.
Disable Forwarding on Your Telephone Line
If you do not have calls forwarded through a phone number, your telephone line (extension number) can have calls forwarded instead. If you have forwarded calls in this way, you can use the web portal to ensure that forwarding is no longer active.
To disable temporary forwarding set for your telephone line…
1. Navigate to Features → Telephone lines.
2. Click your 7-digit extension number.
3. In the Forward to section, clear the All Calls, without ringing telephone, to number box.
4. Click the Save button.
5. Place a test call to extension number to confirm that calls are routing normally.
On the Phone Itself
Your IP desk phone will give you three options of forwards to configure to ensure your calls are being answered when your phone is not available to be answered in certain conditions.
These forwards include…
- An always or unconditional forward
- A busy forward
- An unanswered forward
When an always/unconditional forward is enabled, any calls to your phone will be immediately forwarded to the forward's destination. When your phone should receive calls again, the always/unconditional forward will need to be disabled.
✔ Setting an always or unconditional forward can be useful when you need to step away from your phone for a period of time.
Disable a Call Forward on a Yealink Phone
Your Yealink phone will give you three options of forwards to configure to ensure your calls are being answered when your phone is not available to be answered in certain conditions.
If you have set up and enabled an Always forward, then that forward will need to be disabled in order for calls to ring your phone again.
Yealink Desk Phones
1. Press the Menu button.
2. Select 2. Features, and then the 1. Call Forward option.
3. Select Always Forward.
4. On the first line, set the forward to Disabled using the left or right arrow buttons.
5. Press the Save button to start accepting calls again.
Yealink Cordless Handsets
1. Press the OK button to access the Main Menu.
2. In the Main Menu, select Call Features → Call Forward.
3. In the Call Forward menu, select your extension number.
4. Select the type of forward that is active and needs to be disabled.
5. Use the left and right navigational button to select Disabled.
6. Press the OK button or the Save softkey to confirm the change.
Yealink Conference Phones
1. Navigate to More → Settings → Features → Call Forward.
2. Select Always Forward.
3. Turn off the Always Forward.
4. Tap  .
.
Disable a Call Forward on a Poly Phone
Your Poly phone will give you three options of forwards to configure to ensure your calls are being answered when your phone is not available to be answered in certain conditions.
If you have set up and enabled an Always forward, then that forward will need to be disabled in order for calls to ring your phone again.
Polycom VVX Phones
1. Press More → Forward.
Quick Tip: Alternatively, press the Home  button and select Forward.
2. Select Always Forward.
3. Press the Disable softkey.
Poly Edge E Phones
1. Press More → Forward.
Quick Tip: Alternatively, press the Home  button and select Forward.
2. Select Always Forward.
3. Press the Disable softkey.
Disable a Call Forward on a Fanvil Phone
Your Fanvil phone will give you three options of forwards to configure to ensure your calls are being answered when your phone is not available to be answered in certain conditions.
If you have set up and enabled an Unconditional forward, then that forward will need to be disabled in order for calls to ring your phone again.
To disable an enabled Unconditional forward…
1. Press the Menu soft-menu button.
2. Navigate to Features → Call Forward.
3. Select the option that shows your n number.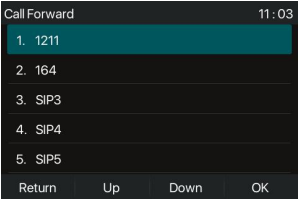
3. Select 1. Unconditional.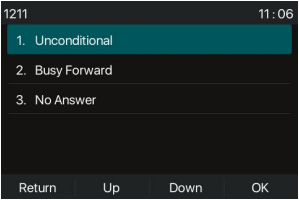
4. Set the first option to Disabled to turn off that forward.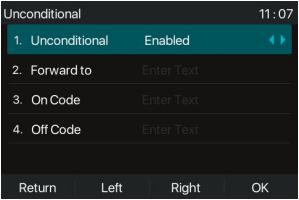
5. Press the OK soft-menu button.
I Recently Forwarded All Calls for a Phone Number
If you recently used the web portal to forward calls for a certain location or your whole business, you can check that forwarding and disable it if needed. Follow the subsections below to check for any forwarding and correct that routing based on the web platform you use.
Stratus Admin Users
As an admin in Stratus, you have the ability to forward calls coming in to one of your phone numbers. If you have forwarded calls for a certain phone number, you have the ability to disable that forwarding whenever that forwarding becomes obsolete.
To check your routing and disable any forwarding…
1. Navigate to the Users page.
2. If you are using an Inbound Routing User, use the search bar to find and select the name or extension number of the inbound routing user.
Quick Tip: Your call routing may not use an inbound routing user.
This can be checked by…
1. Navigating to the Inventory page.
2. Locating your main phone number in the list and checking that extension number is shown as the Destination.
Other types of users that can be used for a business' call routing include:
– Call Queues
– Auto Attendants
– A specific user
3. Click the Edit  icon next to the inbound routing user and select Answering Rules.
4. Check to see if there is any forwarding that is Active.
5. Click the Edit  icon next to that forwarding rule.
6. Deselect the Enabled box.
7. Click the Save button.
8. Place a test call to yourself to confirm that calls are routing normally.
Enswitch (ES) Admin Users
As an admin in the Enswitch web portal, you have the ability to decide how and where your phone numbers route calls. Whenever calls need to be forwarded, you can forward one of your phone numbers to another destination using either a temporary override or a time route.
Use the following subsections to disable any forwarding for your phone number depending on how you have forwarded calls.
Used a Temporary Override
1. Navigate to Features → Numbers.
2. Click your main phone number that shows Temporary routing.
3. In the Route calls to section, use the Temporary override drop-down to select Default destination (overrides by caller and time routes).
4. Click the Save button.
✔ You should now see that phone number listed without the Temporary routing tag.

5. Place a test call to your phone number to confirm calls are routing correctly now.
Used a Time Route
1. Navigate to Features → Numbers.
2. Select your main phone number.
3. In the Time routes section, click Edit time group next to the last forwarding time route you used.
4. In the Time periods section, select the time period that needs to be removed and click the Delete selected button.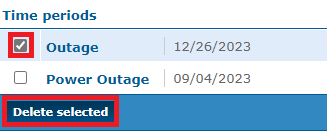
5. In the confirmation prompt, click OK.
✔ You should now see that time period removed from the list.

6. Place a test call to your phone number to confirm calls are routing correctly now.
My Phone Cannot Place or Receive Calls
If your phone is unable to place or receive calls, then that phone could be experiencing technical issues that are preventing it from receiving service or an internet connection.
Every Phone Says No Service
If every phone says there is no service, it is recommended to check a PC, or another device connected to the same internet network, to see if you may be experiencing an internet outage.
If every device that connects to the internet is unable to connect, then it is recommended to give your router a reboot. If you have your phones connected to a switch, then rebooting the switch can also help. A power cycle can help resolve many different technical issues.
Technical issues that can cause issues with the connections of your phones include:
- Internet connectivity issues: A stable and reliable internet connection is crucial for the proper functioning of a VoIP phone. Slow internet speeds, unstable connections, or connectivity issues can cause poor call quality, dropped calls, or inability to make calls.
- Router or modem problems: VoIP phones rely on routers and modems to communicate over the internet. If these devices are not set up correctly, or if they are experiencing problems, it can cause issues with the VoIP phone.
- Firewall restrictions: Firewalls can block VoIP traffic, causing calls to fail or have poor quality. If the firewall settings are too restrictive, it may be necessary to adjust them to allow VoIP traffic.
- Power supply issues: If the VoIP phone is not getting enough power, it may not work properly. This can be due to a faulty power adapter, a dead battery, a faulty outlet, or other power supply issues.
- Network congestion: If the network is congested with too much traffic, it can cause delays and quality issues with VoIP calls. This can be due to a large number of devices on the network, or high levels of network activity during peak hours.
If a reboot does not restore service to your devices, then it is recommended to contact your Internet Service Provider, Managed Service Provider, or IT team to report an outage.
You can contact our Technical Support team to have your calls forwarded while your devices are offline.
If your other devices are connected but the phones are not after rebooting your network equipment, contact our Technical Support team so that the issue can be explored further.
Only My Phone Says No Service
When only your phone seems to be having issues, there are steps you can take to further explore and diagnose your phone's connection issue.
Check for an IP Address
If only your phone is unable to make or receive calls, check the Status page of the phone to see if there is an IPv4 Address.
Check out these articles to learn how you can find the IP address of your model of IP phone:
- Yealink: Find the IP Address, MAC Address, and Firmware Version of a Yealink Phone
- Polycom VVX: Finding the IP Address of a VVX Polycom Phone via the Menu
- Poly Edge E: Find the IP Address of a Poly Edge E Phone
- Fanvil: Find the IP Address of a Fanvil Phone
Phone is Having a Registration Issue
If the phone does show an IPv4 address or gives you a busy signal and then says, “Invalid Account”, then there may be a registration issue for the phone. Please contact our technical support team to troubleshoot the registration issue further.
Phone is Having Connection Issues
If your phone does not show an IPv4 address, then the phone may be having issues connecting to the internet. Follow the sections below to further troubleshoot the issue.
Troubleshoot the Ethernet Connection
Examine the ethernet cable for any damage like fraying, cuts, exposed wiring, etc. If the cable has signs of damage, you can…
- Replace the damaged cable with an undamaged ethernet cable.
- As a temporary connection solution, connect the phone to a wireless network as the cabling is being replaced.
- If there is no other way to connect the phone, contact our technical support team to have the calls forwarded, or follow this guide for forwarding on either the Stratus or Enswitch platforms.
If the cable is in good condition, make sure the cable is snugly plugged into the Internet port of the phone and the network's equipment. If the cable is in the wrong port, ensure it is firmly plugged into the Internet port.
Relocate the Phone
Since our phones rely on a healthy internet connection on your network, any issues on the networks can cause issues. To narrow down where the cause of the connection issue might lie, move the affected phone to the spot of a working phone.
If the phone works and obtains an IP address at the other location, then the issue may have to do with where the phone is being plugged into and not the phone itself. We recommend trying to:
- Use a different ethernet cable.
- Moving the affected phone to the spot of a working phone.
-
See if the network equipment the device was connected to is having any issues.
- A port may be dead, which can be confirmed by moving the ethernet cable into a different port on the network device.
-
If all devices connected to the device are down, then the network device may be having issues.
Note: For any issues with your network's equipment that has not been provided by SpectrumVoIP, we recommend contacting either your ISP (Internet Service Provider), Managed Service Provider, or IT team.
If we provide support to a Mikrotik or switch on-site, we recommend rebooting the devices and contacting our technical support team after the reboot.
-
Check the affected area's wall ports and wiring in your building for any issues.
Note: We recommend contacting your IT team, Internet Service Provider, or an electrician to check any wiring on-site.
