Enswitch - Set Up an IVR (Phone Tree)
Learn how you can create and set up an automated IVR menu to help route callers to different destinations.

Written by Adrian Angwenyi
Updated at May 7th, 2024
Table of Contents
Configure an IVR Menu
✔ Using an IVR menu can help organize your call flow and give your callers the power to choose how their call should be handled.
Step 1: Create or Edit an IVR Menu
- Sign into your web portal.

- Navigate to Features → IVR menus.

- If this will be a new IVR, click the New button. If you will be editing an existing IVR, click on the name of the IVR menu being adjusted.
- In the IVR settings section, fill in the following information. Any field marked with * is required.

| Option | Description |
|---|---|
| * Name | Type in a unique name for the IVR. |
| Description | Type in a brief description of this IVR that will be displayed beside its name. |
| Allow callers to enter feature code of telephone line | Select whether or not callers should be allowed to interrupt the IVR's message by typing a feature code or a user's extension number. |
| Time out after | Select how long the IVR should wait for a response before timing out and following the Time out destination option. |
|
PIN for IVR setup menu & PIN repeat |
If this IVR should only be accessed by callers that have a PIN, use this box to type in a PIN that secures this IVR. ✔ This option is commonly used for IVRs that are meant for internal use only. |
| Show in control panel |
Choose whether or not this IVR's activity should be shown in the Control Panel page. ✔ Enabling this option will allow calls to be dragged and transferred to the IVR Menu using the Control Panel page. |
- In the Destinations section, use the drop-down menus to select what will happen when a caller selects that option on their dial pad.
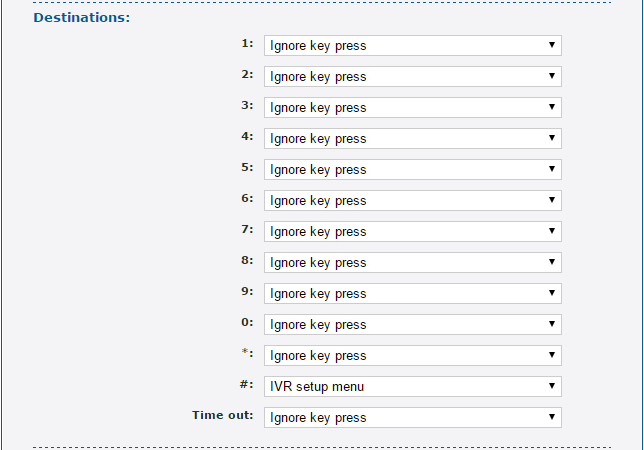
While there are many destinations that can be used for the dial pad options, the most commonly used ones are…- Number - Forward the caller to an outside number, like a cellphone or remote call center.
- Telephone line - Direct the call to a user's extension.
- Mailbox - Forward a caller directly to an extension's mailbox.
- Queue - Direct the call to a call queue that has been set up.
- Hunt group - Direct the call to a hunt group that has been set up.
- IVR menu - Forward the call to another IVR menu.
- Feature Code - Forward the call to a feature set on a feature code. This option is commonly used to play Messages that are accessed through a Feature Code.
- Use the Time out dropdown to select the exit option for calls that do not respond within the amount of time selected in the Time out after setting.
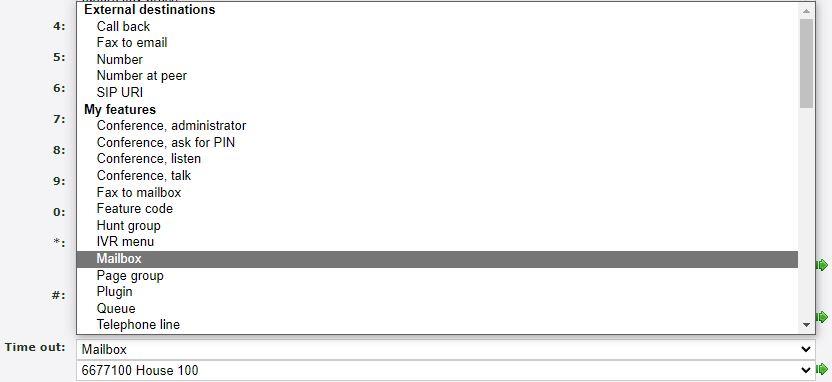
- If needed, use the second drop-down menu that appears to specify where exactly the call will be sent.
- Once any adjustments have been made, click the Save button and then click Return to the list of IVR menus.
Step 2: Set Up a Recorded Greeting for an IVR
To allow callers to know what their options are in an IVR, a message will need to be set in the IVR menu.
To do this…
- Click the name of the new or existing IVR menu.
- Record a greeting to be used in the IVR Menu by etiher…
- Dialing 170# on any desk phone and record a greeting.
✔ With this method, the greeting that is recorded is automatically formatted and uploaded to the Sounds subsection of Features. This allows the sound file to easily be selected for use.
- Record a greeting using an audio recording program on one of your devices, and then select Choose File to upload the recording to the IVR.
✔ This method allows you to use recordings you have create through a professional recording firm.
DANGER: The sound file needs to be in a WAV file, mono channel, and 8000 Hz format to be properly read in the phone system.
To convert your audio file, use this handy website:
- Dialing 170# on any desk phone and record a greeting.
- Select a recorded greeting by either…
- If you dialed 170# to record a greeting, use the Sound file to use dropdown to select the new recording.
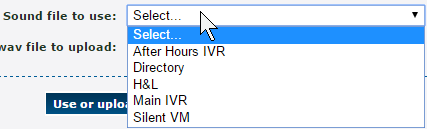
- If you have a pre-recorded greeting, click the Use or upload button to select the greeting's audio file from your PC.
- If you dialed 170# to record a greeting, use the Sound file to use dropdown to select the new recording.
- Confirm the greeting you are using sounds correct by clicking the Download button to download the current recording onto your computer as a .wav for you to listen to.
Step 3: Route a Phone Number to the IVR Menu
- Navigate to Features → Numbers.
- Select the phone number that will route callers to the new IVR menu.
- There are different ways you can add an IVR into a number's routing:
Always Route Calls to the IVR
1. In the Route calls to section, use the Default destination dropdown to select IVR menu as the destination.
2. When prompted, select the name of the IVR menu that should be used.
3. Click the Save button.Only Route Calls to the IVR for a Certain Date or Time
1. In the Time Routes section, click the Add a time route button.
Quick Tip: If you already have a time route created for the number, click the name of an existing time route and skip to step 3.
2. Use the Time group drop-down to select an existing time group that has been created in Features → Times and dates.
3. Use the Forwards matching calls to dropdown to select the IVR menu destination option.
4. Use the second dropdown to select the name of the IVR menu.
5. Click the Save button.Only Route Calls from Certain Phone Numbers to the IVR
1. In the Caller routes section, click the Add a caller route button.
2. Use the Caller number prefix box to type the whole or start of the caller's phone number that will be routed to the IVR menu.Quick Tip: If only callers with a certain phone number should follow this routing, type the whole phone number.
If you would like callers from a certain area code to be routed to this IVR, type in the area code.
If you would like all callers with Unknown caller IDs to be routed to this IVR menu, leave the box blank.
3. In the Description box, type a brief description of the caller route.
4. Use the Forward matching calls to dropdown to select the IVR menu destination option.
5. Use the second dropdown to select the name of the IVR menu.
6. Click the Save button.