Enswitch - Route a User's Calls to a Phone Number
Learn how to efficiently route a user's calls to a specific phone number in the Enswitch web portal.
Table of Contents
Forward a User's Calls to a Phone Number
When a user needs their calls routed to a telephone number, this can easily be done depending on how exactly those calls route to the user and how they should be forwarded.
Two ways that callers can be routed to a user is:
- Using a Direct Inward Dialing (DID) number that directly dials the user.
- Using a Feature Code that routes internal or transferred calls to the user.
If the user is using a DID number, then that DID can be forwarded to another phone number. A user's feature code can be routed to a phone number instead of their telephone line.
Forward a User's DID Number
Scope: Enswitch Admins have the ability to edit the routing of any phone number.
Basic Enswitch Users can edit a phone number's routing if they are set as the Owner of that phone number by an Enswitch Admin.
One option for routing a user's call is a Direct Inward Dialing (DID) number. If a user already has one, you can reroute that DID to route calls to the user's call queue instead of a specific device's telephone line.
- Navigate to Features → Numbers.
- Click the user's phone number.

- Follow the following subsections depending on how calls should be forwarded.
Forward Calls Indefinitely
If this phone number will be forwarding to another phone number indefinitely…
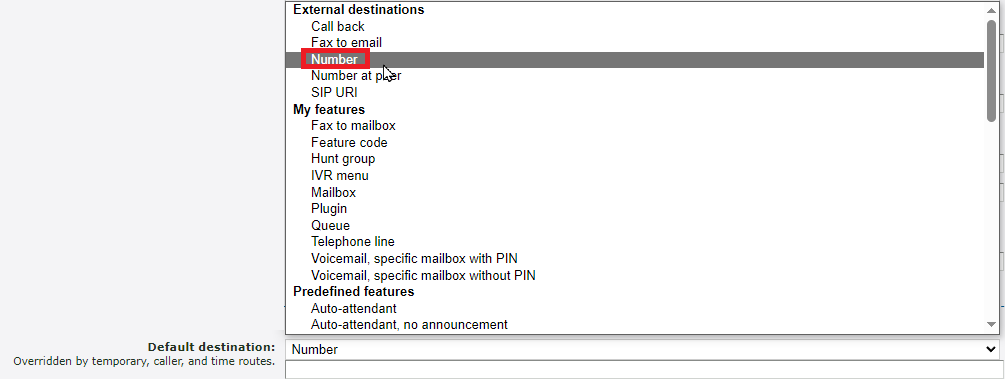
1. In the Route calls to section, use the Default destination drop-down to select Number.

2. Use the second box that appears to type the 9 or 10-digit phone number to forward calls to.
DANGER: ONLY USE NUMBERS. Special characters, such as parentheses and dashes, cannot be used.
3. Click the Save button.
✔ You should now see that user's DID number listed with it routing to the other phone number.

Forward Calls Temporarily
If the phone number will temporarily be forwarding calls to another phone number…
1. Use the Temporary override drop-down to select Specific number.
2. Use the Number box that appears to type the 9 or 10-digit phone number to forward calls to.
DANGER: ONLY USE NUMBERS. Special characters, such as parentheses and dashes, cannot be used.
3. Click the Save button.
✔ You should now see that user's DID number listed with a note that says Temporary routing and the number it is routing to.

Forward Calls for a Specific Amount of Time
Sometimes having calls forwarding indefinitely can be inconvenient since that forwarding would need to be disabled.
If you know how long calls should be forwarded for, you can create time groups that determine when the system should forward calls and time routes that tell the system where calls should be routed when a time group is active.
Create a Time Group
In order to tell the system when a forward should start and end, a time group will need to be created.
To configure a time group…
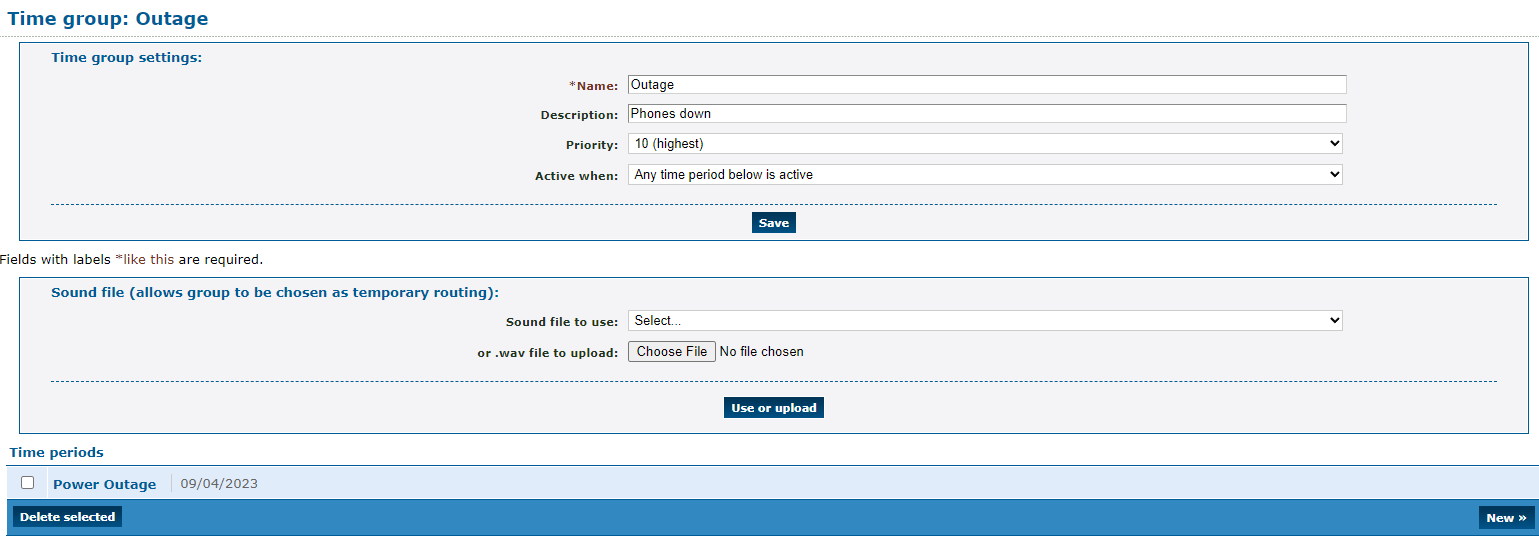
1. Navigate to Features → Times and dates.
2. Click the New button.
3. On the New time group page, fill in the following information:
– *Name - Give the time group a unique name to identify it by.
– Description - If needed, add a description that will show by the time group's name.
– Priority - If this time group will be for emergencies, like an outage, use the Priority drop-down to select 10 (highest).
4. Click the Save button.
5. On the Time group saved message, click Add a new time period.
6. On the New time period page, use the Time period settings section to give the time period a descriptive name and an optional description.
7. In the When the time period starts and stops each day section, use the dropdowns to select the start and stop timesmporary forward.
Note: The times shown will be in the 24-hour format.
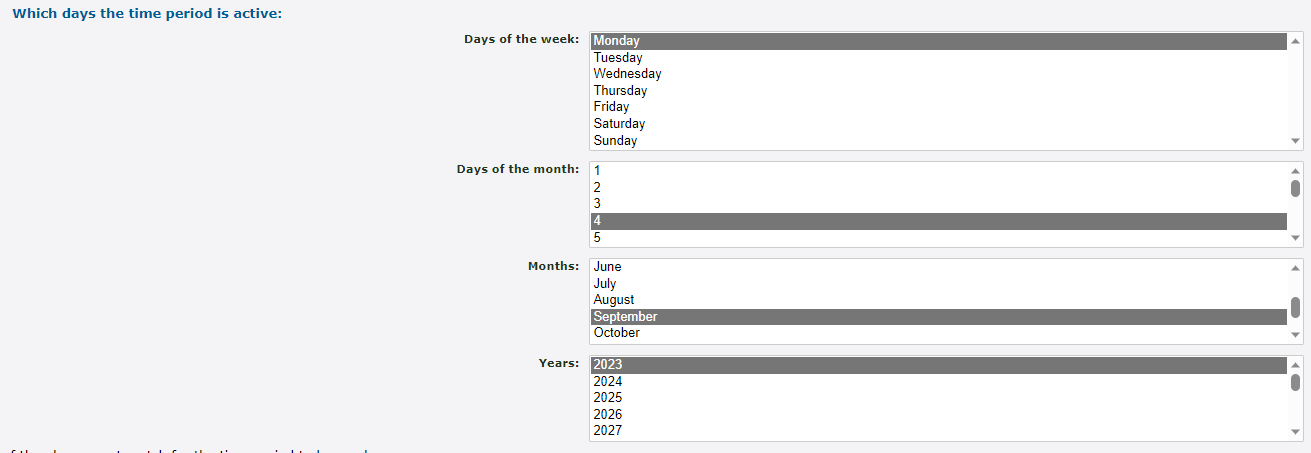
8. In the Which days the time period is active section, select the day, month, and year that this specific period will be active for. 
Quick Tip: If needed, multiple days can be selected as long as they both follow the same start and stop times.
To select multiple days, either click and drag to highlight multiple, or press Ctrl while clicking selecting.
9. Click the Save button.
✔ You should now see this time period showing in the time group.

More time periods can be added in the future that will determine when this time group should be active.
Set Up a Time Route
Now that a time group has been created, a time route can be set up for a number that will tell the system where calls should be routed when that time group is active.
To configure a time route for a phone number…
1. Navigate to Features → Numbers.
2. Select the phone number that needs to temporarily be forwarded.
3. In the Time routes section, click the Add a time route button.
4. In the New time route window, fill in the following information:
– Time group - Use the drop-down to select the time group that this route will use.
– Forwards matching calls to - Select Number.
– Use the second box that appears to type the 9 or 10-digit phone number to forward calls to.
DANGER: ONLY USE NUMBERS. Special characters, such as parentheses and dashes, cannot be used.
5. Click the Save button.
✔ You should now see the new time route and where it will route calls.

The destination of this time route can be edited at any time by clicking its name.
Clicking Edit time group will take you to where you can add more time periods for the time group to be active in.
Edit a User's Existing Feature Code
Scope: Enswitch Admins have the ability to add in new feature codes.
Basic Enswitch Users can edit a feature code if they are set as the Owner of a feature code by an Enswitch Admin.
If this user already has a feature code, we can adjust where their feature code routes calls. To do so…
- Navigate to Features → Feature codes.
- Click the Feature Code that needs to be edited.

- Follow the following subsections depending on how calls should be forwarded.
Forward Calls Indefinitely
If this user's feature code will be forwarding to a phone number indefinitely…
1. Use the Default destination drop-down to select Number.
2. Use the second box that appears to type the 9 or 10-digit phone number to forward calls to.
DANGER: ONLY USE NUMBERS. Special characters, such as parentheses and dashes, cannot be used.
3. Click the Save button.
Forward Calls Temporarily
If the feature code will temporarily be forwarding calls to a phone number…
1. Use the Temporary override drop-down to select Specific number.
2. Use the Number box that appears to type the 9 or 10-digit phone number to forward calls to.
DANGER: ONLY USE NUMBERS. Special characters, such as parentheses and dashes, cannot be used.
3. Click the Save button.