Adjust Your ES Desktop App's Sound Settings
Learn how to adjust audio settings for your ES desktop app to get the most out of your calling experience.
Table of Contents
Set Your App's Ringtone
On your ES desktop app, you have the ability to adjust what ringtone will play when you receive a call.
To adjust your ringtone for the desktop app…
- Click the Settings
 icon.
icon.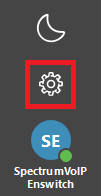
- Navigate to the Notifications tab of the Settings window.
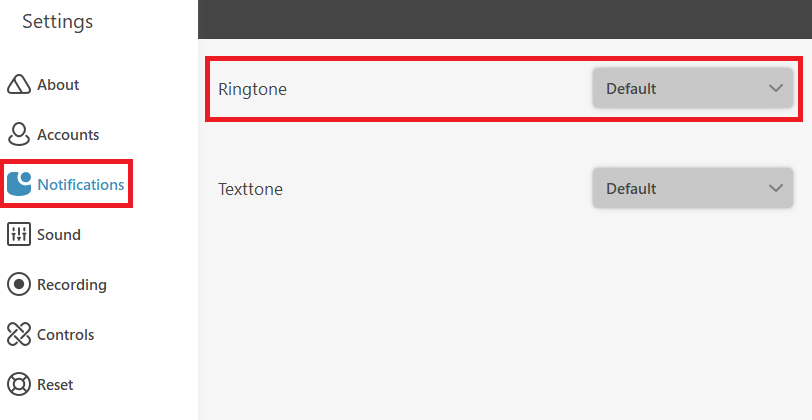
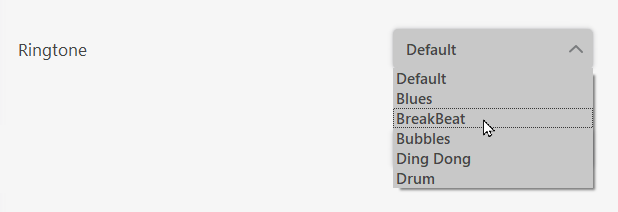
- Use the Ringtone drop-down to listen to and select a new ringtone to use for incoming calls.
Configure Your Basic Sound Settings
While you are using the SpectrumVoIP ES Desktop App to handle calls, you may find that you need to adjust its settings to fine-tune how your app handles audio.
To access your app's Sound Settings…
- Click the Settings
 icon.
icon.
- Navigate to the Sound tab of the Settings window.
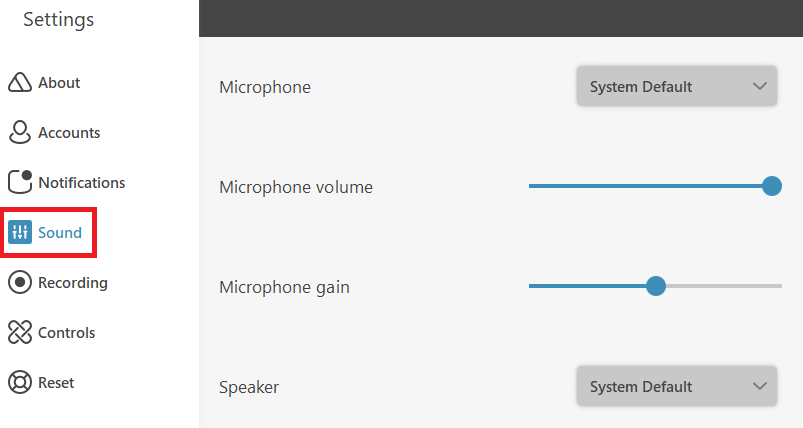
Using the app's Sound Settings, you can…
- Select audio devices to use.
- Adjust your volume and gain settings for your PC's audio devices.
- Mute other apps while your desktop app is in an active call.
- Adjust noise suppression and echo cancellation settings.
- Ensure your app integrates well with headsets.
Manage Audio Devices
When you have a headset or headphones connected to your PC, you can set your app to use that audio device instead of your PC's built-in microphone and speakers.
Select a Microphone
When you have a separate microphone or a headset with a microphone, you can use the Microphone drop-down to pick that audio device to use as your microphone for calls.

Select Your Speakers
If you have a headset or set of speakers you want to listen to your calls' audio with, you can use the Speaker drop-down to have your app use your headset or speakers.

Select an Audio Device to Play Ringtones
If you need to use a different audio device to play ringtones when you receive calls, you can use the Ringtone audio output drop-down to select which device will play these sounds.

Adjust Volume and Gain Settings
After you have selected your audio devices, you can adjust each device's volume and gain settings to fine-tune how those devices sound.
Microphone Audio Settings

Playback Audio Settings

Ringtone Volume

Keypad Volume

Mute Apps While in an Active Call
While you are handling calls, you may notice other apps playing audio during your call. If this is an issue you are experiencing, click the Mute other apps during call toggle to allow the app to silence other apps.

Manage Noise Suppression and Echo Cancellation Settings
If you are noticing your calls are experiencing excess background noise, you can use the Incoming audio noise suppression and Outgoing audio noise suppression drop-downs to fine-tune how intensely the app should cancel out noice it determines is in the background of calls. 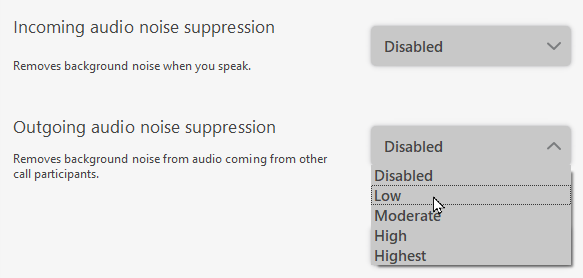
Click the Echo cancellation mode drop-down to select how the app should cancel out echoes depending on the device you are using as your speakers. 
Integrate Headsets
Allow Headsets to Integrate with Your App
By default, the SpectrumVoIP ES Desktop App will be enabled to integrate with headsets. 
It may become necessary to disable this setting, especially if you are using other calling apps that are integrated to the headset you are using.
Allow Sennheiser Headset Controls
If you are having issues connecting a Sennheiser headset to the app, you can click the Enable EPOS integration toggle to have the app allow your headset to control calls efficiently.
Advanced Sound Settings
To further troubleshoot and fine-tune how your audio for the app sounds, you can use the Advance dSound Settings.
To view these settings, click the Advanced button in the Advanced sound settings section.
Record the Data of Your Audio for Troubleshooting
If you are trying to troubleshoot persistent audio issues that do not originate from your internet network, you can click the Record audio data toggle to allow the app to start recording your app's audio at multiple processing stages. 
✔ To retrieve these recordings, navigate to the file path of C:\Users\<user>\AppData\Local\com.spectrumvoip.es.winx.storage\Temp\Recordings in your PC's file directory.
These recordings can be reviewed to see if you notice any issues starting at certain stages of the app's audio being processed.
Adjust Buffer Timeouts
In some audio setups, it may be necessary to set a buffer timeout to allow your audio device to buffer before capturing or playing back audio. Use these dropdowns to add a buffer timeout and place some test calls. 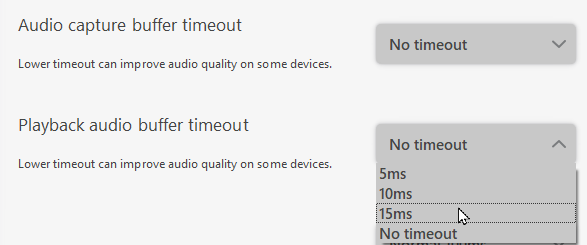
Set AEC Latency
If you are using an Acoustic Echo Cancellation (AEC) sound card component, you can adjust the latency or delay in the microphone's signal to help process out echoes.
Set Audio Fragmentation and Latency Rates
Select the size of the audio data packet in milliseconds and bytes. The default setting is server default, which is the size decided by the setup of the server in use.
If you are in an environment that has low bandwidth or must have echo suppression and cancellation performed, it may be necessary to adjust this setting.
WARNING: Make sure to close and open the app if you make changes to this feature.
Disable Default Sound Format and Sample Rate
Leave these two options enabled to save audio files in Microsoft’s Waveform (.wav) format when the app record calls. 
When these options are disabled, the app will use a predefined format with pulse-code modulation (PCM) method, 2 channels, and 16 bits per sample when recording calls.
WARNING: Disable these options only if you experience audio issues when using non-standard audio devices, such as microphones with multiple audio channels.
Disabling these settings when they do not need to be can cause issues recording audio.
Enable Audio Enhancements
By default, the desktop app will enable extra signal processing for audio to account for PCs and audio devices that rely on a sound card that handles and modifies audio signals. 
These options can be disabled for setups that rely on a PC's CPU to process audio signals.
Set Microphone Audio Buffer Capacity
Further fine-tune how your audio from your microphone sounds by lowering your microphone's audio buffer capacity.
This may be useful for certain models and brands of microphones. To determine if your specific microphone could use this adjustment, reference your microphone's include documentation or do a quick search online.
NOTE: It is recommended to place a test call while adjusting this setting.