StratusWEB PHONE Comprehensive Guide
Take a deep dive into StratusWEB PHONE and the features you can use to manage calls, voicemails, contacts, and more!

Written by Val Campos
Updated at February 11th, 2025
Table of Contents
Note: The StratusWEB PHONE is not downloadable, it is only accessible through a web browser.
StratusWEB PHONE will only work in browsers that support WebRTC functionality. SpectrumVoIP recommends using the Google Chrome browser.
Getting Started
StratusWEB PHONE is a browser-based softphone that utilizes the WebRTC standard. This softphone requires no additional software installation. This web phone uses the same login credentials used to log into your Stratus web portal.
StratusWEB PHONE can be accessed by directly navigating to https://stratus.spectrumvoip.com/webphone.
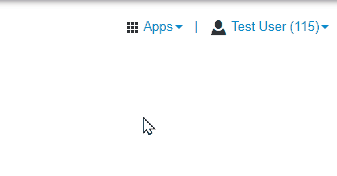
It can also be accessed by clicking Apps on the top left and selecting StratusWEB PHONE from the dropdown like so:
Grant Permission to the Microphone
When first launching StratusWEB PHONE, the browser will prompt you to grant access to the microphone.
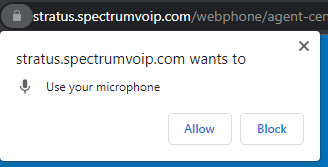
Note: This prompt will look different based on the browser being used as the prompt is generated by the browser, not the Portal.
Select Audio Devices
After granting permission for StratusWEB PHONE to use your microphone, you will be prompted to select your preferred audio devices. 

While selecting a device to use for your microphone and audio output, you can check the activity of the device to confirm it is functional.
Allow Browser Notifications
If you would like your browser to show notifications for incoming calls, click the ALLOW button in the Allow browser notifications prompt. 
After clicking ALLOW, follow your browser's instructions to allow notifications.
Allow Your Web Phone to Ring
If your current answering rule is configured to ring only your main extension when first launching StratusWEB PHONE, a warning will appear that states that the StratusWEB PHONE may not be configured to receive all incoming calls: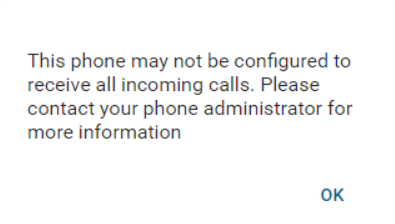
If you are seeing this warning, your answering rules may need to be adjusted to allow this device to ring. If needed, contact our technical support team to have a support specialist assist with this change.
If you would like to make this change yourself, use the module below to learn how:
Set StratusWEB PHONE to Ring for Calls
Using the Stratus web portal, you can adjust your answering rules to ensure that your web phone is ringing for calls.
Note: If you do not use the Stratus web portal, you can reach out to a Stratus admin user in your organization or our technical support team.
1. Navigate to your Answering Rules page.
✔ Doing so will show your current answering rules.
If you are having issues with other devices, besides your desk phone, ringing then it may be because your Default answering rule is set to just ring your main extension:
2. Click the Edit  icon next to your main answering rule:
3. In the Edit Answering Rule menu, select Simultaneous ring and ensure that Ring all user's phones is selected.
Quick Tip: If you only want the web phone to ring, in the Call Forwarding section, select Always and type and select your extension number with “wp” at the end.

4. Click the Save button. 
✔ You should now see the answering rule set to direct calls to your registered devices, including StratusWEB PHONE.

Quick Tip: StratusWEB PHONE will appear as your extension number appended with “wp”.
The Sidebar
On the left toolbar of StratusWEB PHONE, you will see many tabs that can be viewed to help manage calls and your Stratus account. Read more of this guide to explore these tabs and the tools they have to offer.

Handle Calls
With StratusWEB PHONE, you can place, answer, and handle calls as needed from your PC. This can make it much easier to work remotely from home or any other location where you do not have a desk phone.
Place a Call
With StratusWEB PHONE, there are many ways that you can place calls to other people and companies. The different methods you can use include the following:
- Dial a phone number or extension number using the Dial Pad.
- Call a contact that you have saved in your Stratus account.
- Use the Call History to call someone that you have spoken to or missed a call from.
- Call someone that has left you a voicemail message in your voicemailbox.
Use the module below to learn how you can use the methods listed above:
Dial Someone
To place a call using the Dial Pad, do the following:
1. Click the DIAL PAD button.
2. Using the Dial Pad that appears, do one of the following:
• Click or type the phone number/extension number to be called.
• Use the search bar to type and select the phone number, extension number, or name of the person to call.
3. When dialing is complete, click the Dial button or press ENTER on your keyboard to begin the call.
✔ StratusWEB PHONE will show that it is calling the number dialed. 
Once the call is answered, you can use the active call menu and its features to talk with the party you called.
Call a Contact
StratusWEB PHONE can access and display the contacts of your coworkers and any contacts that have been added to your Stratus account.
To use one of your contacts to place a call…
1. Navigate to the Contacts tab.
2. Select the contact of the person you would like to call.
3. In the person's contact, click the Call  icon.
icon.
✔ StratusWEB PHONE will show that it is calling the number dialed. 
Once the call is answered, you can use the active call menu and its features to talk with the party you called.
Use the Call History
On the Call History page, you can redial someone or return a call using the call logs that are listed.
To use the Call History to place calls…
1. Navigate to the Call History tab.
2. Select the call log of the person you want to call. 
3. Select the Call option.
✔ StratusWEB PHONE will show that it is calling the person's phone number.
Once the person answers, use the active call features to speak with them and handle the call.
Call a Vmail Sender
If someone has left you a voicemail message, you can place a call back to them from StratusWEB PHONE's Voicemail tab.
To call back someone using this method…
1. Navigate to the Voicemail tab.
2. Select the voicemail of the person you want to call back.
3. Click the Call  icon.
icon.
✔ StratusWEB PHONE will show that it is calling the number of the person that left a voicemail.
Once the person answers, use the active call features to speak with them and handle the call.
Receiving a Call
When you receive an incoming call, your PC will play a ringtone, and StratusWEB PHONE will display the following call options:

| Function | Description | Note |
|---|---|---|
| Accept | Accept the call. | Accepting the call will pull up the Call menu and show the functions you can use to handle the call. |
| Ignore | Have the call silently ring. | Have StratusWEB PHONE ring silently. If you are set to simultaneously ring other devices, the other devices will continue to ring. |
| Reject | Reject the call. | A 480 SIP Response is sent to the caller to cease the ringing. If you are set to simultaneously ring other devices, the other devices will stop ringing. |
Active Call Features
When you answer a call or a caller answers your call, you will be able to view and utilize the active call menu and its features.
In this menu, the following functions will be available:
| Function | Description | Note |
|---|---|---|
| Mute | Disable your microphone. Click Mute a second time to unmute yourself. | The caller will not be able to hear you, but you will be able to hear the caller. |
| Hold | Place your caller on hold. | While waiting on hold, the caller will be listening to your music on hold. |
| Dial pad | Show the dial pad so that you can enter digits for automated menus, such as auto attendants. | |
| Transfer | Transfer the call to a contact or a dialed number. | |
| Park call | Transfer the call to a park queue where the caller will wait on hold for someone to pick up their call. | Other users viewing the parks on StratusWEB PHONE or their other devices can retrieve and handle the call. |
| Add call | Put your current call on hold and start a second call. | |
| Switch phone | Move the call to another device registered to your extension number. | |
| Start Recording | Start recording a snippet of the call. When you are ready to stop recording, click Stop recording. 
|
Since different states and countries have laws regarding consent for recording, make sure to ask for a caller's consent before recording a call. To learn more about recording calls as a Stratus user, read this article. |
| Hide call |
Return to the main page while keeping the call active.
This allows you to look at the other tabs of StratusWEB PHONE, such as your contacts, call parks, chat/SMS messages, voicemails, and more. |
To view the active call again, click More on the active call card that appears on the right. 
|
Transfer a Call
While handling a call, it may be necessary to pass the phone call along to a user, call queue, or an external phone number. This can be done through transferring.
Using the StratusWEB PHONE, there are three different types of transfer that can be utilized depending on how exactly the call needs to be transferred and handled:
- Blind Transfer - Transfer a call directly to another person without talking to that second person. This is sometimes referred to as a “cold” or "unassisted" transfer.
- Assisted Transfer - Speak with the person being transferred to before completely transferring the call. This is sometimes referred to as a “warm” or “attended” transfer.
- Voicemail Transfer - Transfer a caller directly to a general mailbox or the voicemailbox of another user.
Use the module below to view step-by-step instructions about how you can perform these transfers:
Blind Transfer
When you use a blind transfer, you transfer a call without speaking to the party to whom you’re transferring the call. The call is automatically transferred as soon as you select Blind Transfer.
1. While on an active call, click Transfer. 
2. In the Transfer to prompt, select one of the following:
• Choose from contacts - Select the contact of the person/company that will be receiving the transfer.
• Dial a new number - Dial the extension number or phone number of the person that will be receiving the transfer.
3. When you are ready to call the next person, click the Call button. 
4. In the Complete transfer via prompt, select Blind transfer. 
✔ You should see a confirmation message that the transfer has been completed.

Assisted Transfer
If you want to talk to the party to whom you are transferring the call, you can perform an assisted transfer.
If you initiate an assisted transfer but you do not want to talk to the person you are transferring to, you can wait for the party’s ring-back sound and then transfer the call.
To perform an assisted transfer…
1. While on an active call, click Transfer.
2. In the Transfer to prompt, select one of the following:
• Choose from contacts - Select the contact of the person/company that will be receiving the transfer.
• Dial a new number - Dial the extension number or phone number of the person that will be receiving the transfer.
3. When you are ready to call the next person, click the Call button.
4. In the Complete transfer via prompt, select Assisted transfer.
✔ You should now see a second call being start with the second party while the first caller is put on hold.

5. Once the second party answers, talk with them as needed. 
Quick Tip: If you need to cancel the transfer, click Cancel Transfer or end the call.

6. When the call is ready to be transferred, click Complete Transfer.
✔ You should see a confirmation message that the transfer has been completed.
Voicemail Transfer
In some instances, a caller may need to reach out to a user that is not able to accept a transfer at the moment. If this is the case, the caller can instead be transferred to a user's voicemailbox to leave a message.
To transfer a caller to a user's voicemailbox…
1. While on an active call, click Transfer.
2. In the Transfer to prompt, select Dial a new number.
3. In the Dial Pad menu, click or type 03 and the user's extension number.
For example… To send the caller to the mailbox of extension 100, I would type 03100.
If you have a general mailbox that is extension 500, you can type 03500.
4. Click the Call button. 
5. In the Complete transfer via prompt, select Blind transfer.
✔ You should see a confirmation message that the transfer has been completed.
The caller will now be listening to the mailbox's greeting while waiting to leave a message.
Park a Call
As an alternative to placing a call on hold, you can park the call to give other users a chance to handle the call for you. Calls that are parked can be retrieved from other devices and softphones that are able to see these parks. Some accounts may set up different parks for different departments/sites.
There are two ways that a call can be parked: Static parking and Dynamic parking. To learn more about parking calls using these two different methods, read the module below:
Static Parking
If you would like to select the park that a caller will be transferred to and placed on hold, you can use static parking to do so.
To place a call on hold using static parking…
1. While on the active call, click Park Call.
2. In the Call Parks menu, click the Park  icon next to the park queue you would like to use.

✔ The caller will now be waiting on hold in the park queue listening to music.
You should now see a number on the Call Parks tab reflecting that there is a call parked. 
On the Call Parks page, you can view the parked call, the caller's information, and how long they have been waiting.
Dynamic Parking
If you do not need to select a specific park to park the call in, you can use dynamic parking to have the system park the call.
To dynamically park a call…
1. While on the active call, click Park Call.
2. In the Call Parks menu, click DYNAMIC PARK. 
✔ The caller will now be waiting on hold in a park queue listening to music.
You should now see a number on the Call Parks tab reflecting that there is a call parked.
On the Call Parks page, you can view the parked call, the caller's information, and how long they have been waiting.
Retrieve a Parked Call
If a call has been parked, you can use StratusWEB PHONE to retrieve and handle the call.
- Navigate to the Call Parks tab using the sidebar.

- Click the Retrieve
 icon next to the parked call you want to pick up.
- On the call notification that pops up, click ANSWER.

✔ Now you can use the active call menu and its features to speak with the caller and handle their call.

Conference Calling
For some calls, it may be imperative to merge another party into a call. This can be done using conference calling.
To start a conference call on StratusWEB PHONE…
- On an active call, click Add Call.

- In the Add call prompt, select one of the following:

-
Choose from contacts - Select the contact of the person/company that will be receiving the transfer.
-
Dial a new number - Dial the extension number or phone number of the person that will be receiving the transfer.
-
Choose from contacts - Select the contact of the person/company that will be receiving the transfer.
- Click the Call button.
✔You should now see a second call being start with the second party while the first caller is put on hold.

- Once the second party answers, talk with them as needed.

- If you need to speak with the first caller again, click Swap calls.

Quick Tip: You can also click the call at the top that you would like to swap to. 
Swapping calls will place the now inactive call on hold.
- Once you are ready to merge the calls, click Merge calls.

✔ You should see a notification confirming that the calls are being merged.
Once the merging is complete, you should now be in a conference call with the other participants.
- To end the conference call, click the End Call button.

✔ Doing this will place the participants on hold on their own calls.

- From here you can resume a call, speak with each party individually, and end each call as needed.

Contacts
The Contacts tab shows any contacts added to your Stratus account, including other users in the organization, shared contacts created by Stratus admins, and any contacts you have added. 
Quick Tip: Organization contacts show presence; indicated as a green, red or gray circle; and favorite contacts are indicated with a star.
By default, this view will show all contacts.
You can click the Contacts dropdown to view contacts in specific categories, such as your favorites, personal contacts (My Contacts), and coworkers. If your organization has sorted users into Departments, you can look at the contacts of users in those departments. Contacts can also be sorted by their Status (e.g., Online, Busy, and Offline).

You can also sort the contacts by Extension, Last Name, and First Name.

To search for the contact of a specific person…
- Click the Search
 icon.
icon.
- Type the name, extension number, or phone number of the contact.


Create Contacts
While handling calls with customers and clients, it can be beneficial to save their contact information in contacts so that reaching out to these people is more convenient and efficient.
- While on the Contacts tab, click the Create new contact
 icon.
icon.
Enter the person's name and contact information.

- When you are ready, click SAVE.

View a Contact
When viewing the list of contacts, you can click on a contact to view its details. The contact’s extension/phone number(s) and email address (if available) will be displayed.

| # | Function | Description |
|---|---|---|
| (1) | Contact Name | View the contact's name. |
| (2) | Contact Information | Reference the phone number(s) and email address(es) for the contact. |
| (3) | SMS |
If you have SMS enabled, send a message to the phone number. |
| (4) | Call |
Place a call to this phone number using StratusWEB PHONE. |
| (5) |
Add to favorites
|
Click the Add to favorites button to add this contact to the Favorite folder of your contacts. If this contact is already added to your favorites, this button will update to become a Remove from favorites button. |
| (6) | Options |
Display a dropdown of additional options for this contact: • Edit - Adjust or add contact information for this contact. • Copy to clipboard - Copy this contact's information to your device's clipboard for pasting elsewhere. • Delete contact - Remove this contact from your contacts. This option will not appear for the contacts of coworkers. |
| (7) | Return | Click the back arrow to return to your list of contacts. |
Edit a Contact
Over time, you may need to update a contact to add a phone number or update that person's email address.
To edit an existing contact…
-
Select the contact you want to edit.

- Click the Options
 icon.
icon.
- Select Edit.
- In the Edit Contact menu, adjust the person's contact information.

- When you are ready, click SAVE.

Call History
On the Call History tab, you can view the calls your extension number has handled, including inbound, outbound, and missed calls.

While viewing this list, you will see a colored arrow that will indicate the call direction of the call.
| Symbol | Call Direction | Description |
|---|---|---|
| Outbound | Dialed and placed a call to another person. | |
| Inbound | Received and answered a call from another person. | |
| Missed | Received a call, but it was rejected or not answered. |
You can look for a specific type of call by clicking the Call History dropdown:

To view a log for a specific call, select the call from the Call History list.

While viewing a call, you can reference the caller's information, place a call back to the person, and send the caller a chat or SMS message (if SMS is enabled). You also have the option to add this caller as a contact. If a contact already exists for this person, you can view their contact instead.
Voicemails
On the Voicemail tab, you can view your mailbox and its stored voicemail messages. If needed, you can use the drop down to view messages in either the New or Saved folders of your mailbox:

To review a specific voicemail message, click the voicemail that you would like to view. Doing so will show you additional options for handling the voicemail.
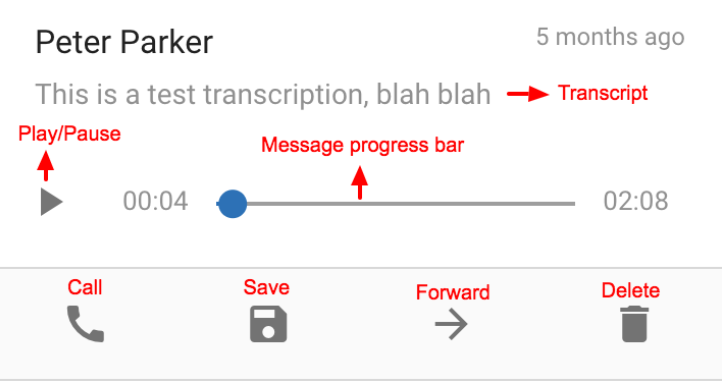
| Function | Description |
|---|---|
| Transcript | If enabled, a message transcript will be generated and displayed directly below the caller's name. |
| Play/Pause Toggle | Start or pause the playback of this message. |
| Message progress bar | Shows the current place in the message. Drag and drop the circle, or click on the bar to jump to a particular part of the message |
| Call | Place a call to the number that left this message. If the caller has hidden their caller ID (i.e., an anonymous call), then calling may not be possible. |
| Save | Move the message to the Saved folder of your voicemailbox. |
| Forward | Forward the message to another user on your account. |
| Delete | Move the message to the Trash folder of your voicemailbox. |
Chat and SMS
StratusWEB PHONE can be used to send and respond to chat and SMS messages. You can send chat message to your coworkers at any time. If your business has SMS registered and enabled for your account, you can send SMS messages to the phone numbers of your contacts.
WARNING: In order to use SMS/MMS messaging, an SMS Campaign must be created and registered for your organization.
To have SMS set up, feel free to contact our technical support team by calling (469) 429-2500 or emailing support@spectrumvoip.com.
If you would like to register an SMS campaign yourself or review the information needed for registering an SMS campaign, feel free to read these articles:
Register an SMS Campaign in Stratus
SMS Campaign Registry - FAQ
On the Chat and SMS tab, you can view the chat and text conversations you have with your contacts.

Start a Conversation
With StratusWEB PHONE, you can start a chat or SMS conversation.
To start messaging one or more people…
- On the Chat and SMS tab, click New Conversation.

- In the window that appears, type and select the contacts that should be messaged.

- Select the phone number you want to send the message from.

- Click DONE when you are ready.

In the Conversation window, you can type a message, use emojis, and attach a file. When you are ready to send the message, press ENTER on your keyboard.

Once the message it sent, you can chat to your heart's content.

You can also Minimize ![]() the window and Pin
the window and Pin ![]() the conversation to StratusWEB PHONE's main screen.
the conversation to StratusWEB PHONE's main screen.
Manage a Conversation
While viewing an active conversation, you can click the Options ![]() icon to view additional options for managing the conversation and its participants.
icon to view additional options for managing the conversation and its participants.

Use the table below to learn more about these available options:
| Option | Description |
|---|---|
| View Participants | View the people in your chat/SMS conversation.  If needed, click the Add Participant |
| Turn off/on notifications | Toggle browser notifications on/off for messages received in this conversation.  If you are having issues receiving notifications for StratusWEB PHONE, make sure that it has permission to use notifications. |
| Change Conversation Name |
Give the conversation a fun or descriptive name.
|
| Add Participants |
Add more people to the conversation.
|
| Leave conversation | Select this if you no longer want to send or receive messages from this conversation. |
| Delete conversation | To remove this conversation from the Chat and SMS tab, select this. |


Answering Rules
The Answering Rules tab can be used to view and reorder the answering rules that have already been created for your own account.
Note: Answering rules cannot be added or edited using StratusWEB PHONE. You can only view Answering Rules that currently exist for your extension number.
Answering rules can be created and edited using the Stratus web portal.
To learn more about adding answering rules for yourself using the Answering Rules page of the Stratus web portal, read this guide.

This list of answering rules goes by priority. The answering rule at the top of the list has the highest priority, while the bottom answering rules (i.e., Default) has the lowest priority. You can click and drag these answering rules to reprioritize them.

When the time frame of an answering rule is active, a blue Active indicator will be next to the answering rule.

To view more information about an answering rule, select the Answering Rule in the list. You will be able to view when the answering rule is active and the destination for your calls.

If an answering rule is no longer needed, you can click the Options ![]() icon to view two ways of turning off the answering rule: Disable and Delete.
icon to view two ways of turning off the answering rule: Disable and Delete.

- Disable - Turn off the answering rule without removing it.
- Delete - Remove the answering rule so that it is no longer in use or viewable.
Greetings
On the Greetings tab, you can view and manage the voicemail greeting(s) that you have created so far for your voicemailbox.

Create a Greeting
If needed, you can create multiple greetings for different scenarios. To add an additional greeting,
- Click the New greeting icon.
- Give the greeting an identifiable Greeting Name.

- Click the Record button.

- When you are done recording, click the Stop button.

- In the Sound Good? section, click the Play button to listen to your greeting and make sure it sounds correct.

- Do one of the following:
- If this greeting needs to be re-recorded, click the REDO button.

- If the greeting is correct, click the SAVE button.

- If this greeting needs to be re-recorded, click the REDO button.
Manage Greetings
If you have multiple greetings, you can view and adjust the greetings that have been created for your extension number. You can select a greeting from the Greetings list to manage that greeting.

| # | Function | Description |
|---|---|---|
| (1) | Play | Listen to the greeting to see if it is correct and ready to use. |
| (2) | Set as default | Set the greeting as your active greeting to use. |
| (3) | Delete | Remove the greeting so that it is no longer usable for your mailbox. |
Settings
One the Settings tab, you can view and configure your StratusWEB PHONE's settings, such as its connected devices for audio.

You can also view the Version of your StratusWEB PHONE, which may be useful if you are troubleshooting issues regarding StratusWEB PHONE.

Select Your Calling Device
Select the device you want calls to be placed on when you dial someone using StratusWEB PHONE. You can select any device that is currently registered to your extension number. By default, this setting should be set to ring StratusWEB PHONE, which is the device shown as your extension number appended “wp” (e.g., 108wp).

The suffixes that may be listed include the following:
- No suffix - This is usually the main extension number that is usually reserved for a desk phone
- wp - StratusWEB PHONE
- sp - StratusHUB desktop app
- i - Stratus mobile app on an iOS device
- a - Stratus mobile app on an Android device
- m - Our obsolete SpectrumVoIP mobile app for cellular devices
- h - Commonly used for a second desk phone that is usually used at home.
Select Audio Devices
Many users that handle calls will have different speakers or headsets connected to their PCs. If you have multiple audio devices, you can select the Microphone and Speaker to use when handling calls with StratusWEB PHONE.
-
Microphone - Select one of your connected devices to use as your microphone for calls.
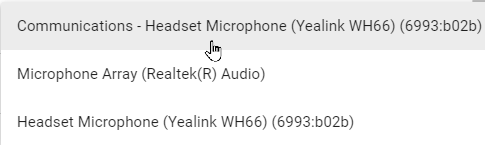
-
Audio Output - Select a device that should play the audio for calls.
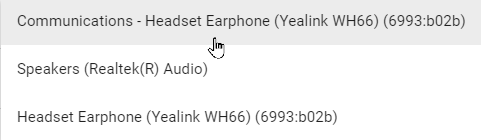
-
Ringtone Output - Select which audio device should play your ringtone when StratusWEB PHONE receives a call.

This section of the Settings will also have a tool where you can check that your microphone is picking up audio input:

And a slider that you can use to adjust the volume of your speaker:

Adjust Your Ringtone
StratusWEB PHONE will play a ringtone when you are receiving a call. There is a variety of ringtones that you can select from. With the Ringtone option of the Settings, you can listen to and select a ringtone that you prefer.

You can also adjust how loud your ringtone will play using the provided slider.

Call Waiting Tone
When there is an additional call waiting to be answered while you are actively on a call, you should hear a tone.
You can use the Call Waiting Tone option to adjust how additional calls ring. You can select from the following for this option:

- Enable - Have StratusWEB PHONE play a tone for each call you receive while handling an active call.
- One Time - Only have StratusWEB PHONE play a tone once when you receive calls while on your current active call.
- Disabled - Have additional calls waiting ring silently while you are on an active call.
EMERGENCY CALLS
IMPORTANT: SpectrumVoIP's softphone products are designed to redirect emergency calls to a Native Cellular Dialer whenever possible on a reasonable, best-efforts basis. This functionality is dependent on the operating system of the device and/or mobile phone. This is outside of SpectrumVoIP's control and subject to change at any time.
This product is not intended, designed, or fit for placing emergency calls.