Use Templates to Update the Layout of Multiple Phones
Discover how you can add, copy, and edit templates to make changes to multiple phones at once.

Written by Val Campos
Updated at August 7th, 2025
Table of Contents
Manage Templates
When there are a large number of phones in your Inventory, it may not be practical to edit the phones' configurations one-by-one. To make editing multiple phones easier, Configuration Templates can be used.
Add or Copy and Edit a Template
- Click the Phone Manager button.
Quick Tip: Alternatively, you can click the arrow
 and select Manage configuration templates.
- In the Phone Manager Launcher menu, click the Manage all templates hyperlink.

✔ Doing so will pull up the Phone Manager Configuration Templates menu.

- Add a template or Copy an existing template.
Add a Template

1. In the Template Name box, type in an identifiable name for the new template.
2. In the Description box, type any notes about the template.
3. Use the Model dropdown to select the phone model this template will be for.DANGER: The Model type of the template will need to match the model of the phones using this template.
Be sure to keep this in mind when creating a new Template for existing devices. The template will not be a selectable option if the Model of the phone does not match the model of the template.4. Click the Add button.

Copy a Template

1. Click the Search icon
 and type the name of an existing template or phone model.
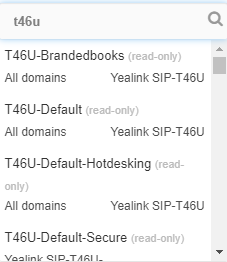
2. Select a template from the list.

3. Click the Copy button to create a version of this template that you can edit.

✔ Clicking Copy will pull up Phone Manager with the template's configurations displayed.

4. Click the Edit icon
 next to the template's name to rename the template to make the template easier to find later.
5. Click the second Edit icon to adjust the description of the template.
6. Customize this template to match what is needed for phones using this template.
7. Click the Save button.
Customize Your Template
When looking at a newly added or copied template, there are several ways you can personalize the template using the Phone Manager tool.
You can…
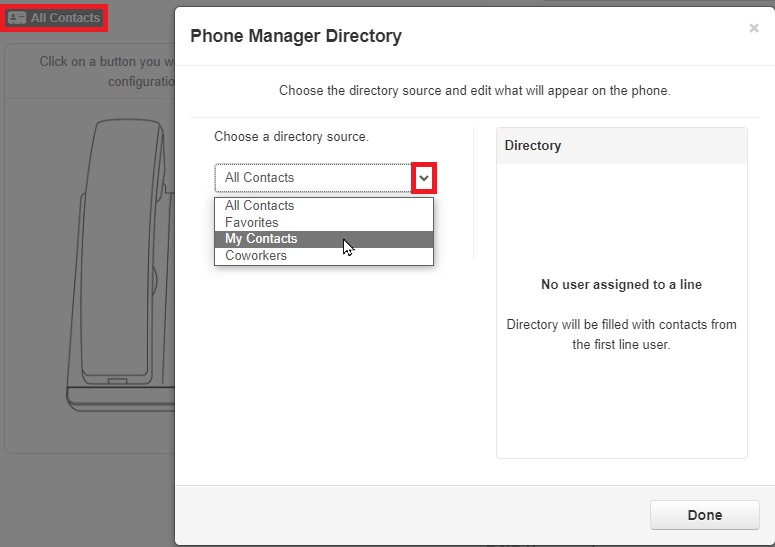
- Click the Directory button and use the Directory Source drop-down to select what contacts should be shown.
 or
or 
-
Add Features to your line keys to match your preferences.

Line Key Feature Options
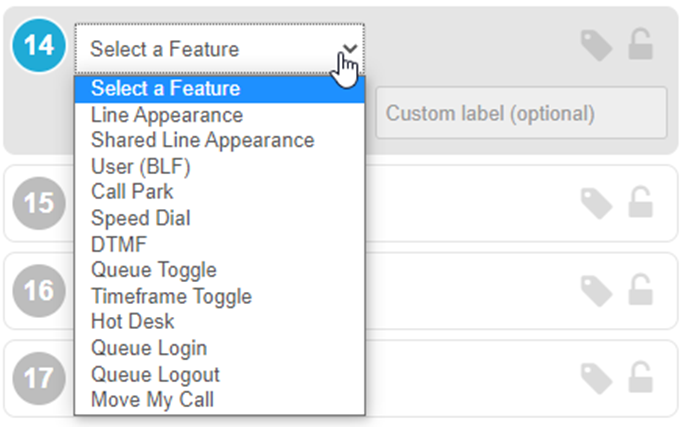
Feature Description Line Appearance Adds a line registration to the device and acts as a channel of communication that allows for multiple calls to be handled at once. Some features, such as transfers and conferences, require at least two line appearance keys. Shared Line Appearance Adds a shared line registration that can be shared by multiple devices. User (BLF) Press this key to quickly call or transfer a call to a coworker. The light allows you to see the presence status of another extension. Speed Dial Press this key to quickly call or transfer a call to a specific destination. This key can be used to contact external telephone numbers and other internal users. Call Park Allows you to park and retrieve an active call, based on your Call Park Queues and Dial Translations. DTMF Use mid-call DTMF features such as star codes.
Note: This feature is not supported by Cisco and Poly IP devices.Queue Toggle Quickly toggle your queue availability status between Available and Unavailable.
Note: Indicator lights may not work on some devices.Timeframe Toggle Toggle a specific time frame on and off for your user. This timeframe must be on the Answering Rules of the user of the phone. Indicator lights may activate on applicable devices. Hot Desk This version of Hot Desking is not recommended.
If you would like to utilize a hot desk set up, please reach out to SpectrumVoIP’s Technical Support team.Queue Login Log into all call queues that you are assigned to. Queue Logout Log out of all call queues that you are assigned to. Move My Call Move a call that is currently active for your user to this device, such as from the SpectrumVoIP Mobile App, the StratusHUB desktop app, or the Stratus Web Phone. -
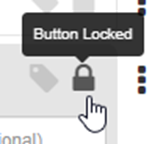
Lock line keys to prevent users from editing certain buttons while viewing their own phones.
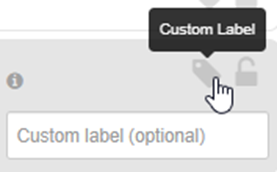
- Add a Custom Label to name a line key.
- Use Phone Manager's additional options.
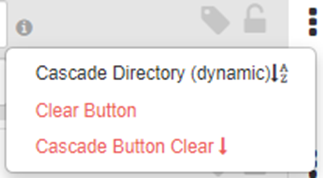
- Cascade Directory (static) - Auto fills the button being assigned, and all subsequent buttons, with static BLFs for the current directory entries.
- Cascade Directory (dynamic)- Auto fills the button being assigned, and all subsequent buttons, with dynamic BLFs which update whenever the phone resyncs.
- Clear Button - Deletes the button assignment and resets it to initial state.
- Cascade button clear - Deletes the button assignments for all subsequent buttons.
-
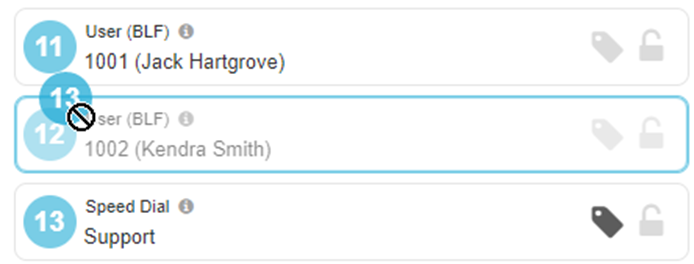
Reorder line keys by dragging the button ID circle and dropping it onto another spot.
-
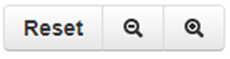
Zoom in or out when viewing the phone image. Click Reset to return the phone image to its default view.
- Once done configuring the template, click Save (for new templates) or Save as new template (for copied templates).

Apply a Template
After a template has been made, it can be applied to phones on the account. This can be done to a single phone or multiple phones at a time.
Single Phone Template Update
- In the Phone Manager tab, click the Phone Manager icon
 next to the phone needing the change.
- Click the Templates button and select a template from the dropdown.

- Click the Apply Template button.

✔ You should see the buttons appear on the Phone Manager screen.
- Click Save and Resync to apply the template to the device.

Quick Tip: Alternatively, you can click the Save button to apply the changes in the portal and have the phone update later during its nightly update.
Bulk Update Selected Devices
Once you have created/edited a template, you can apply it to multiple phones.
To apply a template…
- In the Phone Hardware tab, click the check boxes to select the devices you wish to apply the template to.

- Click the Phone Manager drop-down arrow and select Apply a template to selected Devices.

✔ The Bulk Edit Phone Manger Templates menu will appear.
- In the Configuration Templates section, search for and select the template.

- Select Apply and Resync to apply the changes to both the portal and the phones.

Quick Tip: Alternatively, you can click the Apply button to apply the changes in the portal and have the phones update later during their nightly update.