Grandstream WP816 Handset User Guide
Discover how you can complete tasks, like handling calls and checking voicemails, using your Grandstream WP816 Handset.

Written by Val Campos
Updated at September 18th, 2025
Table of Contents
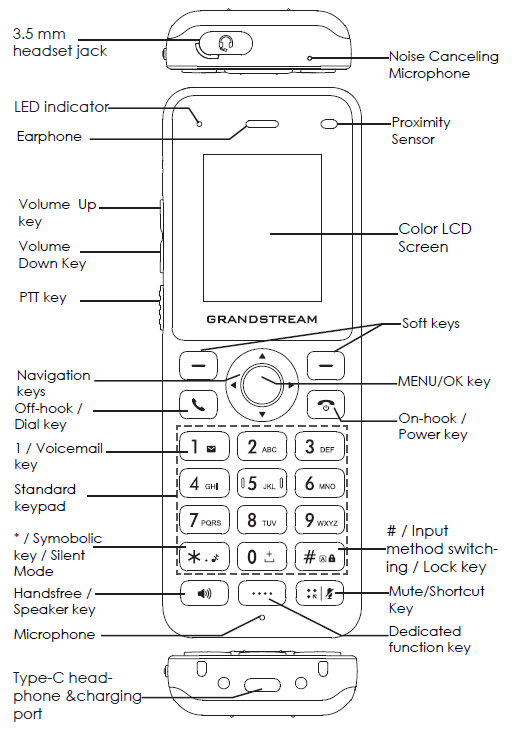
Handset Components and Buttons
Place a Call
You can do one of the following to start a call:
- Start dialing the number you want to call using the keypad.
- Press the Dial
 button to pull up the Dialing screen.
 - Press the Speaker
 button to pull up the Dialing screen.
 - Press the History softkey to find a previous caller to talk to.
- Press the OK button and select Contacts to call a contact you have created.
- If there is a Missed Call notification, press the OK button to pull up the Missed folder of the History. Select the caller to call back.
Incoming Calls
When your Grandstream handset received an incoming call, you will be able to view the caller's information and use the Answer or the Hangup buttons to respond to the call. You can either answer the call, reject the call, forward the call to a different person, or let the call continue to ring until it is rejected.

Answer Calls
When there is an incoming call for your handset, you can answer the call by pressing the Dial ![]() button. You can also press the Options softkey and select Answer to accept a call.
button. You can also press the Options softkey and select Answer to accept a call.
Handle Multiple Calls
Your Grandstream handset can handle multiple calls. If you are already on a call, a Ringing… message will appear that shows the caller ID of the additional caller. 
You can press the Dial ![]() button to accept this other call.
button to accept this other call.
Accepting an additional call will put the first caller on hold automatically.
If you do not want to answer or reject the call, you can press the Hang Up ![]() button. You can also press the Options softkey and select Reject to return to the view of your current call.
button. You can also press the Options softkey and select Reject to return to the view of your current call.
You can also Reject the call, Forward the call to a different extension number or phone number.
While interacting with an additional caller, you can use the Options menu to use active call features to handle the call. 
Forward a Ringing Call
While a call is ringing your phone, you can do the following to forward the call to another user or a telephone number:
- Press the Options softkey.

- In the Options menu, hover over Forward using the navigational keys and press the OK button.

- On the Dial screen, enter the extension number or phone number that should receive the forwarded call.

- Press the Dial
 button.
Missed Calls
When you miss a call, your handset will display a message showing you details about that missed call, such as the Caller ID/contact name of the person and the date and time of the missed call. If you press the OK button while viewing this notification, the handset will take you to its Missed Call folder of the History to view the missed call's details and place a call back as needed.
If the caller leaves a voicemail, the handset will display a notification for the voicemail. When the OK button is pressed, the handset will call into your mailbox to check and manage this voicemail message.
Hold and Resume Calls
You can place an active call on hold and resume the call when you are ready. When you place a call on hold, the caller will be listening to music until their call is resumed.
Place an Active Call on Hold
While speaking with someone, you can place their call on hold by pressing the Hold softkey.
You can also press the Options softkey and select Hold. 
Any time you initiate an action (e.g., transferring or conferencing), the call you were on before will automatically be put on hold.
Swap Between Held Calls
While handling multiple calls or starting a transfer, you may need to swap to another call. To swap between held calls…
- For the current call, press the Hold softkey.

- Press the Up or Down navigational buttons to select a different held call.

- Press the Resume softkey for the call you need to resume.

Resume a Call That is on Hold
If you are ready to begin speaking with a caller you placed on hold, you can resume that call by pressing the Resume softkey.
If you have multiple calls on hold, you can press the Resume softkey while hovering over the call you need to resume.
Park and Retrieve Calls
When calls are placed on hold, the call is held on your handset so that you can resume and handle the call when you are ready. As an alternative, you can park the call. Parking a call allows other users to pick up and handle the call for you.
Dynamic Parking
With dynamic parking, you can let the system choose a park to park the call in for you. To park an active call dynamically, dial *** during your call.

The phone will place the call on the 1st available park and announce which park the call was forwarded to. After hearing the destination, you can hang up your call.
Static Parking
With static parking, you can choose the park that you want the call to wait in. To statically park a call…
- Press the Options softkey and select Transfer.

- Dial the extension number of the park.

Quick Tip: By default, the extension numbers of the parks are as follows:
• Park 1 = 701
• Park 2 = 702
• Park 3 = 703 - Press the Transfer softkey.
- Select Blind Transfer.

✔ The caller will be sent to the park associated with that extension number.
While a caller is parked, they will listen to your music on hold until their call is retrieved.
Retrieve a Call
One of the ways cordless handsets can be convenient is being able to walk around and pick up parked calls without being seated at a desk.
To pick up a parked call with a handset, dial the parks' extension numbers (Park 1 = 701, Park 2 = 702, and Park 3 = 703).

Park Contacts and Speed Dials
Unlike desk phones, cordless handsets do not have park buttons ready to use for parking and retrieving calls. As a workaround, you can add contacts and speed dials for the parks to make retrieving parked calls easier.
By default, your account will have Park 1 (extension 701), Park 2 (extension 702), and Park 3 (extension 703). You can create contacts and speed dials for each of these parks.:

✔ Using these speed dials for the parks will make it easier for users to retrieve parked calls.
For example… If a call is parked on Park 1 (x701), a user can hold down the speed dial button they have for Park 1 to retrieve the parked call. The user can also dial 701 on a handset to retrieve a parked call in Park 1.
Contacts for Parks
Each cordless handset has a Local Phonebook that contacts can be added to. Once a contact is added, you can press the call button while hovering over a contact to place a call to that person/business. These contacts that you add can be edited and deleted as needed.
To create contacts…
1. Do one of the following to access your handset's Directory:
• Press the Left navigation key.
• Press the OK button to access the menu and select Contacts.
2. In the Local Phonebook menu, press the Options softkey and select New Contact.
3. In the New Contact menu, type a name and the park's extension number.
Quick Tip: The extension numbers for the parks are as follows:
• Park 1 = 701
• Park 2 = 702
• Park 3 = 703
4. To save the contact, press the OK softkey.
✔ You should see the park contact(s) listed. You can press the Dial Key  to place a call to that park to pick up parked calls.

Park Speed Dials
The number buttons on your handset's number pad can be programmed to dial a park when held down. This can help simplify picking up parked calls.
Quick Tip: Each handset can have up to 7 speed dials, which can be assigned to buttons 2-9 on the keypad.
There is not a #1 option since the 1 button on the keypad is reserved for calling the handset's voicemailbox.
To add a speed dial for a park…
1. Press the OK button to access the Menu.
2. Use the navigation keys to select Settings. 
3. In the Settings menu, navigate to Basic Settings → Key Customization → Number Keys.
4. In the Number Keys menu, select the number you want to set as a park speed dial.
Quick Tip: The number spot that you select correlates to the number on the handset's keypad. Assigning a contact to one of these numbers will turn that number on the keypad into a speed dial button.
As a reminder, there is not a #1 option since the 1 button on the keypad is reserved for calling the handset's voicemailbox.
Since there are 3 parks, it may be beneficial to select a series of 3 numbers that are side-by-side, such as 4-6 or 7-9.
For example… If I assign the #4 speed dial spot to call Park 1, holding down the 4 button on the handset's keypad would dial 701.
5. Input the following information:
• Long press function - Select Speed Dial.
• Number - Type the ion number of a park (e.g., 701 for Park 1).
• Label - Type a name for the speed dial.
6. Press the OK softkey.
✔ That speed dial for a park will now be assigned to the number button on the handset's keypad. Holding down that button on the keypad will call the park, which can pick up any calls parked on that particular park.
For example… If you assign a speed dial that dials 701 to the spot 4, holding down the 4 button on the keypad will dial Park 1.
7. Repeat steps 5 and 6 for each speed dial you need to add.
Transfer Calls
While handling a call, it may be necessary to pass the phone call along to a user, call queue, or an external phone number. This can be done through transferring.
While handling a call on your Grandstream handset, there are three different types of transfer that can be utilized depending on how exactly the call needs to be transferred and handled:
- Blind Transfer - Transfer a call directly to another person without talking to that second person. This is method of transferring is also referred to as a “cold” or "unassisted" transfer.
- Attended Transfer - Speak with the person being transferred to before completely transferring the call. This method of transferring is also referred to as a “warm” or “assisted” transfer.
- Voicemail Transfer - Transfer a caller directly to a general mailbox or the voicemailbox of another user.
Use the module below to view step-by-step instructions about how you can perform these different transfers:
Blind Transfer
When you use a blind transfer, you transfer a call without speaking to the party that the call will be transferred to. The person receiving the transfer will need to answer the transferred call.
To perform a blind transfer…
1. While on an active call, press the Options softkey and select Transfer.
Note: The caller will be placed on hold automatically where they will listen to music on hold.
2. On the Dial screen, dial the extension or phone number you want to send the call to.
3. Press the Transfer softkey.

4. Select Blind Transfer.
Attended Transfer
Perform an attended transfer if you want to talk to the person receiving the transfer.
✔ This can be a great way to check that the person being transferred to is actually available and ready to receive a transfer.
If the second person answers your call and an attended transfer is completed, the caller will be directly connected to the second person without the need for them to answer the call.
Quick Tip: If you decide you do not want to talk to the person you are transferring to, you can perform a semi-attended transfer.
To do so, you can press the Transfer softkey while the call is still ringing. 
1. While on an active call, press the Options softkey and select Transfer.
Note: The caller will be placed on hold automatically where they will listen to music on hold.
2. On the Dial screen, dial the extension or phone number you want to send the call to.
3. Press the Dial ![]() button to start the second call.
button to start the second call.
Quick Tip: You can also press the Transfer softkey and select New Call to start an attended transfer.
4. Wait for the second person to answer and talk to them as needed. 
Quick Tip: If the person receiving the transfer needs more information, you can Swap between the calls by pressing the Options softkey and selecting Swap.

5. Press the Options softkey again and select Transfer to complete the transfer.
Transfer to Voicemail
In some instances, a caller may need to reach out to a user that is not able to accept a transfer at the moment. If this is the case, the caller can instead be transferred to a user's voicemailbox to leave a message.
To transfer a caller to a user's voicemailbox…
1. While on an active call, press the Options softkey and select Transfer.
Note: The caller will be placed on hold automatically where they will listen to music on hold.
2. On the Dialing screen, dial 03 and the mailbox's extension number.
For example… To transfer the caller to the mailbox of user 100, dial 03100. To transfer the caller to general mailbox 500, dial 03500.
3. Press the Transfer softkey.
4. To complete the transfer, select Blind Transfer. 
Conference Calling
While talking with someone, it may be imperative to add an additional person to your call. This can be done through a conference call. With your Grandstream handsets, you can have up to 3 participants in an active conference call.
Once a conference call has started, you can manage the call and its participants using the Options menu.

Start a Conference Call
When you are ready to start a conference call, there are two ways to handle doing so:
- Merge someone into an active call immediately.
- Call another person separately and merge them when they are ready.
To explore these different methods for starting a conference call, reference the module below:
Immediately Merge
To initiate a conference call on your Grandstream handset…
1. While on an active call, press the Options softkey and select Conference.
3. On the Dial screen, dial the on number or phone number of the person to add to the call.
4. Press the Dial ![]() button.
button.
5. Wait for the second participant to answer the call.
✔ Once the second person answers, they will be immediately merged into the conference call.

Speak Separately First
If you need to speak with the second person being merged separately before starting the conference call, do the following instead:
1. While on an active call, press the Dial ![]() button to start a separate call.
button to start a separate call.
2. On the Dialing screen, dial the n number or phone number of the person to add to the call.
3. Wait for the second person to answer your call.
4. Speak with the second caller as needed.
5. Once the caller is ready to be merged into a conference call, press the Options softkey and select Conference.
6. On the Dialing screen, press the Down navigation key to select the other caller on hold.
✔ You should now have both callers in a conference call together.

End a Conference Call
Once the group conversation is over, there are two ways you can handle disbanding the conference call: splitting or ending the call. You can also kick specific people from an active conference call.
End the Whole Call
To end the conference call for yourself and the participants, press the Hang Up ![]() button or press the Options softkey and select End.
button or press the Options softkey and select End.
Doing so will completely disconnect the call for all participants, including yourself.
Split the Call
For some calls, it may be important to speak with each conference participant separately before ending their calls. To split a call…
1. While in a conference call, press the Options softkey and select Split.
2. Speak with each participant separately as needed.
3. End each call when you are ready.
Kick a Participant
If you do not want to end your conference call but you do need to remove a specific participant, you can kick that specific participant instead.
To kick a participant from the conference call, press the Options softkey and select the Kick option with the participant's name.
✔ The conference call will end, and you will remain on a call with the remaining participant.
Check Voicemails
Over time, your voicemailbox may receive voicemails from customers and coworkers. With your Grandstream handset, you have a variety of ways that you can check voicemail messages for yourself and your coworkers:
- Use a Voicemail notification.
- Hold down the 1 button on the handset's keypad.
- Use the Voicemail option of the Menu.
- Dial a code to either call your own mailbox or the mailbox of another user.
Use the module below to explore these different methods for checking voicemails on cordless handsets:
Voicemail Notification
When you have received a voicemail, the handset will display a notification showing how many voicemails are in your mailbox.
When you press the OK button with this notification active, your phone will dial 5001 to connect you to your mailbox. 
When you are prompted to, enter your voicemail PIN and press the # key.
The 1 Button
By default, your handset will have the 1 button programmed to speed dial into your mailbox.
Fun Fact: Holding down the 1 button has the phone dial 5001. If you dial 5001 on a phone, it will direct you to the phone's extension number's mailbox.

To use the 1 button to check your voicemail messages…
1. Hold down the 1 button on the handset's keypad.
2. Enter your voicemail PIN and press the # key.
✔ Once the voicemail menu accepts the PIN, the voicemail can be managed and adjusted using the Menu Options.
There will be audio prompts for you to navigate through the voicemail menu to check your voicemail messages and edit the voicemailbox's settings.
To learn more about the voicemail menu options available for voicemail management, feel free to check out this article.
Voicemail Menu
To check the activity of your own mailbox using the Main Menu of your handset…
1. Press the OK button to open the menu.
2. Select l.
3. Press the OK button to connect to your mailbox.
4. When prompted, enter your voicemail PIN and press the # key.
Dial a Code
You can dial a code to access your own mailbox so that you can check its messages and manage it using the menu options. The way to do this will depend on the platform you are using.
For Stratus Users
As a Stratus user, there are many default codes that you can dial to perform different actions. Three of these codes are:
1. 5001 - Call the mailbox assigned to the extension number of the phone you are dialing on.

2. 03 - Dial 03 and a user's extension number to call a specific user's mailbox.

3. 5000 - Call an automated menu that you can use to find a specific mailbox.

Use the module below to learn more about the differences between these codes and how they can be used:
The 5001 Code
When 5001 is dialed on a phone, you can call the voicemailbox of the extension number assigned to the phone you are dialing on.

Fun Fact: The way the 1 speed dial button works is by automatically dialing 5001.
Once 5001 is dialed, you will be prompted to enter your voicemail PIN. Once your PIN is entered, you can check your voicemails or use the mailbox's menu options to manage your mailbox.
The 03 Code
One of the dialable codes that can be used on desk phones, the StratusHUB desktop app, and the Stratus mobile app is 03.
When 03 is dialed in front of an extension number, your call would be forwarded to that extension number's voicemailbox.

While the mailbox's greeting is playing, you can press star (*) to interrupt the greeting and enter the user's voicemail PIN.

For example… If a user needs to leave a voicemail for extension 100, they can dial 0-3-1-0-0 from their desk phone to be taken directly to x100's mailbox. They can wait for the greeting to stop playing to leave a message.
If a user needs to check extension 100's mailbox for them, they can dial 0-3-1-0-0. Once they hear the mailbox's greeting, they can press star (*) to interrupt the greeting and enter x100's voicemail PIN when prompted.
The 5000 Code
If you are a Stratus user, you can dial 5000 to access an automated menu that can route you to your own or another user's voicemailbox.
To access this menu…
1. Dial 5000 on your handset.

2. When asked for an Account Number, dial your own or another user's extension number.

3. When prompted for a Password, dial the voicemail PIN and press #.
✔ From here, you can review the mailbox's voicemails and use the menu options to manage the mailbox's settings.
For Enswitch Users
If you are an ES user, you can dial another user's mailbox code to access that user's mailbox.
To do so…
1. Dial your or the other user's mailbox code on another SpectrumVoIP phone.
Quick Tip: Most accounts use 1+EXT (e.g., 1103 for dialing extension 103's mailbox) as the code for dialing into the mailboxes of other users.
Find Your Mailbox's Dialable Code
If you are not sure what your mailbox's feature code is, you can check this and the other feature codes you are set as the Owner for by logging into the ES web portal as a basic user.
To find your mailbox's feature code…
1. Log into the ES web portal.
2. Navigate to Features → Feature codes.
3. Take note of the Feature Code shown that is marked for your extension's Mailbox. 
Reference the Feature Codes for Your Users as an Admin
Admins of the ES web portal can check the Feature Codes shown for all of their users using the web portal.
To check the feature codes for the whole account…
1. Log into the ES web portal.
2. Navigate to Features → Feature codes.
3. View and take note of the feature codes for your users.
4. If needed, click the Export as .csv button to download this list of feature codes as a spreadsheet that you can keep record of and share with your team.
If you do not have access to the ES web portal, feel free to contact our technical support team to learn more about the dialable codes you can use. You can also read this article to learn how you can create a code for dialing a mailbox.
2. When you hear the mailbox's greeting, press *.
3. When asked for the Mailbox, dial the user's 7-digit extension number and press #.
4. When asked for your PIN, enter the mailbox's il PIN and press #.
✔ From here, you can review the mailbox's voicemails and use the menu options to manage the mailbox's settings.
Enable Paging
By default, paging is disabled on the handsets just in case the handsets should not be playing intercom messages while users walk around with them. If you would like a handset to receive pages from desk phones and other handsets, do the following:
- Press the OK button to access its menu and select Settings.

- In the Settings menu, select Advanced Settings → PTT/Paging.


- In the PTT/Paging menu, select Multicast Paging.

- While hovering over the Multicast Paging option, press the Left or Right navigational key to set it as Enabled.

- Press the On-Hook/Power button to exit menus.
- If needed, place a test page by holding down the Paging button located under the Volume buttons on the left side of the handset.