Stratus – Shared Contacts
Find out how to quickly and easily manage and share contacts with users in your organization.

Written by Adrian Angwenyi
Updated at January 27th, 2026
Table of Contents
Scope: Office Managers and Call Center Supervisors will be able to use the Shared Contacts feature.
To allow Site Managers and other specific users to see Shared Contacts, feel free to reach out to our technical support team.

Access Shared Contacts
As an Office Manager, Site Manager, or Call Center Supervisor, you can view and manage shared contacts for your users and agents to see on their devices and web portal.
To view the shared contacts that your account has so far, do the following:
- Navigate to the Users/Agents page of your Stratus web portal.

- Click the Shared Contacts button.

✓ Doing so will pull up the Shared Contacts page.

While viewing these shared contacts, you can edit or remove them using the Edit and Delete icons.
NOTE: Shared Contacts can only be edited or deleted by Office Managers, Site Managers, and Call Center Supervisors (unless your account has been edited to allow other user scopes to as well).
Add a Shared Contact
On the Shared Contacts page, you can add more contacts for all users to reference and use to contact important people and organizations.
- In the Shared Contacts page, click the Add Shared Contact button.

- In the Add Shared Contact menu, fill in the following information:

- First Name, Last Name - Type the name of the person or company featured in the contact.
- Work number, Mobile number, Home number - Type in the contact numbers of the person/organization.
- Fax number - If the contact has a fax number, you can include to make it easier to reference.
- Email - Type the contacts email address if needed.
- Click the Save button.

✓ Additional shared contacts can be added quickly by using the Save and add another option.

Import Multiple Shared Contacts
When needing to add in multiple contacts, it may not be practical to use the Add Shared Contact modal. As an alternative, you can fill in a spreadsheet and then import that spreadsheet to add in multiple contacts at once.
Step 1: Create Your Own Template
To make sure your contacts are imported correctly, it is best practice to export a spreadsheet to use as a template. To do so…
- Click the Export button.

- In the Export Contacts menu, do the following:

- Contacts to export - Select All. If there are other groups of contacts to select from, you can select a specific group of contacts to export.
-
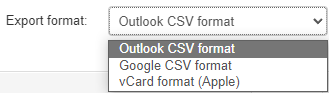
Export format - If necessary, select a specific format for the spreadsheet.
- Click the Export button.

✓ Doing this will download a formatted spreadsheet that you can use to fill in the information for more people to add as contacts.

- Open the downloaded spreadsheet.

Quick Tip: You can expand the columns in the spreadsheet to more clearly see what is put in.
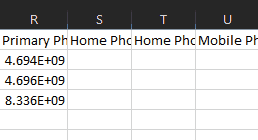
- Use the columns of the spreadsheet to fill in the information for the contacts.

- Click the Save icon
 once you are done.
Step 2: Import Your Updated Spreadsheet
Once you have filled in the information for your contacts using the spreadsheet. To do this…
- Click the Import button.

- In the Import Contacts menu, click the Browse button to select the spreadsheet from your PC.

- Click the Import button.

✓ After the system finishes importing, you should see a confirmation message
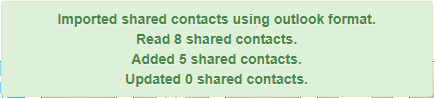
and your Shared Contacts page should show the new contacts.
View Shared Contacts as a Basic User
Basic Users can view the contacts you have added by navigating to the Contacts page ![]() of their Stratus web portal. The shared contacts will be listed along with contacts they have created and contacts for other users on your account.
of their Stratus web portal. The shared contacts will be listed along with contacts they have created and contacts for other users on your account.

To view only the Shared Contacts, users can filter the contacts by using the dropdown to select Shared.