Enswitch - Configure the Queue Panel's Options
Discover how you can fine-tune your Enswitch web portal's Queue Panel to make monitoring your queues' activity easier.
While you are using the Queue Panel to monitor queues and their agents, you may need to adjust the Queue Panel to show specific bits of information or queues. Using the Panel Options menu, you can adjust your Queue Panel to match your preferences.
To configure the Panel options…
- Click the Panel Options button.

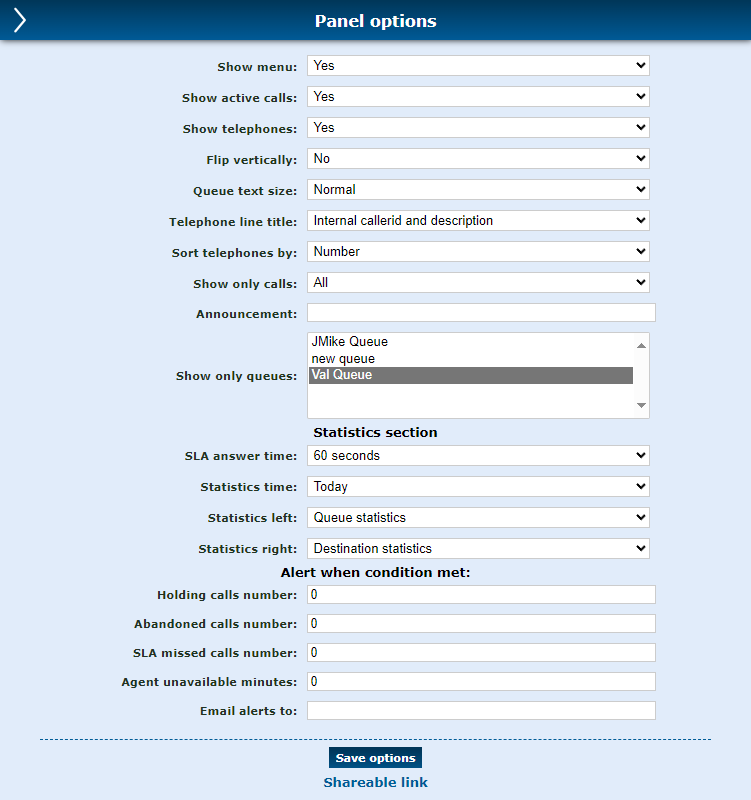
- In the Panel options menu, adjust the following settings as needed:

| Option | Description |
|---|---|
| Show menu | Select whether or not to see the Panel options menu you are viewing. |
| Show active calls | Select if active calls should be shown or hidden in the Queue Panel. |
| Show telephones | Show or hide the telephone lines (agents) in the Queue Panel. |
| Flip vertically |
Move the Queue Statistics and Destination Statistics tables above the Active Calls and Telephone Lines sections of the Queue Panel.
|
| Queue text size | Adjust the size of the text shown in the Queue Panel. |
| Telephone line title | Fine-tune what information and the order of the information is displayed for the agents shown in the Telephone lines section of the Queue Panel. The options that can be selected include… • Full number • Description • Internal callerid • Full number and description • Internal callerid and description • Description and full number • Description and internal callerid |
| Sort telephones by | Select whether the agents shown in the Telephone lines section should be sorted by Number (7-digit extension number) or Title (based off the option above) |
| Show only calls | Set the type of calls that should be shown in the Active calls section of the Queue Panel: • All calls - Show any active calls in the queue. • Answered - Show only calls that were answered and are being handled by an agent in the queue. • Unanswered - Show only calls that are not yet answered. |
| Announcement | Type a message to be displayed in red at the top-right of the Queue Panel:  An example message that could be set as an announcement is a reminder or note for a call center supervisor. |
| Show only queues | Select the queue(s) that should be shown in the Queue Panel page. • To select a single queue, click the preferred queue. • To select multiple queues, either click and drag to select multiple, or hold down Ctrl while clicking the queues. |
| SLA answer time | If your call center has a set standard for response time that may or may not be necessary for a Service Level Agreement, you can set the threshold for your expected SLA answer time (in seconds). Configuring this option… • Will update the SLA missed statistic shown in the Queue complete column of the Queue Panel's statistic table. • Is necessary if an SLA missed calls number alert will be set up below. |
| Statistics time | Select the time frame of the statistics shown in the Queue Statistics and Destination Statistics tables. Your options include: • This hour • Today • Yesterday • Last 7 days • This month • Last month |
| Statistics left | Show or hide the Queue Statistics table shown on the left of the Queue Panel page. |
| Statistics right | Show or hide the Destination Statistics table shown on the right of the Queue Panel page. |
| Alert when condition met | Email alerts can be configured to be sent when the thresholds for the following conditions are exceeded: • Holding calls number • Abandoned calls number • SLA missed calls number • Agent unavailable minutes Type a valid email address in the Email alerts to box to set where these email alerts should be sent. |
- Once you are done making changes, click the Save options button.

- In the confirmation message, click the OK button.

-
Wait 2-3 minutes to allow the webpage to save and apply your changes.
Quick Tip: It is recommended to wait until the webpage fully loads your changes to refresh.
WARNING: Refreshing too soon may result in the Queue Panel reverting to its previously set changes.
- To close the Panel options menu, click the back arrow.
