Forward Your Extension's Calls with StratusHUB
Discover how you can easily forward your own extension's calls using the StratusHUB desktop app.
Table of Contents
The Time Frames Tab

Time Frames are utilized by Answering Rules to lay out the times/dates that these rules are active for routing/forwarding purposes. The Time Frames section will show information for your own Time Frames.
WARNING: The Time Frame section of the StratusHUB App will only show time frames that were created by you.
Time frames in use by the whole organization can only be edited and viewed in Stratus by Users with a high enough User Scope (i.e., Office Managers and Site Managers).
You can adjust your existing Time Frames by clicking the Edit button. Time Frames can also be deleted in this menu.

NOTE: If there are not any Time Frames created by you, then the Time Frames section will look empty.

The Answering Rules Tab

The Answering Rules section is where all of the Time Routing takes place. The answering rules refer to the time frames that are set to determine where a call should be routed. 
NOTE: Since time frames are essential for the functionality of the Answering Rules, answering rules can only be added if there is another time frame available for use.
Update Your Default Routing
While viewing your Answering Rules, you will notice a rule called “default”. This rule will route calls whenever answering rules above it do not apply. By default, this default rule is usually set to simultaneously ring your registered devices.

If needed, the default rule can be adjusted to match your call routing needs. To do this…
- Click the Edit
 icon next to the default rule.
✔ Clicking the Edit icon will pull up the Edit Answering Rule menu.

- If your extension number should not be receiving calls for an undefined amount of time, select Do Not Disturb to have your calls treated as Busy.

- If needed, call screening can be enabled for your extension number.

✔ When enabled, anyone that calls your extension number will be prompted by the system to record their name. Once they record their name, the call will be forwarded to you. The system will play their name and prompt you to press 1 to accept the call, press 6 to send the call to your voicemail, or press 7 to drop the call.
When the answering rule is saved, the rule should update and show “Screen calls”.

- If calls should be sent to a different destination or your voicemail, select a specific forwarding option (e.g., Always, When Busy, when unanswered, etc.). Use the dropdown to select the type of function to send calls to and the box to type the specific extension number/telephone number of the destination.

Call Forwarding Options
The options that can be configured in the Call Forwarding section include…
• Always - Send all calls for this extension number to the destination selected.
• On Active - Forward calls to this destination if your online and registered phones are already on calls.
• When Busy - Forward calls to this destination if your phone is Busy or on Do Not Disturb mode.
• When unanswered - Forward calls to this destination if the call is not answered after the specified ring timeout.
• When offline - Automatically forward calls to this destination when your devices are registered.Quick Tip: Use the Custom option to type the telephone number or extension number of another person.

NOTE: If you are typing a phone number, make sure to include the country code of the phone number. For example, for phone numbers from the U.S., I would need include the 1 at the beginning.

-
If you are having your own phones ring, there are two options for doing so: Simultaneously Ring and Just Ring.

Simultaneously Ring
Simultaneous Ring allows multiple phones to ring at the same time. This can be useful if you have multiple registered devices that should ring together.
Select the following options depending on how you want these phones to ring.

• Include user’s extension - Make sure that the desk phone registered to your main extension number rings.
• Ring all user’s phones - Ring all devices and softphones registered to your extension number at the same time.
• Extension, number or phone - Type the extension or phone number of another telephone that should also ring.NOTE: If you are adding a phone number, make sure to include the country code of the phone number. For example, for phone numbers from the U.S., I would need include the 1 at the beginning.

• If needed, use the Delay icon to specify a ring delay. A ring delay allows you to enter the amount of time before the call rings at the destination typed in the Extension, number or phone box.

Note: Once you click the Save button, the Answering Rule will update to show the ring delay.

• To add additional phones to the simring, click the Add new number icon and fill in the fields that appear.

Just Ring User's Extension
If you should just have your main extension number ring, you can leave Just ring user's extension selected. This will ensure that your desk phone will ring by itself.
Selecting Simultaneously ring or the Always call forwarding option will disable the Just ring user's extension option so that the destination set by these other options will be used instead.
- Click the SAVE button.
✔ Once you save, the default rule should update to show your changes.

Forward Your Calls
If you need calls to be forwarded to a destination that is different from the destination set in the default answering rule, you can add a new rule that can forward calls according to when a time frame is active.
To do this, a time frame and then an answering rule would need to be created.
Step 1: Create a Time Frame
To forward calls for a certain period of time, a Time Frame will need to be created that will tell the system when the forwarding needs to be active. Using your StratusHUB desktop app, you can add in a time frame at any time.
To create a time frame to use for call forwarding…
- Navigate to the Time Frames tab.

- Click the ADD TIMEFRAME button.

- In the Add Timeframe menu, use the Name field to give the new time frame a unique, descriptive name.

- In the When section, select one of the following…
Always
Create a time frame that will need to be toggled on and off. This type of forwarding is used for irregular forwarding situations where the end time for the forwarding is not known.

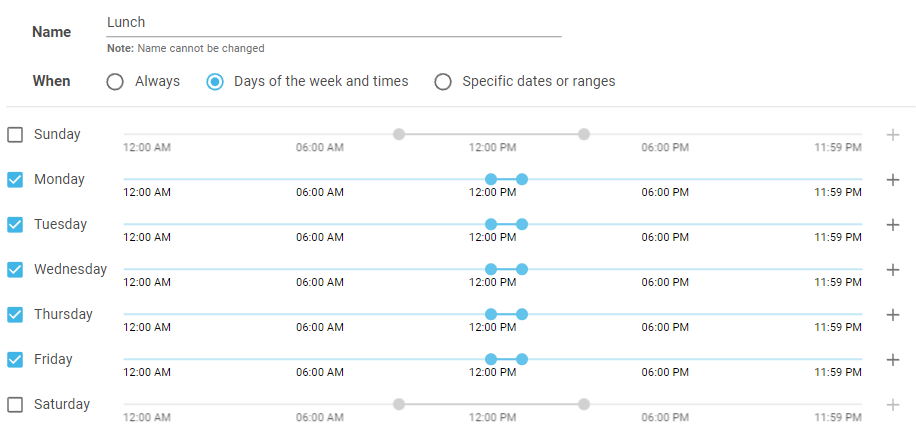
Days of the Week and Times
Used for forwarding that will occur on a recurring basis for a specific day and time.

Quick Tip: The Days of the Week and Times option would be active every week.
For Users needing to create a schedule that alternates between weeks, using the Specific Dates or Ranges option is recommended.
If needed, click the Add Range
 icon to add an additional slot in that day for another time range.
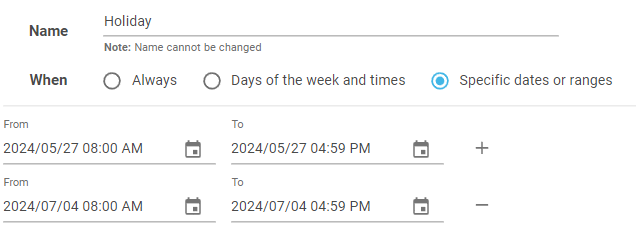
Specific Dates or Ranges
Schedule forwarding in advance for specific date and times, such as the holidays or out of office days

To add more dates for this specific forwarding scenario, click the Add Date Range
 icon.
icon.
To remove an obsolete date, click the Remove Date Range
 icon.
icon. - Click the Save button.
-
Repeat steps 2-5 for each time frame that is needed.
✔ You should now have a list of time frames that can be used to create Answering Rules.

Step 2: Add an Answering Rule
Now that a time frame has been created for the call forwarding scenario, an answering rule can be created that will reference the new time frame.
To create an answering rule for call forwarding…
- Navigate to the Answering Rules tab.

-
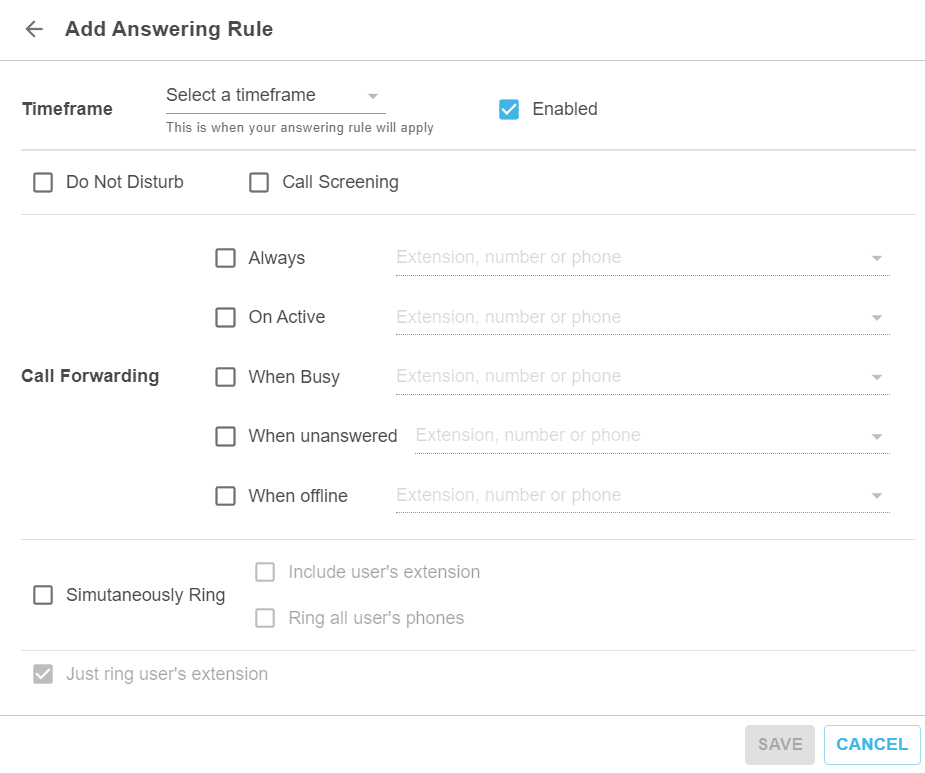
Click the Add Rule button to pull up the Add Answering Rule modal.

-
Use the Timeframe dropdown to select an unused time frame from the drop-down.

- If this call forwarding should not be active yet, deselect Enabled. Leave Enabled selected if the answering rule should be active when the time frame is active.

Note: If this answering rule is using a time frame that is set to be active on Days of the week and times or Specific dates or ranges, you can leave this answering rule Enabled since the answering rule will only become active when its time frame is active.
-
In the Call Forwarding section, select a specific forwarding option (e.g., Always, When Busy, when unanswered, etc.). Use the dropdown to select the type of function to send calls to and the box to type the specific extension number/telephone number of the destination.

Quick Tip: Use the Custom option to type the telephone number or extension number of another person.

NOTE: If you are typing a phone number, make sure to include the country code of the phone number. For example, for phone numbers from the U.S., I would need include the 1 at the beginning.

Call Forwarding Options
The options that can be configured in the Call Forwarding section include…
• Always - Send all calls for this extension number to the destination selected.
• On Active - Forward calls to this destination if your online and registered phones are already on calls.
• When Busy - Forward calls to this destination if your phone is Busy or on Do Not Disturb mode.
• When unanswered - Forward calls to this destination if the call is not answered after the specified ring timeout.
• When offline - Automatically forward calls to this destination when your devices are registered. -
If you are having your own phones ring, there are two options for doing so:
Simultaneously Ring
Simultaneous Ring allows multiple phones to ring at the same time. This can be useful if you have multiple registered devices that should ring together.
Select the following options depending on how you want these phones to ring.

• Include user’s extension - Make sure that the desk phone registered to your main extension number rings.
• Ring all user’s phones - Ring all devices and softphones registered to your extension number at the same time.
• Extension, number or phone - Type the extension or phone number of another telephone that should also ring.NOTE: If you are adding a phone number, make sure to include the country code of the phone number. For example, for phone numbers from the U.S., I would need include the 1 at the beginning.

• If needed, use the Delay icon to specify a ring delay. A ring delay allows you to enter the amount of time before the call rings at the destination typed in the Extension, number or phone box.

Note: Once you click the Save button, the Answering Rule will update to show the ring delay.

• To add additional phones to the simring, click the Add new number icon and fill in the fields that appear.

Just Ring User's Extension
If you should just have your main extension number ring, you can leave Just ring user's extension selected. This will ensure that your desk phone will ring by itself.
Selecting Simultaneously ring or the Always call forwarding option will disable the Just ring user's extension option so that the destination set by these other options will be used instead.
-
Click Save to finalize these changes.
✔ You should see the new Answering Rule listed in the Answering Rules list.

Quick Tip: If the new rule is taking a while to populate on screen, click the refresh button to refresh the desktop app.
-
Make sure the new rule has a higher priority than the Business Hours by clicking the
 symbol and dragging the rule to its spot in the list.
Quick Tip: This list of rules sorts by Priority.
-
Once you have reprioritized the answering rules, a banner will appear. Click the SAVE button on the banner.

✔ Once these changes have been saved, a notification will pop-up to confirm:

- If this call forwarding/routing should be active now, place a test call to your extension number to confirm the call routing is working as intended.